
In this session the team creates keys and encrypts and decrypts key data points from the Installed Package in order to enable the Cloud Page to trigger an API call back to the Wait Until Event in Journey Builder.
How to Create Keys Walkthrough
Why Three Different Keys?
To Encrypt data like in our example the Client ID and Client Secret in the installed package let’s take a look at the EncryptSymmetric example that’s provided on the “Manage Your Encryption Keys” Trailhead page: https://trailhead.salesforce.com/content/learn/modules/marketing-cloud-security/manage-your-encryption-keys?trail_id=administer-marketing-cloud
SET @encData=EncryptSymmetric(“ExampleData”, “AES”, “passwordExternalKey”, @null, “saltExternalKey”, @null, “IVExternalKey”, @null)
To Encrypt you’ll need three keys:
– “passwordExternalKey” is 1
– “saltExternalKey” is 2
– and “IVExternalKey” is 3
How to Create Keys
Select Setup in the upper right hand corner in the Marketing Cloud UI where your name appears.
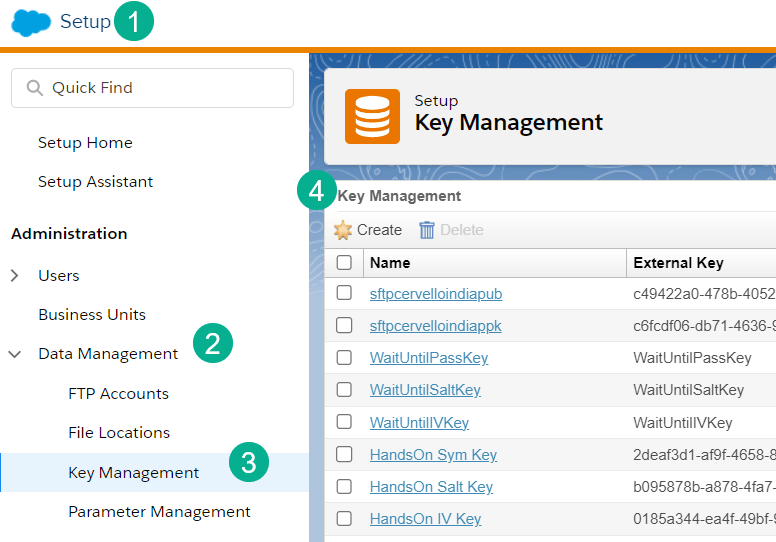
(1) In Setup, (2) select Data Management, (3) select Key Managment and (4) create/manage your keys.
How to Create the First Key – Symmetric Key
For the first key, “passwordExternalKey” you can create a (1) Symmetric key (not 100% why Symmetric and hope to add more of a reason in the future)

Name your key (2), you can either name the external key or leave it blank and a random key will be generated for you (3). Follow the steps below to generate a Pre-Shared Key (4)
To get a random hex key navigate to: https://www.browserling.com/tools/random-hex
and (1) select 16 digits, (2) generate a hex key and (3) copy any of the results here.

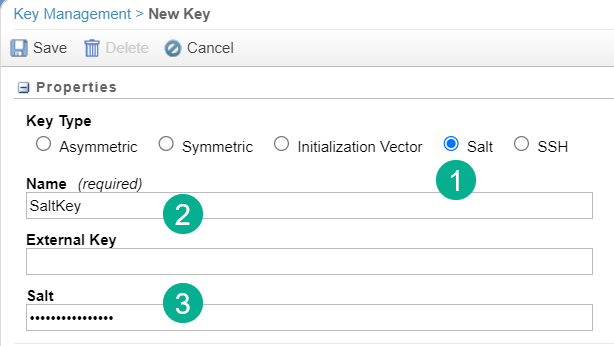
How to Create the Second Key – Salt Key
Follow the similar steps from above to create a Salt Key. (1) Select Salt, (2) enter in a name, you can leave the External Key blank or provide a value and (3) paste in a different hex key.
How to Create the Third Key – IV Key
Follow the exact steps for the Symmetric key above, but name the key something like “IV Key” and use a different Hex key.
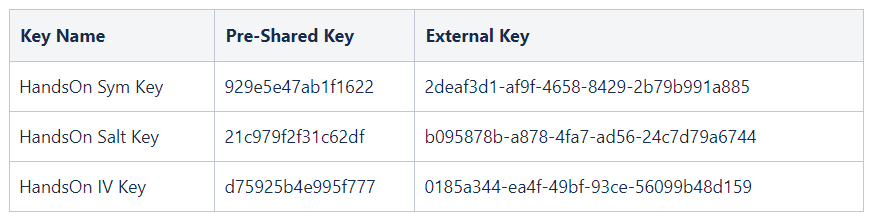
Don’t forget to document your keys somewhere convenient to access the External Keys.
How to Create Encrypted Variables
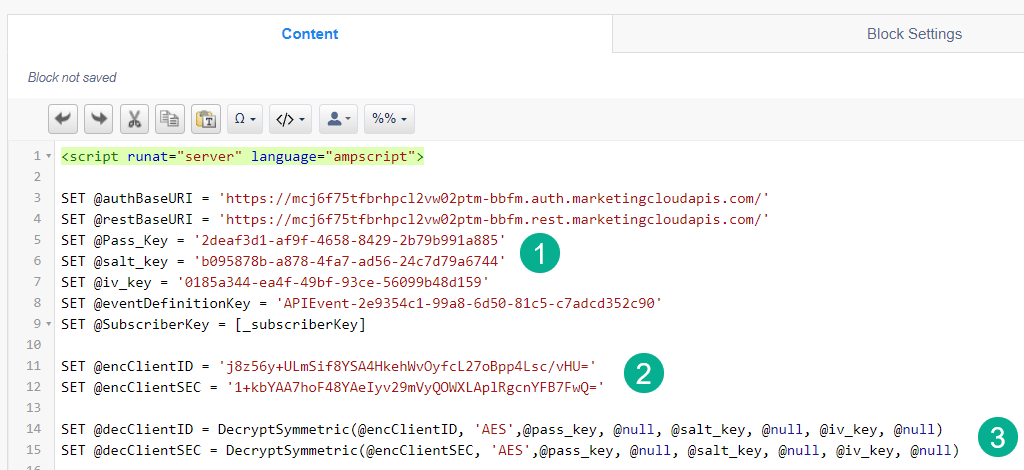
Once you have all of your keys you can create variables to use in your landing page to pass the Client ID and Client Secret. Create a Code Snippet block similar to the one below:

(1) Declare all of your variables.
(2) SET the three keys to the External Keys detailed above.
(3) SET your Client ID and Client Secret to variables.
(4) Follow the syntax on the Trailhead or at Ampscript Guide: https://ampscript.guide/encryptsymmetric/ filling in the variables created above:

(4-1) Set your variable to be encrypted or decrypted
(4-2) Use the ClientID or ClientSecret ID to encrypt
(4-3) Enter in the key variables set above
(4-4) When Decrypting use the variable set in 4-1
(5) Output the variables to confirm the encrypting and decrypting works.
Take this block and drop it into a test email and preview:

(1) You should see the original value you are looking to encrypt in this case ClientID.
(2) Here’s the valuable Encrypted ID for that value
(3) Confirmation that your Decrypt syntax is correct as the value is the same.
And don’t forget to document in a safe place these encrypted keys:

How to Use Keys in a Cloud page
Once you have all of your keys and encrypted variables you can declare them in your cloud page safely:
(1) Set all three keys
(2) Set the encrypted keys for the Client ID and Secret
(3) Set the Decrypted variables for the Client ID and Secret

Leave a comment