Welcome to the SSJS Bootcamp hosted by Jyothsna Bitra as part of the Phoenix Salesforce Marketer Group. This is week two which covers the HTTP function by way of the relatively new Wait Until Event Journey builder functionality.
First we’ll cover the Wait Until Event SSJS API call dependency, then we’ll walkthrough how to create an API test environment in Postman before we build out the Auth call part of the API functionality in a Marketing Cloud page.
For more information on the Phoenix Salesforce Marketer Group please follow this link to sign up: https://trailblazercommunitygroups.com/salesforce-marketer-group-marketing-cloud-phoenix-united-states/
Use Case – Journey Builder Wait Until Event
Marketing Cloud Journey builder is an amazing tool that offers companies so many automated features and functionality. In our use case Cervello Bank has launched a lead nurture journey that sends emails to prospective leads to support sales. Their model serves up three emails with a wait time of seven days between each email send.
The Problem: No just in time Wait activity.
If a lead engages with the email they want to alert Sales immediately to follow up with the lead. Unfortunately the OOB functionality in Marketing Cloud Journey Builder is limited in that the Wait Until Duration activity holds all leads for the full length of time. So if a lead clicks on the email the first day or the seventh day they move along the same way.

(1) The Wait Until Duration activity will hold all leads in this case for seven days no matter if they engage with the email on day one or day seven.
(2) The Engagement Split has to evaluate all leads at the same time, it won’t evaluate leads just in time.
There is a work around for this challenge which is to create multiple Wait By Durations to capture the early engagers:

(1) Create a Wait By Duration checking those who engage in the first hour – typically a large percentage of engagement happens in the first hour.
(2) Create a second Wait By Duration a day later – within 24 hours you should be able to capture more than 90% of the engagement.
(3) Create a third activity to capture any activity after the first 24 hours.
(4) After each of the three Engagement Splits the lead moves on to the next activity in the journey if they engage.
The Solution: The Wait Until Even Activity!
Released early in 2022 the Wait Until Activity will hold those leads for the appropriate length of time, but as soon as the lead clicks on the appropriate link on the email they are moved through to the next step of the journey just in time, no waiting the full wait time. For more information on this functionality please read on here: https://help.salesforce.com/s/articleView?language=en_US&id=sf.mc_jb_wait_until_api_event.htm&type=5
The Challenge: The activity requires an API call from a Cloud Page or Automation Script.
You can drop the Wait Until Event activity on the journey canvas but it won’t work unless an API call triggers the lead. And that is out use case, creating code in SSJS to make an API call from a cloud page.
Marketing Cloud use case components
Before we begin coding in a Marketing Cloud page you’ll need a few things.
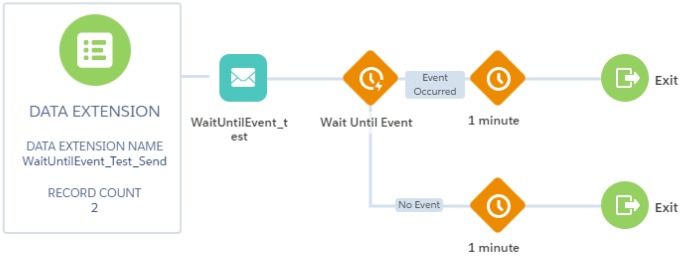
(1) Test Journey with Wait Until Event functionality
If you don’t already have a Journey with a Wait Until Event created, create a simple test journey with a test records in a data extension, an email with a call to action button or link to a cloud page and the Wait Until Event activity.
(2) Wait Until Event Log Data Extension
The API call will do two things, (1) move the subscriber along in the Journey and log a record of data in a logging data extension.

(1) Make sure your data extension is used for Sending
(2) Add at the minimum three fields:
– SubscriberKey – in this case a lead ID
– JourneyID – to make sure that these API calls only trigger the subscriber in this particular journey and not in all journeys add the Journey ID.
– CreatedDate – the date that the record is created when the API call is made. This data point doesn’t need to be passed in the API call, it can be set to the “current date” in the data extension when the record is created.
Don’t make any field like the SubscriberKey a primary key as this lead might click multiple times in the journey. And make sure all non-essential fields like CreatedDate are nullable.
(3) Configure the Wait Until Event
This will require creating a new or leveraging an existing Entry Event.
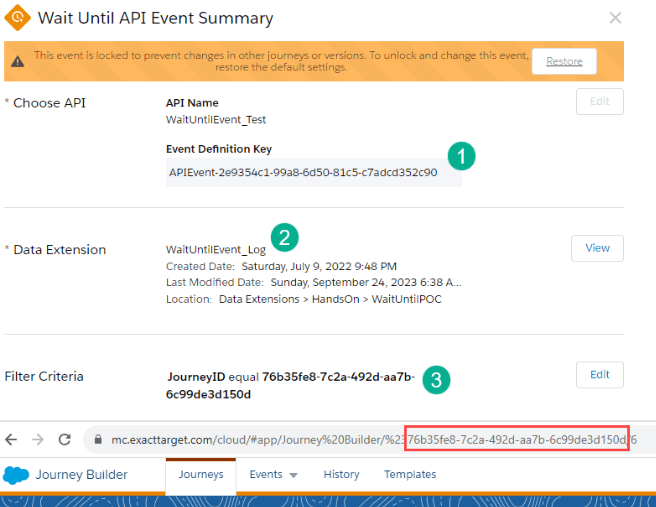
(1) Capture the APIEvent key here, this will be used in the API Rest/Post call.
(2) Select the log data extension
(3) Add the Journey ID from the test journey above. Note the journey ID is in the URL after the “%23” and before the “/”.
Prep for SSJS Coding – API call walkthrough in Postman
Postman is an amazing tool that does several things (1) it validates the connection set up via your Marketing Cloud Installed Package and (2) it is a model that can be used to craft the HTTP coding in SSJS. To download Postman please visit here: https://www.postman.com/downloads/
Before we outline the Postman request here’s a quick overview of the key data ponts needed from an Installed Package in Marketing Cloud:
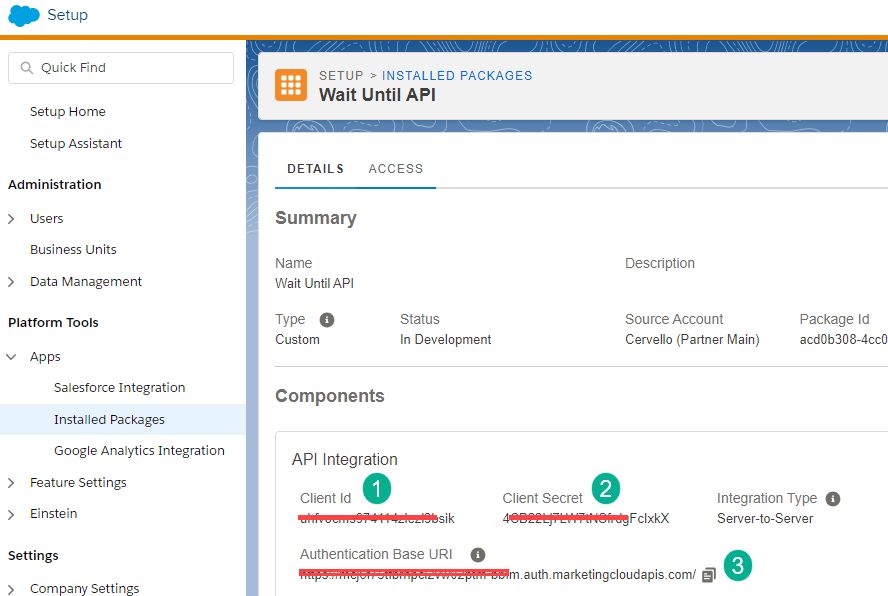
Utilize an existing or create a new Installed Package in Setup, under Platform Tools > Apps > Installed Packages.
(1) Copy the Client ID
(2) Client Secret
(3) and the Auth URL
Here’s the Auth call setup created in Postman:

(1) Create or use an existing Collection and create a new request. It’s best to name the Auth post accordingly as you’ll be using it to generate the token before doing the Post/Rest request.
(2) For the URL, take the Auth URL from the Installed package and add the syntax according to the Auth Call documentation in Salesforce: https://developer.salesforce.com/docs/marketing/marketing-cloud/guide/access-token-s2s.html
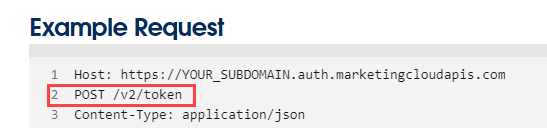
(3) Copy in the Client ID and Client Secret from the Installed Package and fill out the payload per the documentation:
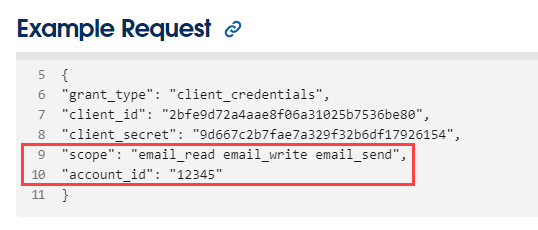
The section highlighted in red isn’t required for the payload.
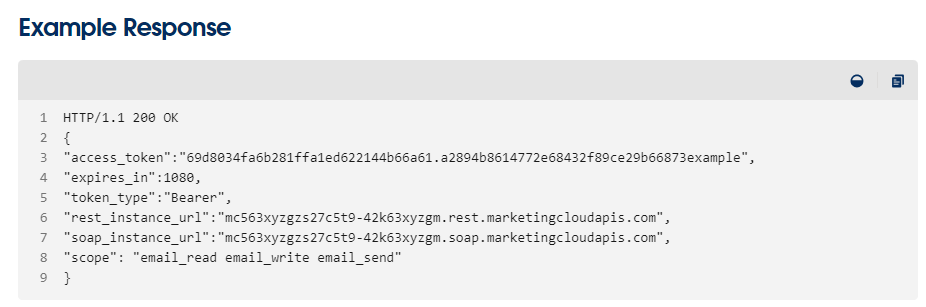
With the settings entered correctly when clicking send the call should generate a token which can be used in the Post/Rest call.
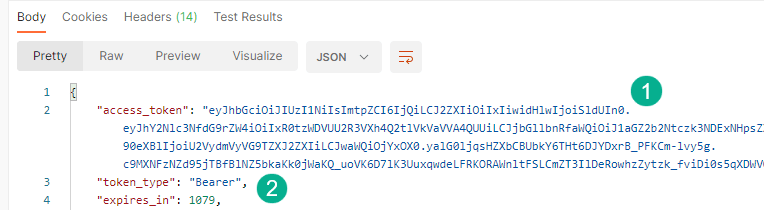
(1) Sample token
(2) token type of “Bearer”, this syntax will be used in the Post/Rest call
Prep for SSJS Coding – Ampscript key variables
In a sample cloud page add an HTML block and add ampscript code to convert encrypted security data points from the Installed Package.
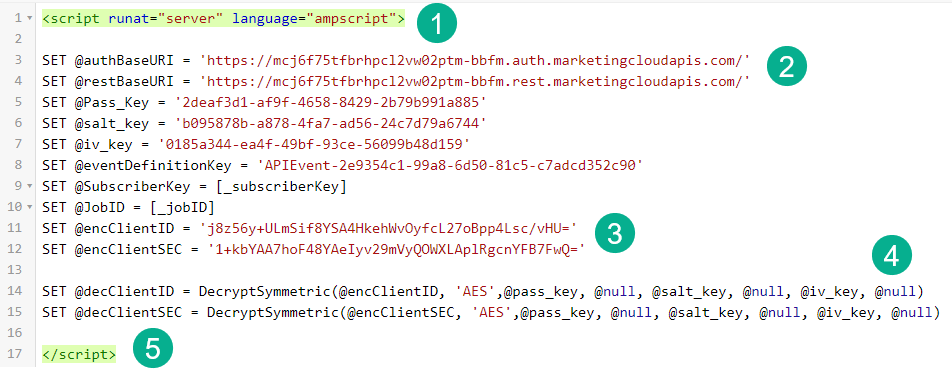
(1) Open up the script block using <script runat=”server” language=”ampscript”> to designate the code to follow as ampscript.
(2) Hard code in the Auth and Rest URLs from the Installed Package.
(3) Encrypt the Client ID and Client Secret to prevent others from accessing key Installed Package data points. Follow the following documentation to create keys and encrypt. https://handsonsfmc.com/how-to-create-keys-in-marketing-cloud/
(4) Use the Decrypt function to set a variable for the unencrypted Client ID and Secret. Use the Ampscript guide for more information: https://ampscript.guide/decryptsymmetric/
(5) End the ampscript code in the cloud page.
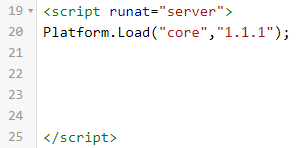
SSJS Auth Call
First let’s open up the script to declare the coding for SSJS.
Now let’s pull up the HTTP Post documentation from our Salesforce documentation: https://developer.salesforce.com/docs/marketing/marketing-cloud/guide/ssjs_httpPost.html

There are three main areas/variables to fill in for the Auth call. We’ll use the headerNames and headerValues in the Post/Rest Call.
(1) HTTP.Post(url)
This URL comes from our Installed Package Auth URL plus syntax to tailor the URL based on this use case.
We have brought over the Auth URL in the Ampscript code block above and need to convert the variable to SSJS. To convert the variable we’ll use the Platform function GetValue: https://developer.salesforce.com/docs/marketing/marketing-cloud/guide/ssjs_platformAMPscriptVariableGetValue.html

Now we need to add in the appropriate syntax for the URL found in the Auth documentation: https://developer.salesforce.com/docs/marketing/marketing-cloud/guide/access-token-s2s.html
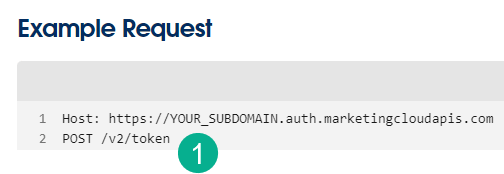

Using the arithmetic operator plus sign we’ll add the syntax finishing the creation of step one the url.
(2) HTTP.Post(contentType)
This variable is pretty simple in that it’s provided in the Salesforce developer documentation.
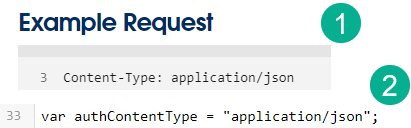
(1) documention for contentType in the developer documentation.
(2) Converting documentation to set a variable to complete what is needed for the second data variable.
(3) HTTP.Post(payload)
Look toward the Salesforce Developer documentation for details on the payload:
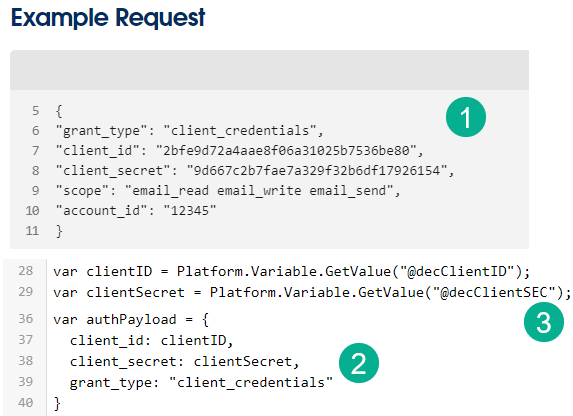
(1) Documentation from the Salesforce Developer documentation.
(2) Simplified code
(a) remove quotes around the variables
(b) remove the scope and account_id variable as they are not needed
(3) For the client_id and client_secret variables use the GetValue platform function again to convert the ampscript variable to SSJS.
The Final few lines of Code
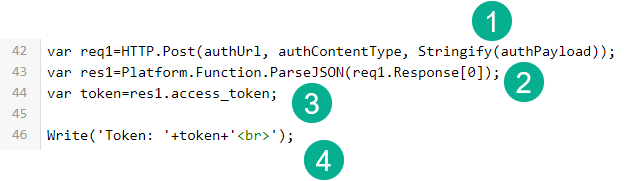
(1) One final step in the code before you finish up the HTTP.Post is to Stringify the payload so that it can be read on the auth call. For more informaiton on Stringify please review: https://developer.salesforce.com/docs/marketing/marketing-cloud/guide/ssjs_utilitiesStringify.html
(2) Now you need to set a variable based on the response that comes from the call. To do this use the plaform function ParseJSON: https://developer.salesforce.com/docs/marketing/marketing-cloud/guide/ssjs_platformUtilityParseJSON.html of the req1 variable that was created by the HTTP function above. In the syntax you are looking to obtain the first variable in the Response string using the [0] syntax. Here’s an example of the response highlighted in the developer documentation:
(3) Set the token to the access_token varable in the response.
(4) Use the Write core function to output the token. Use quotes to display HTML and text and use the + operator to create the output variable or string. Here’s documentation on the Write core function: https://developer.salesforce.com/docs/marketing/marketing-cloud/guide/ssjs_utilitiesWrite.html
If all goes well when the subscribr clicks on the call to action button in the email something like the following should display on the cloud page:

Congratulations you have just made an Auth API call on a cloud page using SSJS. Next up we’ll highlight a Hands On session where a guest builder walks through all the steps highlighted above. https://www.youtube.com/watch?v=vhoUYNR91bg&t=1s
