elcome to the SSJS Bootcamp hosted by Jyothsna Bitra as part of the Phoenix Salesforce Marketer Group. This is week seven which covers the subscriber functions that give you the ability to view and change the subscriber status of your Marketing Cloud subscribers.
These bootcamp sessions are part of the Phoenix Marketer Group, please sign up here for future sessions: https://trailblazercommunitygroups.com/salesforce-marketer-group-marketing-cloud-phoenix-united-states/
Here’s the full video of this SSJS Bootcamp session.
Debug Setup
Before you start building with SSJS we recommend creating Sandesh’s Debug and Error sections. Step by step instructions can be found in a previous blog post captured on the following page: https://handsonsfmc.com/ampscript-bootcamp-part-ii-debug/
How to Set an Ampscript Value
Debug outputs an ampscript value which helps validate the SSJS coding we are building. In SSJS under the Platform Functions there is a function called SetValue: https://developer.salesforce.com/docs/marketing/marketing-cloud/guide/ssjs_platformAMPscriptVariableSetValue.html that will set an Ampscript variable to a SSJS variable. It this exercise we are setting a static variable to test that the Debug is working correctly.

(1) In a cloud page we have created a Code Snippet block to house our SSJS, HTML and ampscript coding
(2) Here’s Sandesh’s Debug code that is displayed on the right
(3) Following best practices we are opening up our SSJS code block
(4) The syntax for Platform.Variable.Setvalue has two variables (1) is the ampscript variable looking to set the value in quotes and (2) what you want to set the value in this case hard coded in quotes.
(5) The output of our test displaying “Test”
How to set up an email link to test send time data in a cloud page
To continue our testing we need to replicate how the typical user/subscriber will experience landing on our cloud page. To do that we can set up a test email pointed to our testing cloud page. And if you use a subscriber that exists in All Subscribers the cloud pages url from the email will work as expected.
Part I – Create a test email
In content builder create a call to action button or link and utilize the Cloud Pages URL function (https://ampscript.guide/cloudpagesurl/), according to The Ampscript Guide this function appends an encrypted query string which: “This encrypted query string provides a reference to the email, which means that system personalization strings can be used on a landing page to retrieve values. We will go into detail below on the amazing library of personalization strings and how they can be leveraged.
Next you’ll want to wrap the code in the Redirectto function syntax (https://ampscript.guide/redirectto/) which is needed for <a> a tags and typically is best practice.

(1) In a test email either in a link or a call to action button
(2) utilize the RedirectTo and CloudPagesURL code
(3) Reference the number of the cloud page used for testing found under Page Properties
(4) and the Page ID number
Part II – Create a test send data extension
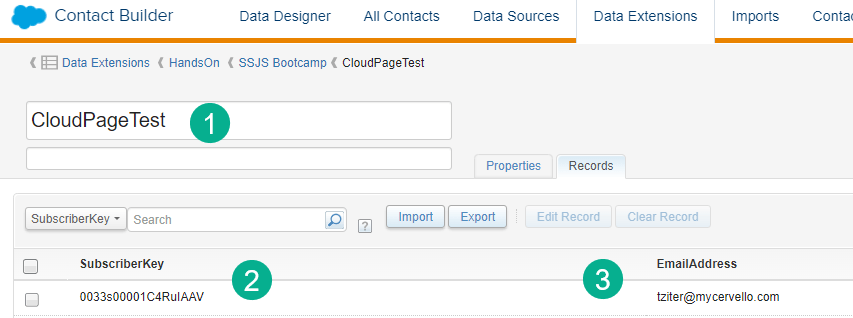
(1) Create a sendable data extension
(2) Include basic fields like SubscriberKey
(3) and an email address
If you can use a subscriber that’s currently in All Subscribers the link in the preview of the email should work or you can send yourself a test send of the email as well.
In the email click on Preview and Test and select the data extension to preview:
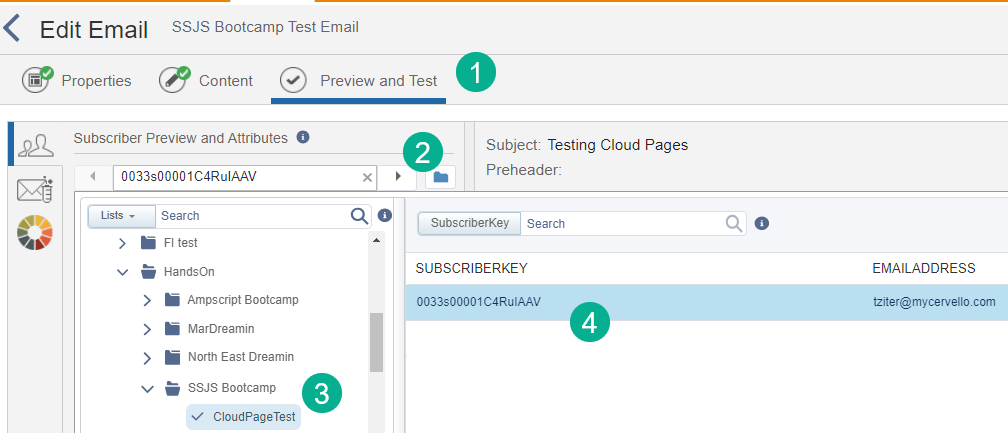
(1) Preview and Test
(2) Select the blue folder
(3) Navigate to the folder where the test data extension was created
(4) Select the subscriber that exists in All Subscribers
With that selected you can click on the call to action button or link which will take you to the cloud page and should be usable to populate all the send information like an actual email send.
How to pull in Personalization Strings with SSJS
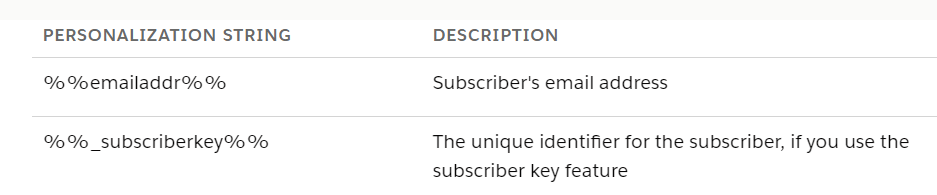
If utilizing the CloudPagesURL function the entire personalization strings dataset becomes available to your disposal. At time of send Marketing Cloud populates a treasure trove of data points called Personalization Strings. Documentation on all the strings available can be found here: https://help.salesforce.com/s/articleView?id=sf.mc_es_available_personalization_strings.htm&type=5
For our purposes today we’ll want to pull in the subscriberkey as that will be the variable we’ll want to use to unsubscribe the subscriber. We’ll also pull in and display the email address to show another data point.
Using the syntax from above we’ll need a function to pull in theses data points and set them as variables. The GetAttributeFunction in the platform library is the one to utlilize: https://developer.salesforce.com/docs/marketing/marketing-cloud/guide/ssjs_platformFieldAttributeGetAttributeValue.html
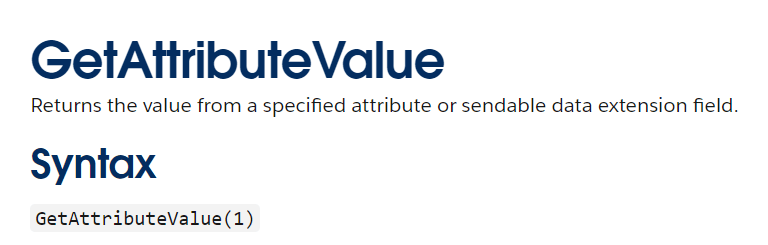

(1) Notice the difference in the syntax for the Platform as it’s Platform.Recipient not Platform.Variable. In a future bootcamp sessions we’ll plan on detailing the difference in this syntax for now utilize the syntax per the example from Salesforce.
(2) Drop in the personalization string syntx without the %% but in quotes.
(3) Both variables render validating that the personalization string variables are able to be pulled into the cloud page.
Subscriber Function – How to display Subscriber attributes
Let’s begin digging into the Subscriber functions in SSJS by using the subscriber that we have and display the attributes associated with the subscriber. We’ll use the retrieve attributes function: https://developer.salesforce.com/docs/marketing/marketing-cloud/guide/ssjs_subscriberAttributesRetrieve.html

Adding the above example and tailoring it in our code:
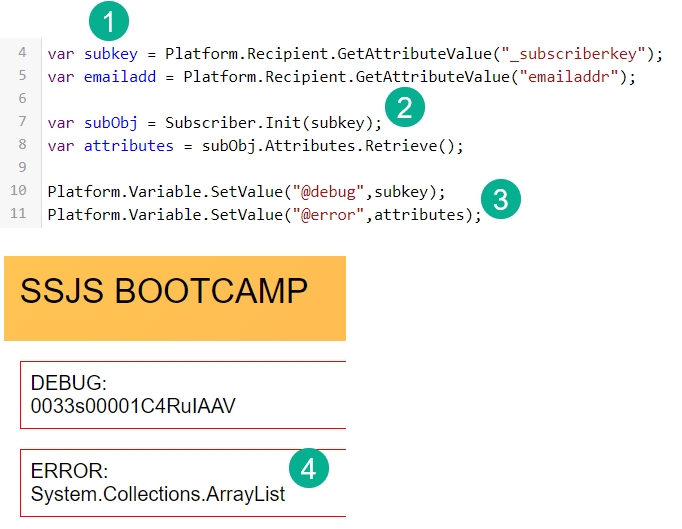
(1) Using the subscriber variable set in our previous exercise.
(2) Copying in the code from documentation and tailoring the variable in line 7 removng the quotes.
(3) Setting the Error variable
(4) The output proves that what is returned is an array or list of variables
Using the Stringify function will allow us to see all the attributes associated with the subscriber: https://developer.salesforce.com/docs/marketing/marketing-cloud/guide/ssjs_utilitiesStringify.html

(1) Adding Stringify to the SetValue function.
(2) Now we see a list of attributes for each subscriber.
What are Subscriber Attributes?
Or Profile Attributes? https://help.salesforce.com/s/articleView?id=sf.mc_es_profile_pref_attributes.htm&type=5 They are variables to store helpful information for each subscriber. They should be set up by your admin. Here we are showing how to view the attributes in All Subscribers (1) and how to find and set variables in Email Studio under the Subscribers tab, Profile Management.

Set and display the subscriber attribute
The last step in this process is setting and displaying a specific subscriber attribute that we can use in our code. In our example we want to set a variable for Contact Owner which should be able to display a value of “Timothy Ziter”.
This will be used later on when we build a preference center that will pull in these attributes to help render different options.

(1) contactOwner is taking the array for attributes and finding the fifth attribute (remember string variables start with “0” in this case we need #4. And the Value is the specfic variable withing variable #4.
(2) Setting the error variable to the contactOwner
(3) The output displaying as expected
(4) The example of the entire string identifying the specific attribute we want to extract.
In part II of Sandesh’s SSJS presentation we will use the subcriber function to (1) display all the lists associated with this subscriber as well as changing their status via SSJS.
