
Let’s say you have synched segments from Data Cloud down into Marketing Cloud and want to enhance and unify the records with your Marketing Cloud subscribers and even Sales Cloud contacts or leads. This blog will walk through building a query to match those synched records with subscribers in Marketing Cloud.
Why we are doing this – Mobile Application Use case
To help understand why we are looking to unify Data Cloud segments let’s frame our approach to solve a particular problem based on a real use case.
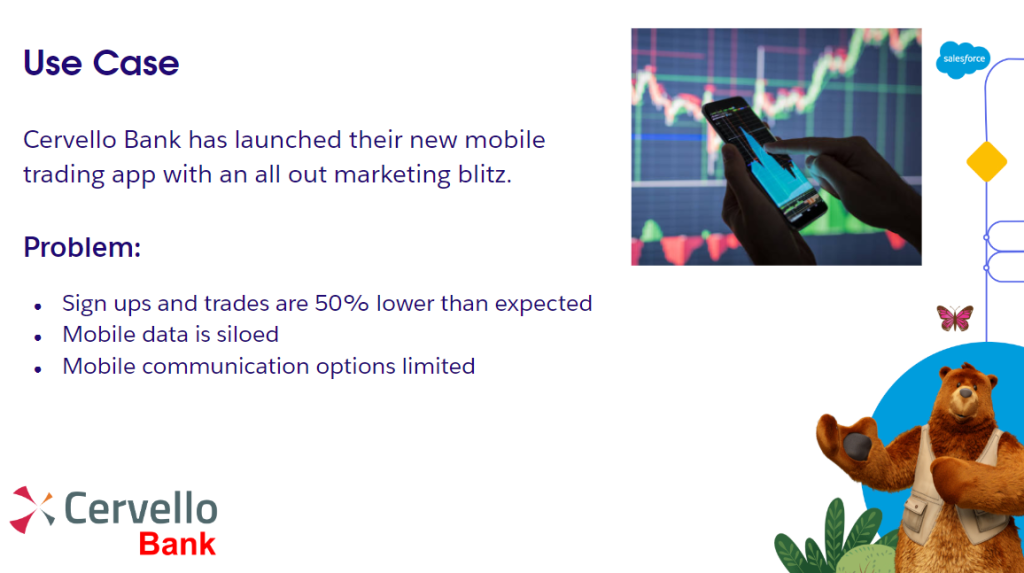
Product: Cervello Bank Mobile App – allowing users to make trades on their phone
Problem: Lower than expected usage in the app and limited capabilities to communicate with the users in the app
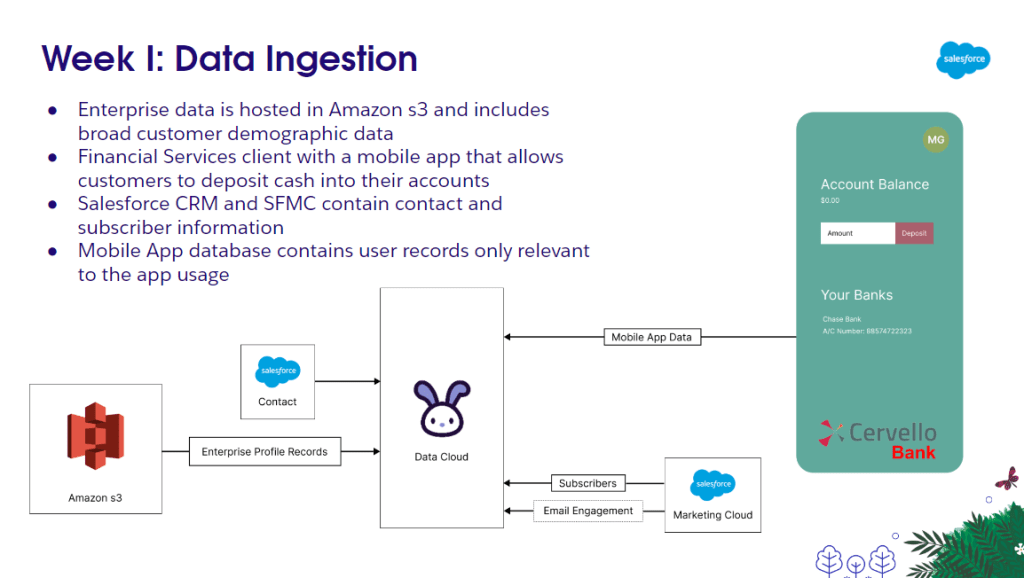
Solution, part I: Use Data Cloud to ingest the Mobile App user data
Solution Part II: Use Data Cloud to unify the data and create targeted segments
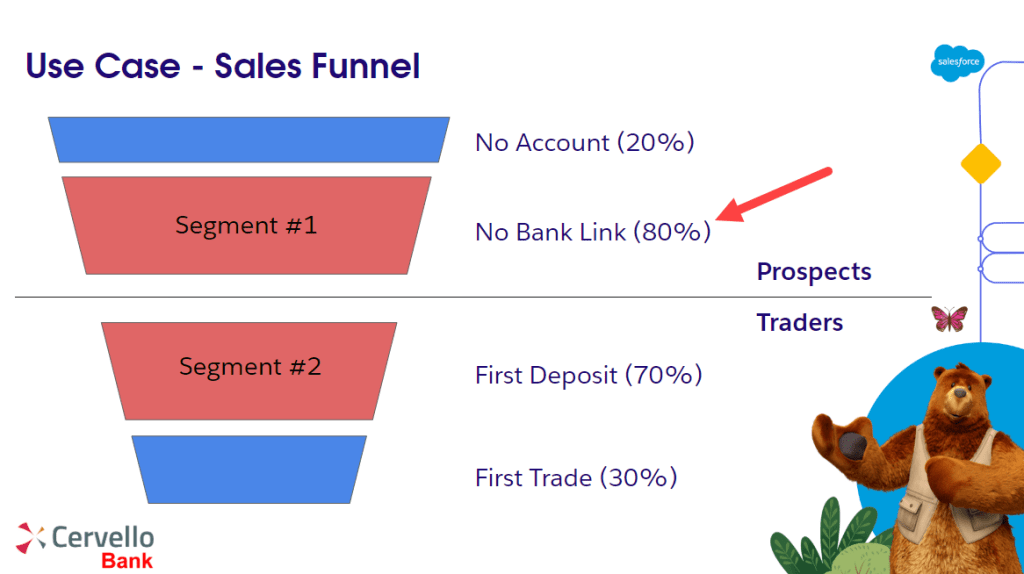
For our solution today we’ll be focusing on the No Bank Link segment. Cervello Bank noticed that they have a significant number of users who have signed up buy haven’t linked their bank to start investing.
The goal is to identify this individual and send personalized emails to open up this bottleneck and create more traders.
Data Cloud Segment Overview
In a Hands On Data Cloud bootcamp we walked through creating segments in Data Cloud: https://www.youtube.com/watch?v=RpyO–EFAPg
The team created a segment called “Bootcamp_Unified” that sourced data from the Unified model which combined not only Mobile data but enterprise and Salesforce CRM data. The team also created a segment called “Bootcamp_individual” which sourced data from just the mobile application.
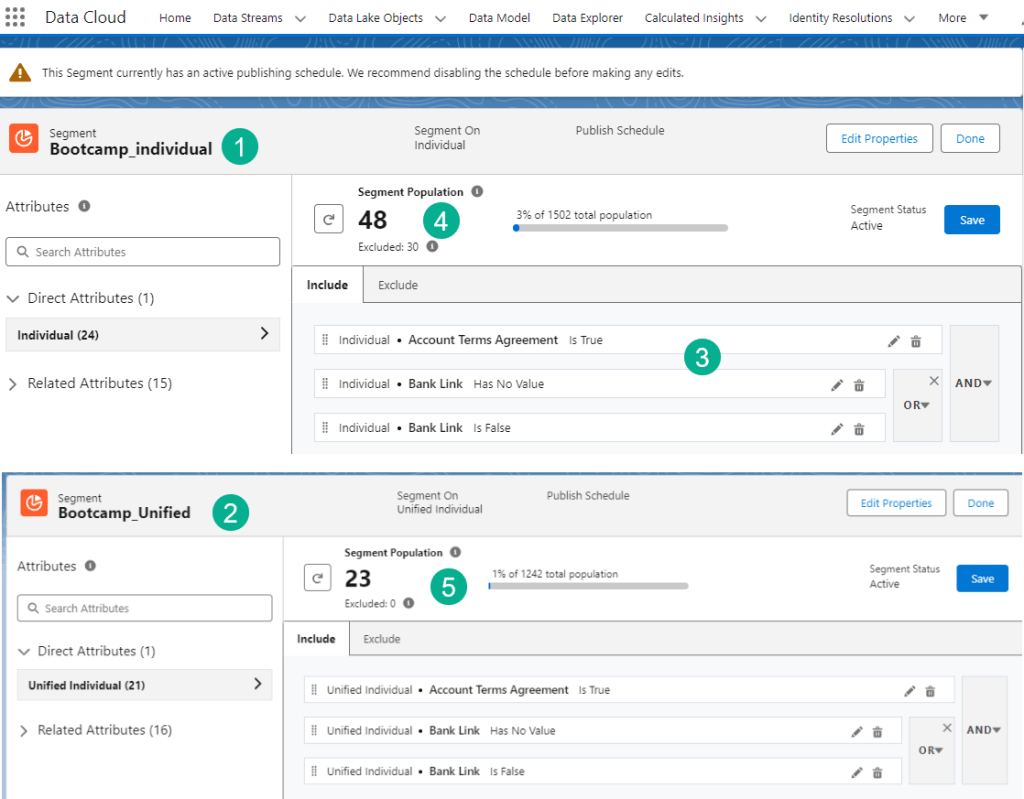
(1) The segment based on the non-unified or individual model (Mobile app data only)
(2) The Unified segment based on the model which unifies the mobile, enterprise and Sales Cloud data
(3) The filters in the segment that identified those individuals who created an account but haven’t linked their bank
(4, 5) The subscriber counts for both segments based on their criteria
Segment overview in Marketing Cloud
After the team created Activation targets and Activations the segments were published and the records were synched into Marketing Cloud. Let’s review the segment data in Marketing Cloud in detail:
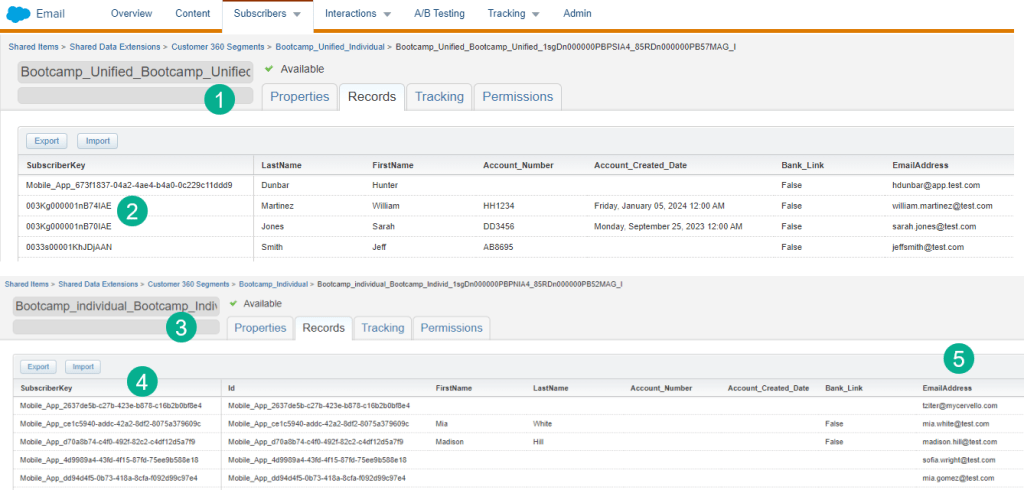
(1) Each segment gets created in the Shared Data Extension folder in Marketing Cloud
(2) The Unified Segment has the Salesforce Sales Cloud Contact ID as the subscriberkey which aligns with our use case where Sales Cloud is the database of record
(3) In the individual or non-unified segment
(4) The subscriberkey is a guid based on the data that comes in from the mobile app only. This is not ideal in our use case as it will create a duplicate subscriber in Marketing Cloud even if the email address is the same as one in our Marketing Cloud or Sales Cloud environments.
Goal: Unify data in Marketing cloud! In our next step we are going to subscriber identified here in (5) and unify their data in Marketing Cloud to identify a Sales Cloud Contact ID to use as the subcriberkey as well as other values used for personalization.
Unify Data Cloud segment in Marketing Cloud
Let’s build a starter query with Query Studio to start our unification journey. If you don’t have Query Studio please visit this link to download your free copy: https://appexchange.salesforce.com/appxListingDetail?listingId=a0N3A00000FP3yFUAT
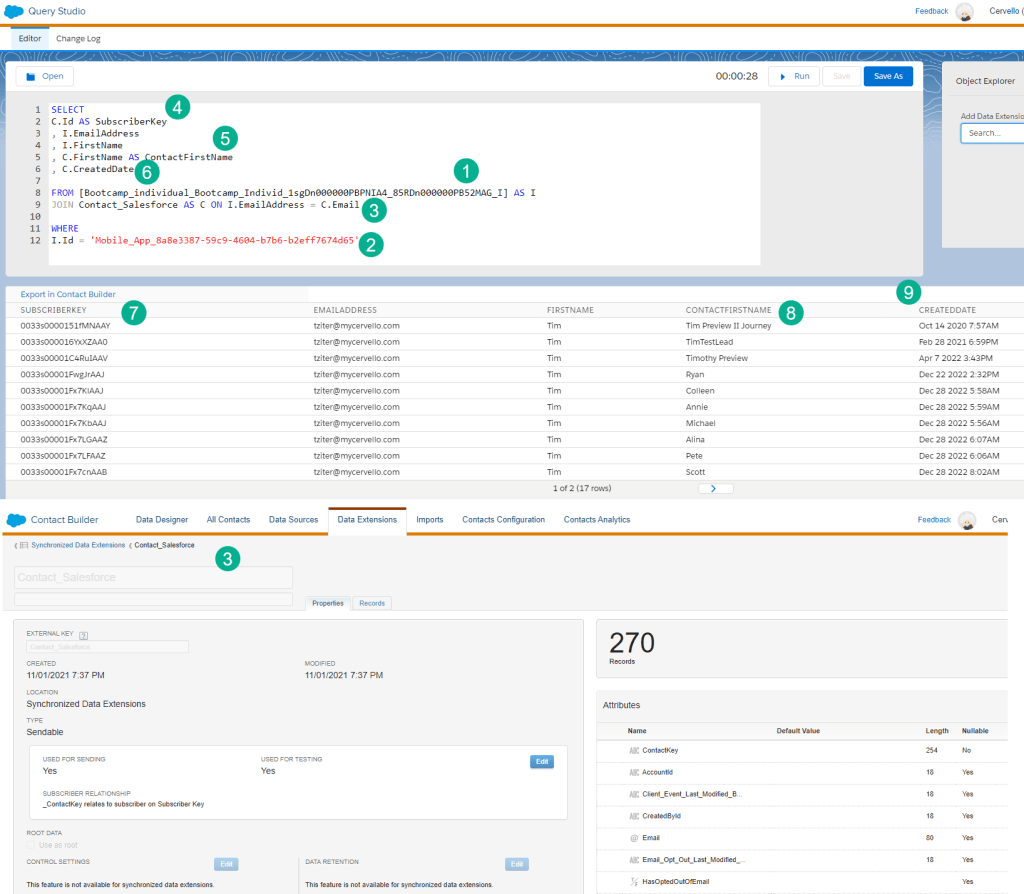
(1) In our FROM section of this query we’ll start out by pulling our data from the Individual Segment reviewed above.
(2) In our WHERE section we’ll want to filter by that one record we identified above in our case we’re identifying it by the ID field.
(3) Next we’ll want to join the Contact_Salesforce synchronized data extension which will pull in all of the contact data from Sales cloud. In our ON statement we are unifying these two data extensions by the email address data point. In the Individual DE that data point is “EmailAddress” where in the Contact DE it’s “Email”.
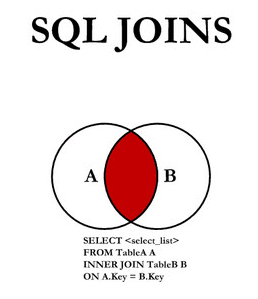
We are also using the “JOIN” or “INNER JOIN” as we only want those records that are present in both data sources. Here’s a depiction of that relationship that can be found in our query cheat sheet page: https://handsonsfmc.com/query-cheat-sheet/.
(4) In the SELECT section we can now output our SubsriberKey using the Contact ID and keep the email address from the Individual Segment even though it should be the same as the contact.
(5) To validate the data we’re outputting the first name from both data sources.
(6) And adding the CreatedDate of the Contact in case there are multiple contacts in our Sales Cloud environment.
(7) In the data we can see the SubscriberKey coming through as the ContactID.
(8) And noticing the names are slightly different so we might want to choose the Contact record for the first name.
(9) As we can see in the data there are quite a few contact records associated with my email address. This instance is used for testing so most likely you’ll not encounter 17 different contacts for an email address. Nonetheless let’s stand up a way to single out the contact with the earliest CreatedDate.
How to isolate a Sales Cloud Contacts in Marketing Cloud
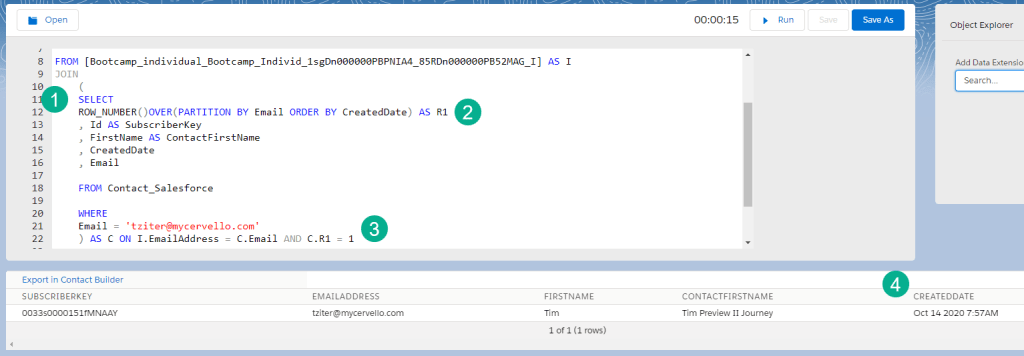
Back to Query Studio with another starter query to take all of the contacts associated with a certain email and return only the one with the oldest CreatedDate.
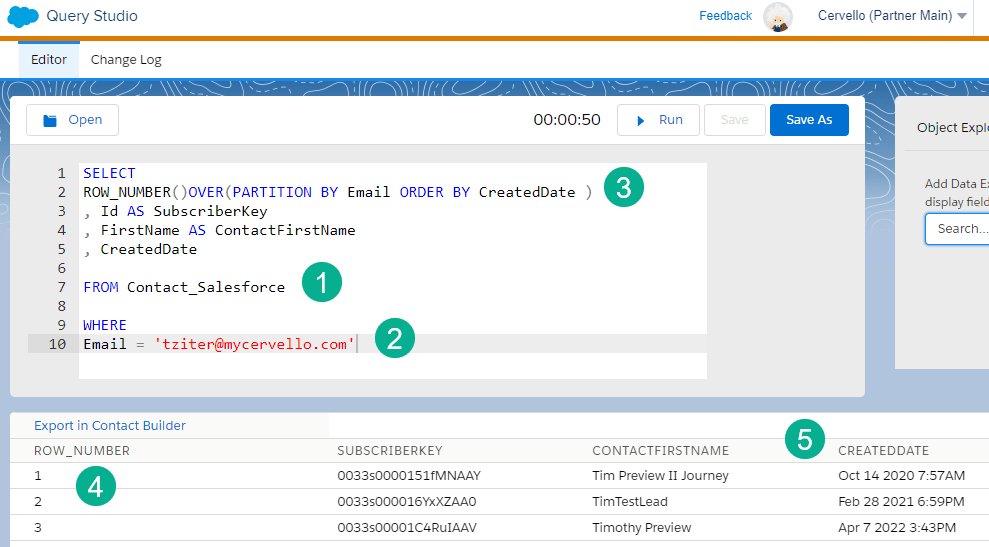
(1) In this query we are only pulling in data from the Contact synched data extension.
(2) And adding a filter for only records with the ‘tziter@mycervello.com’ email address.
(3) We want to order the output using the ROW, OVER, PARTITION function in SQL. For a more detailed breakdown of this function check out this site: https://www.simplilearn.com/tutorials/sql-tutorial/row-number-funtion-in-sql
We want to PARTITION or group on the Email Address or the Email field on the Contact synched DE. And we want to ORDER BY the CreatedDate. You could add a ASC if we wanted the newest CreatedDate.
(4) Running the query we can see the row count.
(5) And we can see the count is ordered by the CreatedDate field.
Now all we need to do is add this query back to the original query and select WHERE ROW_NUMBER is 1.
Nesting a Query in SQL Marketing Cloud
Now that we have our separate query working we can drop it into our original query where the JOIN Contact_Salesforce was listed.
(1) To nest a Query inside of a query we’ll use open parenthesis separated out on it’s own line and indenting the nested query.
(2) We updated the ROW OVER PARTITION code to output the value AS R1.
(3) Just like any other joined data extension we need to link it with an ON statement on the email address plus we only want the first row from the inner query.
(4) We only see one record outputted and it’s the oldest CreatedDate
Unified Segment Query to feed a Journey
Now let’s shift over to our Unified Segment to create a query that uses the unification logic as well determines all of the personalization fields needed for the email send.

(1) We swapped out the Individual data extension with the Unified data extension.
(2) The SELECT has been updated to include the key data points to send the email and personalize based on reviewing the data to determine the best source.
(3) Bank_Link is optional here as a field as it won’t be used in the email send, but might be helpful from a logging perspective.
(4) Our count is only 19 rows as we are only sending to those contacts that have a Sales Cloud CRM record. We can modify our query to be a LEFT JOIN if we want to expand to contacts not in our CRM database.
We’ll be building out this unification solution in a Hands On session on Thursday, June 19th at 8am. If you missed the event please log onto this Marketer group for other great content sessions on Marketing, Sales and Data Cloud: https://trailblazercommunitygroups.com/salesforce-marketer-group-marketing-cloud-phoenix-united-states/
