The Consent Model in Salesforce is a powerful set of objects to capture and maintain complex preferences for any company. But how do you not only integrate the Consent Model with Marketing Cloud, but keep the two platforms in sync so that the Consent Model is the database of record?
We’ve created a blog series where we will outline how you integrate and synchronize the data in Marketing Cloud with the Consent Model so that Salesforce CRM is the data base of record for all preferences.
In our first part of this series we’ll take a look at the automation to synch the Consent Model object with All Subscribers in Marketing Cloud.
Let’s walk through what we’ll be covering in this blog:

(1) The Consent Model sits in Salesforce Core. It starts with the Contact (or lead) and a very basic object structure would include the Individual, Contact Point Consent and Data Use Purpose objects.
(2) To synch these objects with Marketing Cloud All Subscribers (for the email channel) we’ll use one automation that includes the standard ETL to update All Subscribers. This will be covered in detail below.
(3) A second automation will be used to populate a Master data extension which will record the channel, type of communication and more for each subscriber.
(4) A third automation will be used to determine which segments qualify to be sent through a Journey.
(5) Finally the last automation will update the Consent Model in Salesforce Core when All Subscribers is updated in a method that the Consent Model can’t capture.
Before we dig into those different automations let’s take a closer look at the consent model and how it interacts with Marketing Cloud.

(1) To enable the send functionality on the email side Marketing Cloud will use the Contact object.
(2) To update All Subscribers we’ll need two fields:
– SubscriberKey – comes from the Contact object
– ConsentStatus which will be pulled from the Contact Point Consent object
Salesforce uses the Individual object to link the contact to the Contact Point Consent object.
(3) To populate the data rows of the Master Data Extension you’ll need to pull fields from the Contact, Contact Point Consent and Data Use Purpose objects.
(4) In order to update the Contact Point Consent object from Marketing Cloud don’t forget to pull across the Contact Point Consent ID.
Automation #1: Synching the Contact Point Consent object (or #2 in the flow diagram above)
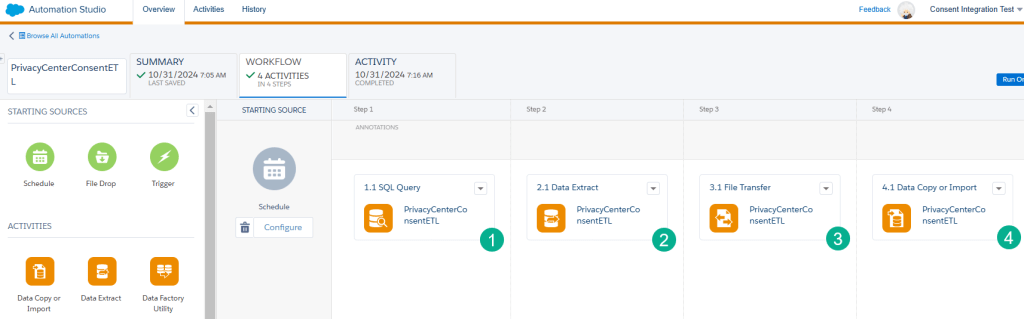
(1) The query populates the data extension that is used for the standard ETL process to update All Subscribers.

(1a) The FROM section of this query models the schema listed above and also adds in All Subscribers or _Subscribers data view.
(2b) To make an update in the standard ETL you only need two fields, the subscriberkey and the status. This example is hard coded for ‘active’ as an example. You’ll want to use a CASE function to build out all the different scenarios.
(3c) The WHERE statement simply compares the status on the Contact Point Consent record to the status of the record in All Subscribers. Just like the SELECT you’ll want to build out all the scenarios as this example covers those scenarios where the Consent Model object record has opted into emails while All Subscribers is ‘unsubscribed’.
(2) The ETL (Extract Transform Load) process begins with the Data Extract that pulls the data extension with records to update into a data extension in the Marketing Cloud Safehouse.
(3) The second step in the ETL is the File Transfer which moves the file in the safehouse to the Import folder of the SFTP. After this step you can validate the file being dropped into the Import folder using an FTP software. For a complete walkthrough on how to set this up click here: https://handsonsfmc.com/how-to-connect-to-the-marketing-cloud-ftp-or-sftp/
(4) The last step of the ETL process is to Import the data files and update All Subscribers. For a complete walkthrough of how to set up the ETL click here: https://handsonsfmc.com/how-to-set-up-an-automated-unsubscribe-process-in-marketing-cloud-part-i/
Let’s drop this query into Query Studio to view the data. Check out Query Studio as it is a free application created by Salesforce: https://appexchange.salesforce.com/appxListingDetail?listingId=a0N3A00000FP3yFUAT
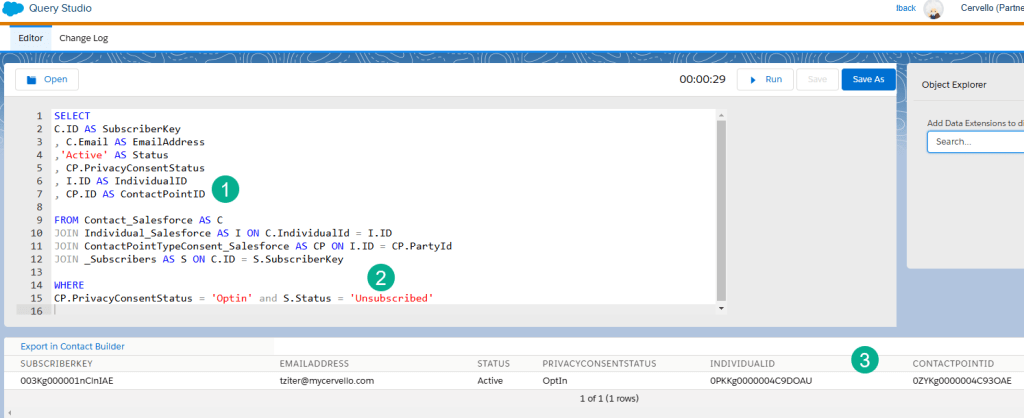
(1) We added to the SELECT statement two additional fields to output in just the Query Studio screen so that we can track down the ContactPoint and Individual record in Salesforce. For more on the SELECT statement check out our How to SQL page on the SELECT statement: https://handsonsfmc.com/how-to-sql-marketing-cloud-select/
(2) When validating the data you might want to remove the WHERE statement to start out and then add the filter afterwards.
(3) With these two IDs outputted we can use these IDs to track down the records is Salesforce to verify the data architecture.
Let’s take a look at these these records in Salesforce:

(1) Using the Contact Point Type Consent record: 0ZYKg0000004C93OAE we are able to validate how the object was set up in CRM.
(2) We can see the Privacy Consent Status field which we are using for the comparison on the query.
(3) The Party is a link to the Individual record where the contact is captured.
(4) In the Individual Record,
(5) We can navigate to the contact which is where we grab the subscriberkey, email address and other relevant contact data points.
Final Notes on Automation #1:
(1) This is only a starter query and doesn’t handle all use cases, it just handles the use case when the Consent Model subscriber is opted in while the All Subscriber is unsubscribed. You’ll want to flip that logic to update subscribers in All Subscribers who are active but are opted out in the Consent Model.
(2) To complete the automated All Subscriber update process please follow our blog for creating the ETL process: https://handsonsfmc.com/how-to-set-up-an-automated-unsubscribe-process-in-marketing-cloud-part-i/
(3) For more on this use case please check out the video: https://www.youtube.com/watch?v=81ei0AkQPak&list=PL_o00w2Z5LYHVcq56BLpBfJHRAghLhHkI&index=15
(4) We also have a Hands-On session where we are aligning All Subscribers and Salesforce core via Journey Builder: https://www.youtube.com/watch?v=7DtjfQMJbgI&list=PL_o00w2Z5LYGK0SNcuAVLtazWWecWRMoe&index=1
In our next blog we’ll cover automation #2 (or #5 in the flow diagram above) which feeds a Journey to update the Consent Records if there’s a change to the subscriber opt in/out status selected in Marketing Cloud.
Join us as a member of the Salesforce Marketer Group Boston where you can attend virtual Hands-On Building sessions weekly as well as monthly in-person meetings.
https://trailblazercommunitygroups.com/salesforce-marketer-group-boston-united-states/
