Have you received that email message from Salesforce alerting you that you’ve exceeded your contract for contacts in Marketing Cloud? We not only consult on the amazing Marketing Cloud platform, but use it to market to our prospective clients. Our Marketing Manager recently received a notice from our Marketing Account Executive alerting of the overage which we solved like we do with clients. Here’s a walkthrough of how you can safely reduce contacts and stay in that limit of your contact.
This article will walk through the following recommended steps to delete contacts:
1. Run the Contacts Count report to determine the current count of contacts
2. Edit lead and contact synchronized data extension settings to reduce synched records
3. Determine the count of email subscribers to delete using a query
4. Create a data extension of contacts to delete
5. Enable Contact Delete in Contact Builder
6. Delete contacts in bulk using the “Delete contacts from data extension” feature
7. Validate contacts/email subscribers have been deleted
8. Monitor and reduce contacts/leads/email subscribers on a regular basis
We also have an additional article on how to delete Contacts Without Channel Address here: https://handsonsfmc.com/tips-on-how-to-delete-contacts-in-marketing-cloud/
How to determine what Marketing Cloud considers a contact
Before we start cleaning up contacts we need to understand what Salesforce Marketing Cloud considers a contact. This article provided by Salesforce helps answer the question: https://help.salesforce.com/s/articleView?id=sf.mc_cab_contact_definition_and_count_determination.htm&type=5
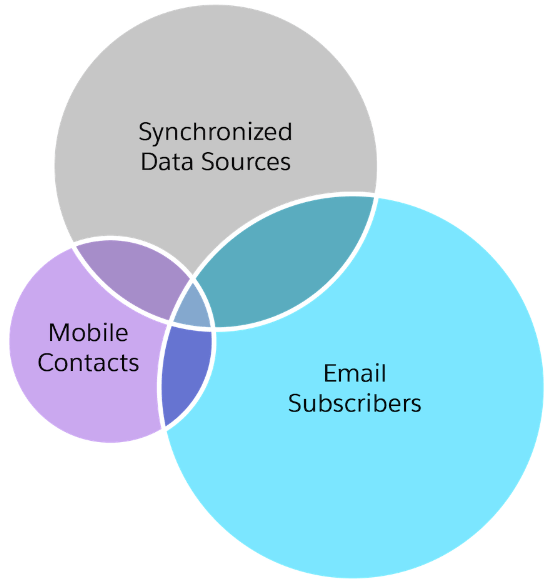
The counting of contacts can be quite complex, but the biggest sources for your contacts are the Synchronized Data Extension Contact & Leads, email subscribers and mobile contacts.
How to find the current contact count
Marketing Cloud makes it easy to monitor your contact count via a simple report.
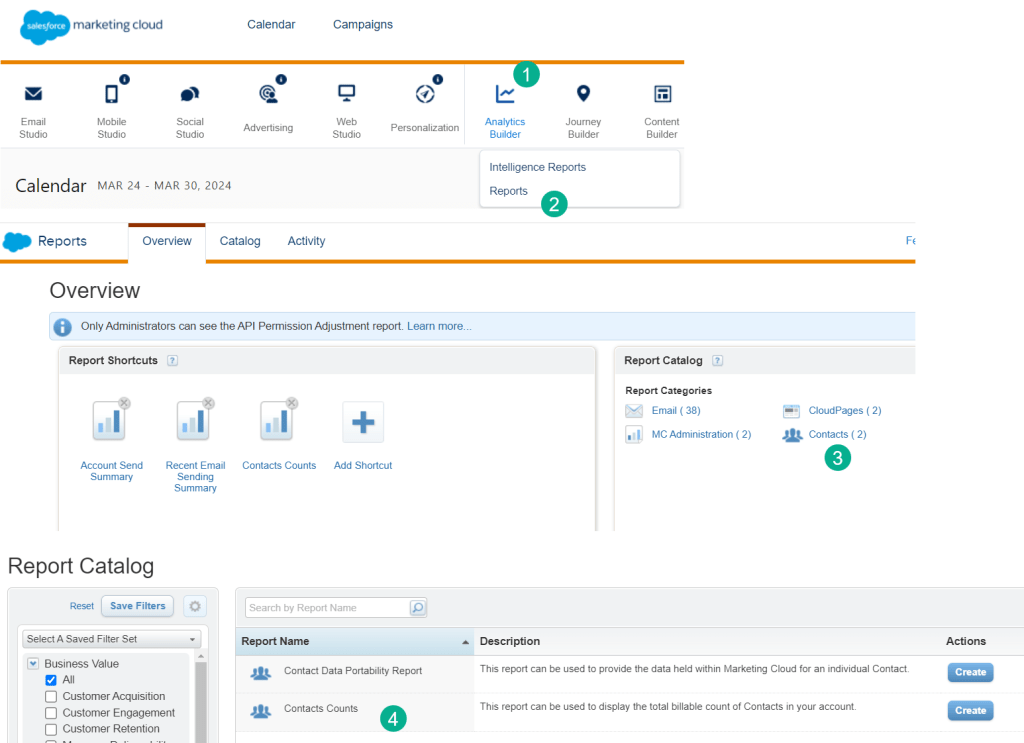
(1) Under Analytics Builder
(2) Select Reports
(3) In your Report Catalog there should be a Contact category
(4) Select the Contact Counts report and select a timeframe – I believe the range is only last three months out of the box.
Here’s an example of our use case, we have a contract for 15,000 contacts and our contact count is showing over 22K.
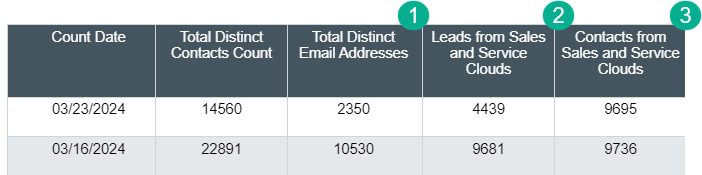
Contact count is a combination of the following:
(1) Email subscribers
(2) Leads synched form Sales/Service Cloud
(3) and Contacts synched
How to reduce Leads and Contacts synchronized to Marketing Cloud
If you have the Marketing Cloud connector connected to Sales or Service Cloud you can synch over leads and contacts directly into Marketing Cloud as well as most other objects. For more information on how to set up synchronized data extensions check out this article: https://handsonsfmc.com/how-to-create-a-synchronized-data-extension-in-marketing-cloud/
You have multiple options to control how many Leads/Contacts get synched. Here’s how to navigate to those options for each synched data extension.

(1) In Audience Builder
(2) select Contact Builder
(3) Select “Synchronized” in this tab area
(4) Click on this box to take you to the synchronized data extensions. This also gives you a summary of the current synched data extensions and fields.
(5) Select either the Lead or Contact synchronized data extension
(6) The count of the records will display here
Once you are in the synched data extension follow these steps to open the settings window and review the options:

(1) In any synchronized data extension click on the edit button to open the settings window.
(2) The current settings will be displayed in this box.
Of the four options two give you flexibility to control the leads/contacts synched.
(3) All records created since gives you the ability to synch those records by the create date of the object, NOTE: not by the modified date.
(4) Another popular option is to only synch records based on a boolean value on the record. The default for leads/contacts is the HasOptedOutOfEmail where you can select this field is false. We’ll be writing up another post on how to customize using this setting so look out for that content in the future.
(5) Select true/false for the custom field
Unfortunately you can’t combine these filters, it’s one or the other.
Let’s walk through the steps to reduce leads being synched into Marketing Cloud.
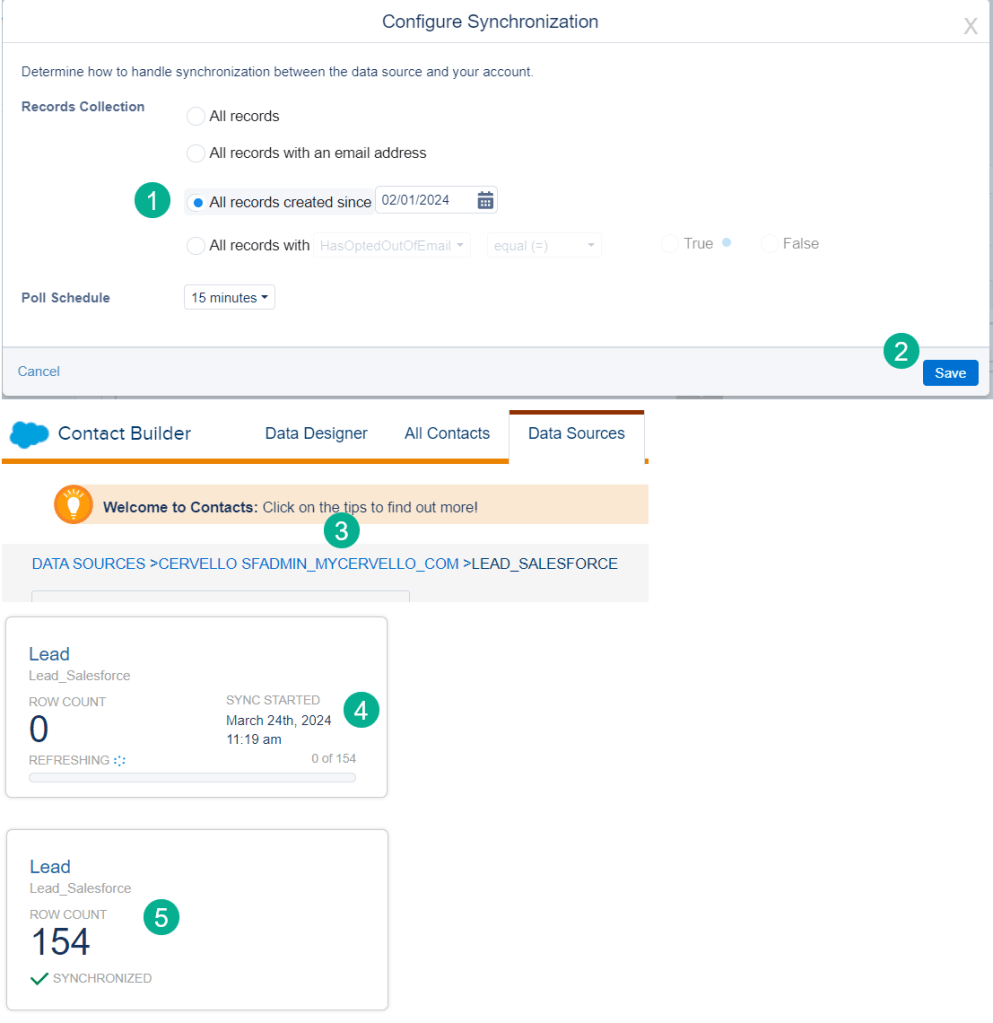
(1) We’ll move the create date from Jan 1st to Feb 1st.
(2) and select Save
(3) Click back on the blue link to the previous screen
(4) You’ll see your synched DE refreshing and see the new count of 154 down from 846
(5) After a minute or two (depending on the size of your data extension) the final total will be displayed and is now accessible in the data extension.
How to delete email subscribers or contacts in Marketing Cloud
This method is a little more complex than reducing synchronized data extension as you need to:
(1) Identify the contacts to be deleted, filtering unsubscribed contacts
(2) Create/add them to a data extension
(3) Follow the deletion steps in Contact Builder
Before we go through these steps, first let’s find the count of email subscribers in Marketing Cloud under Contact Builder.

(1) In Audience Builder
(2) select Contact Builder
(3) view the count of email subscribers
You can also view email subscribers under All Subscribers:
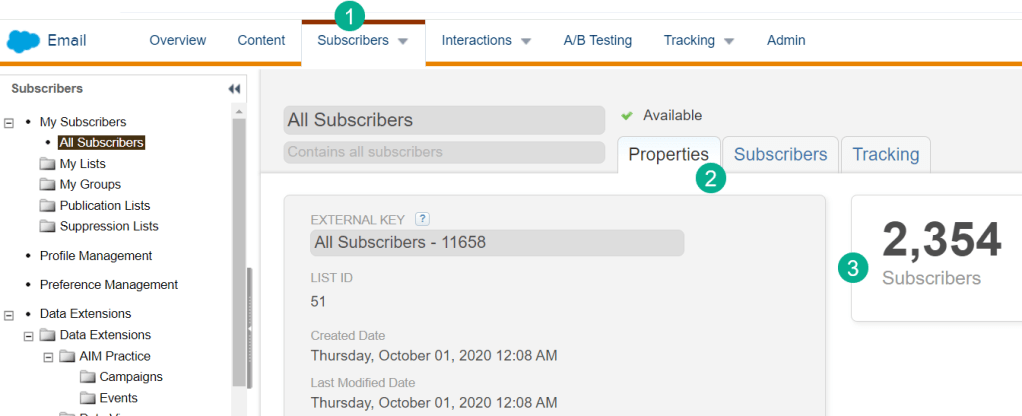
(1) In Email Studio, click on the Subscribers tab and select All Subscribers
(2) Select Properties
(3) The count of the email subscribers is shown here and matches All Contacts
How to identify email subscribers to be deleted – Step (1)
Use the following query as a starter query and make modifications based on your environment and use case. We recommend working in Query Studio: https://appexchange.salesforce.com/appxListingDetail?listingId=a0N3A00000FP3yFUAT first. Let’s break down the major parts of this query which has two nested queries that (a) determine the click recency and (b) the email send recency.
For our use case we want to keep only those email subscribers who have:
(a) clicked in the last 60 days or
(b) have been sent an email in the last 30 days
(c) Are an active subscriber (not ‘Held’ or ‘Unsubscribed’ or ‘Bounced’)
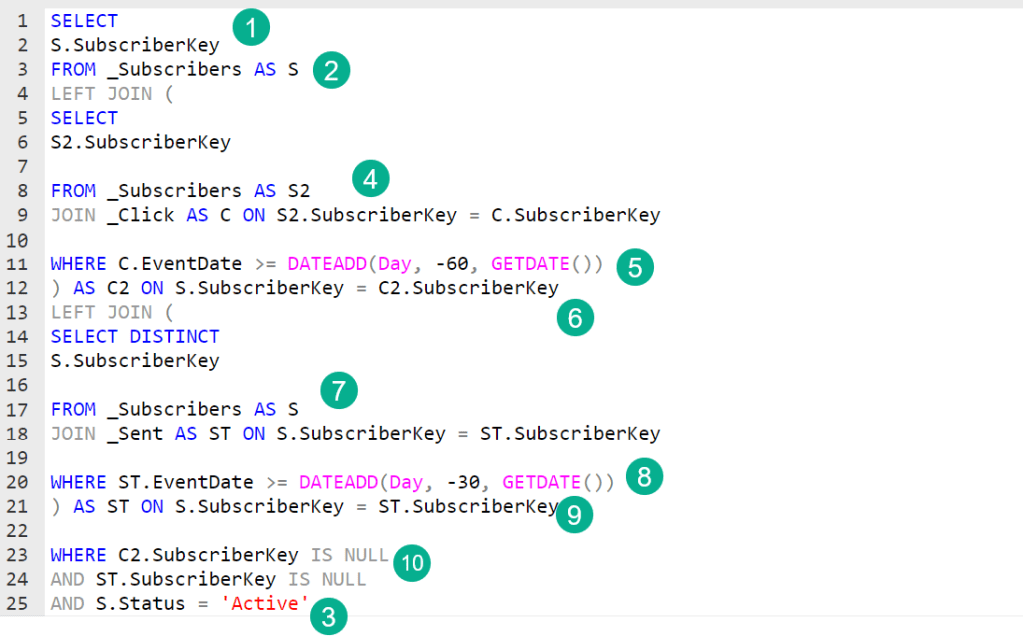
(1) For our main query we only want to output the subscriberkey. You can also output the reason for the removal and other fields. For purpose of deletion only the subscriberkey is needed.
(2) Our main query is pulling from the _Subscribers data view which is how to query all contacts or all subscribers. For more on data views click here: https://help.salesforce.com/s/articleView?id=sf.mc_as_data_views.htm&type=5
(3) We are pulling in only those subscribers who are “Active”.
KEY TIP – Delete only “Active” contacts in Marketing Cloud.
If you delete a unsubscribed contact, not only do you delete the contact/lead but you delete their subscriber preference. If that contact/lead gets pulled into another marketing campaign in the months to come their subscriber preference will not be honored. To maintain the health of your IP Address also consider keeping any “Held” or “Bounced” subscribers to prevent sending to low-quality subscribers in the future.
(4) Our first nested query we’re looking to pull in the _Click data view to determine those who’ve engaged. Note that we are bringing in clicks and not opens given the inaccuracies of opens.
(5) We’re only keeping those who clicked in the last 60 days. This is very conservative and depending on your use case you might expand this to a year plus.
(6) We are matching this nested query to the outer query on the subscriberkey which is present in both data views.
(7) In our second nested query we are utilizing the _Sent data view to pull in those who’ve been sent and email.
(8) Filtering those leads/contacts that have been sent an email in the last 30 days, again a bit conservative and could be expanded. This list keeps those subscribers who are actively in a journey or drip campaign.
(9) Joining this query to the outer query based on Subscriberkey
(10) We are following the nested query logic located on our query cheat sheet: https://handsonsfmc.com/query-cheat-sheet/
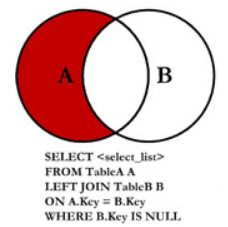
Where you are LEFT JOINing the nested query and in the OUTER WHERE clause adding where the nested query key used for the ON statement IS NULL.
Running the above query in query studio returns the following in our environment:
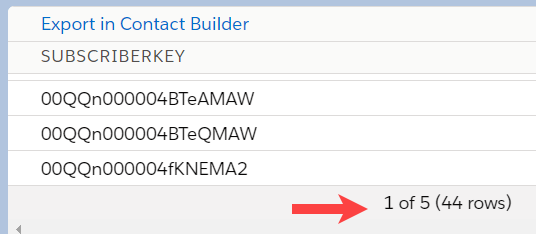
We’ve identified 44 contacts that can be removed.
How to add deleted contacts to a data extension
Once you determine the query to isolate those unwanted contacts all you need to do is create a query and a data extension.

(1) Create a query loading the query that you created in query studio in the step above. Add it to an automation where you can automate running this query or run it manually each month/quarter when you are doing cleanup.
(2) Create a data extension and add it to the query.
(3) Create a data extension and run the query
(4) to populate the data extension with the records to delete.
How to delete contacts in bulk in Contact Builder
Before you can delete contacts in bulk, first turn on the Contact Delete functionality:
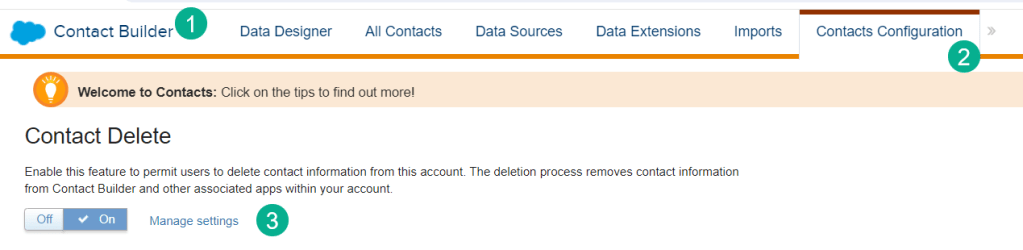
(1) Under Contact Builder
(2) Select Contacts Configuration
(3) Turn on Contact Delete
It’s recommended to turn on this feature only when deleting and then turn it back off to prevent accidental contact deletion.
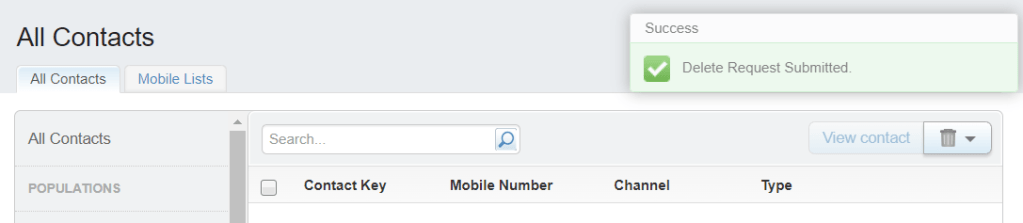
Once Contact Delete is turned on follow these steps to delete contacts in a data extension:

(1) While in Contact Builder
(2) Select the All Contacts tab
(3) Select the trash can button on the right
(4) Select “Delete contacts from data extension”

(1) Navigate to the folder where the data extension is stored
(2) Select the data extension
(3) Select delete the data extension if you want to delete the records and data extension as well. For our use case we’ll leave this unchecked and use the same data extension to bulk delete in the future.
(4) Click the Delete Contacts button
This screen will pop up alerting the user to the variations of the deletion in various parts of Marketing Cloud. Click the Delete Contacts button.

Once clicked the following confirmation window will appear in All Contacts.
How to confirm contacts have been deleted in Marketing Cloud
Once submitted you can validate the deletion has been submitted and depending on the size of the deletion see the changed records in a minute or two.

(1) Under the trash can button select “View Pending Deletions”
(2) In the popup window under the deletion request will be the name of the data extension
(3) and the count of the records to be deleted
(4) and the status and date submitted.
(5) In a minute or two the records should be reduced in All Contacts. Above the count pre-deletion was 2,354 which was reduced by 44 records.
With a little prep work contact deletion should be a regular maintenance process for your team to stay within those contact contract limits and maintain a healthy subscriber database in Marketing Cloud.
