Synchronized data extensions are how the Salesforce Sales Cloud connects and shares data with Marketing Cloud. If you have set up the Marketing Cloud Connector you will be able to add most objects as synchronized data extensions in Contact Builder within Marketing Cloud. For more information on how to install the Marketing Cloud Connector click here: https://handsonsfmc.com/how-to-setup-marketing-cloud-connect/
Part I: Navigating to Synchronized Data Extension menu

(1) In the main menu of Marketing Cloud – you can always click on the Salesforce blue cloud in the upper left corner to get to the home page/main menu.
(2) Hover over Audience Builder.
(3) Click on Contact Builder.

(1) Select Data Sources in Contact Builder.
(2) Select the Synchronized tab.
(3) Select the box that contains Entities and Attributes on the left.

(1) If you have synchronized data extensions already created they will appear here in tiles that include the number of records synched from Sales Cloud.
(2) Search for the object before you create a new one, it might already be synched.
(3) To add a new Synched DE select the Set Up Object button in the upper right corner.
Synched Data Extension Use Case – Account Team Member
Our stakeholder wants to send an email communication to a contact but have the email be sent from the Account Manager on the account. This account manager exists only on a child object of the Account object called the Account Team Member. Because there are multiple Team members on any given account we’ll want to synch over this object in order to utilize the data extension in a query to populate the custom send from email and name sender profile.
Here’s a look at the object record in Sales Cloud:

(1) The object is the Account Team Member.
(2) Which is a child object sitting under the Account, in this case 3C Systems.
(3) The Team Role is the field that designates the “Account Manager” role to designate the role that will be used to send the email from name and email address.
(4) This identifies the Salesforce user that will be used to obtain the name and email address for the custom sender profile.
Synchronized Data Extension Setup
Back in Contact Builder under synchronized data extensions select the blue Set Up Object button in the upper right hand corner.

(1) Select the Set Up Object button.
(2) Search for the object in our case we’ll search for “Account”.
Synch DE Tip #1: Order of synching
If you have just started synching the DEs you’ll notice that not all DEs or objects are available so if it doesn’t appear in the search. If your object doesn’t appear you may need to add a few foundational objects first like contact, lead, account, opportunity, etc. Here’s some documentation related to the order of configuration of synched DEs: https://help.salesforce.com/s/articleView?id=sf.consent_data_model_mc_configurations.htm&type=5

(1) Navigate to the tile that represents the object you are looking to create.
Synch DE Tip #2: Watch those names
The object names might not be named what you think, they could use the object or field name. Check the object manager in Sales Cloud to see the variations of the name to potentially search for in Marketing Cloud.
(2) Click synchronize.
(3) The number of fields available to synch.

Once you click Synchronize a window into the new object will pop up.
(1) The default fields will already be greyed out.
(2) The optional fields will be listed.
(3) Check the empty box if you want to add this field.
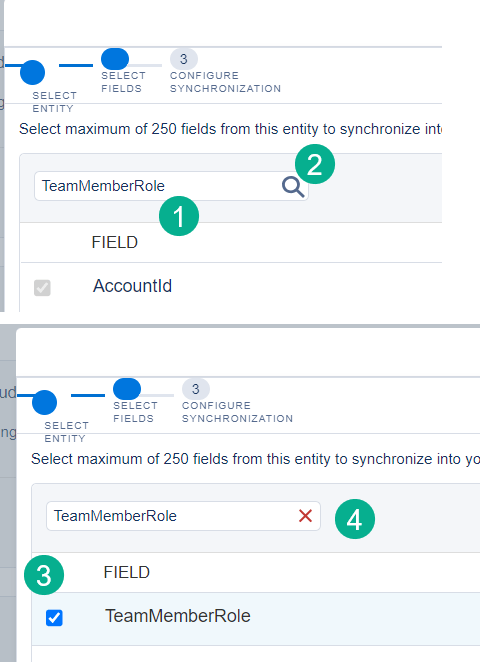
You can also search for fields in the search bar.
(1) Select the field to search and
(2) Click on the magnifying icon to search for the field.
(3) Check the box and to find the next field…
(4) Click the red “X” which will reset the search bar and you can add the next field to search.
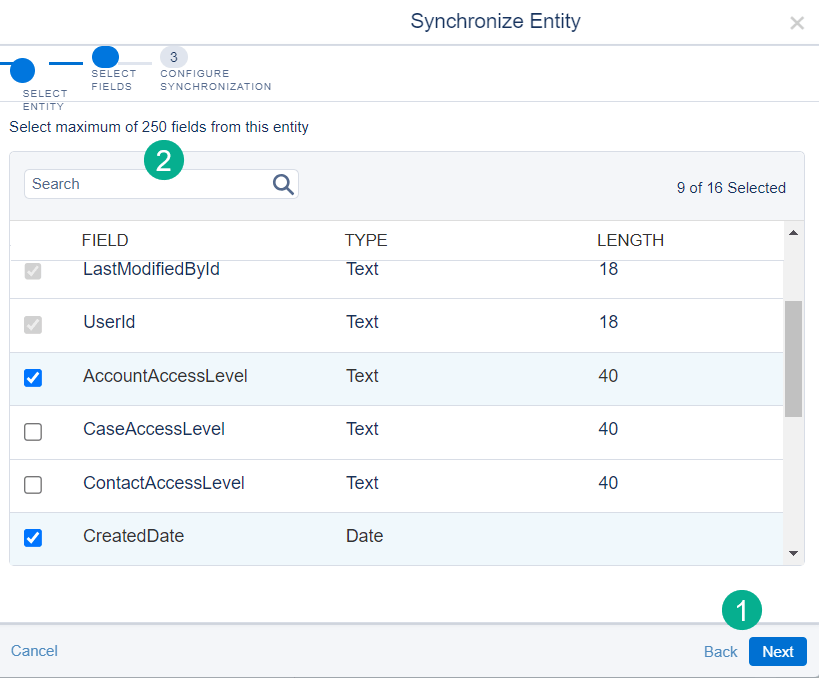
(1) Once you’ve selected all of your fields select the Next button in the lower right corner.
(2) FYI here’s the note detailing that there are a max of 250 fields per synched DE.
How to control the records that synch over to SFMC
The last part of the set up is the most important as it controls the number of records that are synched over from Salesforce CRM to Marketing Cloud. Be mindful with these setting especially on those objects that can add to the Salesforce fees like Contacts and Leads which last checked list price is 10 cents per month for each record that exists in Marketing cloud.
If your contract allows for a large amount of contacts and leads then there’s nothing to worry about and select all records to synch. If you need to limit records the records since and especially the record flagged with a boolean field can be effective in limiting the contacts/leads synched.
For instance on your lead and contact record you could add a field that flags whether the record has an email address. Then use that field (as long as it is a boolean) to only synch over contacts/leads that have an email address. Other options you could flag could be engagement, so only flag those records that have engaged with an email in the last 12-24 months.

1.) Synch all records – only use if records don’t impact storage fees.
2.) Synch all records from a certain date – Choose only a few months or a years worth of records. Unfortunately Created Date is the only option, not modified date.
3.) Filter records by whether a boolean field is flagged. Unfortunately there are limited options here as well, only boolean fields please.
4.) The default poll schedule is set to 15 minutes which will update the data at this frequency.
5.) Once done select Save & Synchronize.
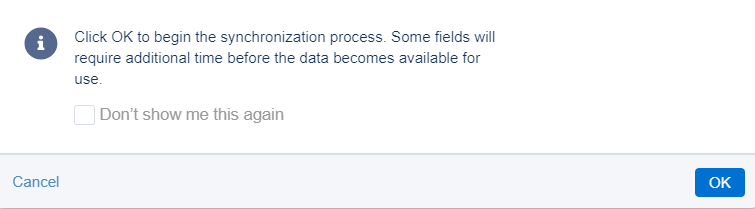
This handy pop up window appears. We’d recommend not checking the Don’t Show me box as it’s a good reminder before synching.
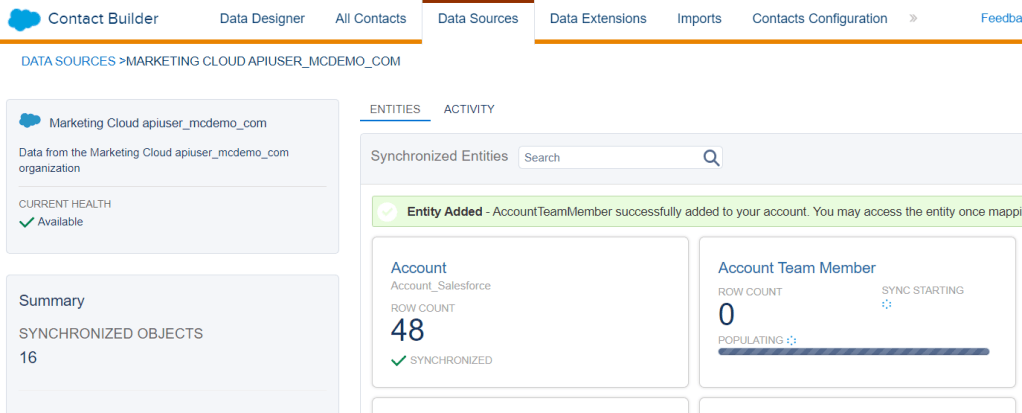
And that’s it. The synchronized data extension window will appear with a new tile for the new synched DE so you can track the records as they synch.

You may see this notification which should go away in a few minute depending on the number of records synching.
Navigate to the synchronized data extension folder once the synch has been competed:
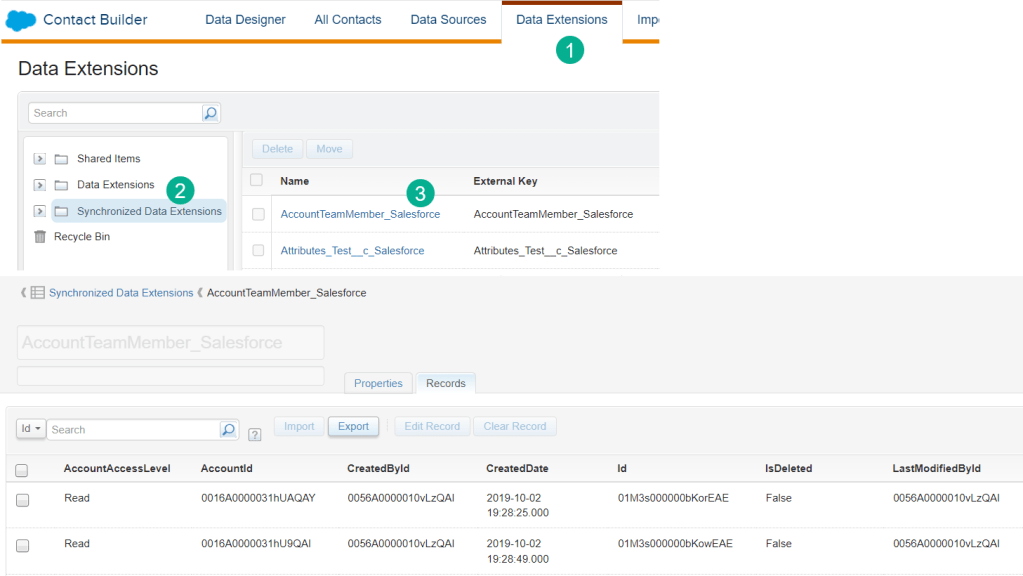
(1) Under Contact Builder and the Data Extensions tab.
(2) Select the Synchronized Data Extensions folder on the left.
(3) Select the new data extension
And your data should be synched including all the fields selected.
It’s best practice to alert the entire team that is working in your Marketing Cloud instance whenever adding or removing synchronized data extensions. And documenting each synched DE including the default and custom fields can help if the Synched DEs need to be rebuilt.
