Data extensions are the backbone of Marketing Cloud. They house all the amazing marketing related data, they are the lists for communication sends and so much more. In our walkthrough today we’ll cover the basics of creating a data extension.
Step I: Choose Email Studio or Contact Builder to create your data extension. There are two ways in the UI and additional ways via API to create a data extension. They both have advantages.
Via Email Studio: Here are the steps to create a Data Extension in Marketing Cloud via Email Studio

(1) Select Email Studio
(2) Select the Subscribers tab
(3) Select either Data Extensions
(4) or Salesforce Data Extensions if you are sending a non journey send and want the data to populate in Sales Cloud
Via Contact Builder: Here are the steps to create a Data Extension in Marketing Cloud via Contact Builder
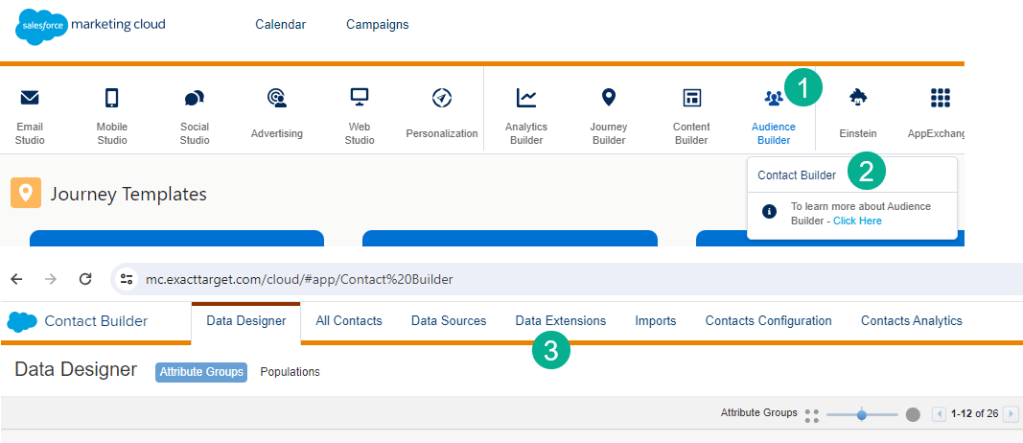
(1) Select Audience Builder
(2) Select Contact Builder
(3) and select Data Extensions – Note Salesforce Data Extensions aren’t available via Contact Builder.
Step II: Create a new Data Extension
We’ll create a new data extension in Email Studio for the rest of the walkthrough. First step is to navigate to the folder that you want to save the Data Extension:
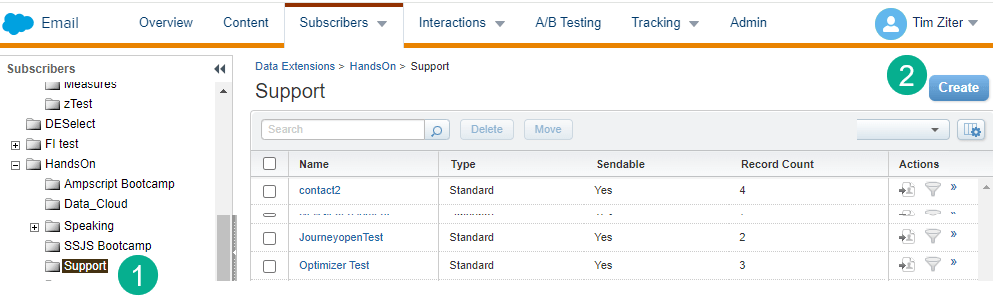
(1) Select the folder to create the data extension – this will automatically put the new data extension in this folder.
(2) Click the Create Button
A window will pop up with options:

(1) Keep the Standard Data Extension setting as it will be selected as a default
(2) Click the OK button.

(1) In the Creation Method drop down for the most part you’ll leave this in the default setting. If you wanted to create a triggered send Data Extension (which we will cover in another post) you’d select Create from Template.
(2) Enter Name
DE Tip #1: Avoid spaces when naming data extensions. Data Extensions will be used in queries and be pulled down via API calls. For coding purposes empty spaces can cause problems. If you want to space out the word use underscores as indicated above.
For instance in a query when selecting a data extension with spaces you have to add [ ] around the data extension name like:
FROM [Lead Import Test]
without spaces its simpler and more scalable:
FROM Lead_Import_Test
(3) Some use the name as the external key which can be helpful when the data extension is used in an ETL process or being accessed via API call. More often than not you can leave them blank and when saved the system will create a unique key.
(4) Add a description. It’s good practice to add a short description for the data extension to help your future self or others understand the purpose up front.
(5) Validate the location. If created in the data extension folder of choice this will be populated automatically, click on “location” to make any modifications.
(6) Select Is Sendable if the DE is being used to send an email or being used by Journey Builder. Select Is Testable if using for testing.
(7) Select Next.
Step III: Select or DON’T select retention settings
The default is to not include retention settings which should be the typical use case. If you need to add retention settings make sure they are consistent and you have a way to document settings.

(1) Turn on/off retention settings
(2) You can select records (Both individual or all) or records and data extensions! We’ve encountered a few scenarios where an important data extension simply disappeared because it had the All records and data extension filter selected. Be mindful when using these settings.
(3) Marketing Cloud gives the user lots of flexibility and retention length.
(4) Typically leave the retention settings off and select next.
DE Tip #2: If you add retention settings after the fact the settings will only impact new records added to the data extension not existing.
Step IV: Select fields and subscriber relationship (if a sendable data extension)
This is the meat and potatoes of creating the data extension. The way you set up each field will have a huge impact on your data and end solution so take the time to make sure you thought through each and every field.

(1) The name – sounds simple, but it’s important. Just the name of the DE, its recommended to not include spaces in the name. If you need spaces use underscores like Test_Field.
(2) Data type. Most often these will be the default of Text. You’ll want to use Email for the field that will be used as the email address. Use Date for date fields. The Number type can be useful if doing calculations with the field.
(3) Length. This can cause a whole lot of problems if not selected correctly. If the field length is too short for the data it will cause errors when writing. Make sure you add adequate length but don’t set all fields to 1,000 length.
DE Tip #3: Do you need an unlimited length for a field like a long string of text or a really long URL? Leave the length blank and the data extension will accept any length.
(4) The field you select as the primary key will limit only one of that value in the data extension. This is often used for the Subscriber Key if you want to prevent duplicate subscribers from entering the data extension. It’s best practice to have only one Primary key.
(5) Nullable determines if the field is required or not. Best practice is to select nullable for most fields. If not selected the data will be required when writing to the DE. If the job does not have this field populated an error will occur.
(6) Default value. You can set a default value or date which can be helpful if you need to flag each record with a certain value or when the record was created.
(7) Send relationship identifies the subscriber key used upon sending in Marketing Cloud. Best practice is to use a unique key like a Lead/Contact ID from Sales Cloud vs an email address.
EXAMPLE: Here’s a query that we’ll be using in an upcoming blog importing leads from a campaign in Sales Cloud:

To populate the data we’ll be creating a data extension based on the select statement in this query.
(1) The LeadID will be our Subscriberkey in the data extension and will be selected in the subscriber relationship.
(2) Email will contain the email address which will be used as the address to send the email.
(3) The rest of the fields are important but not critical to the email send.
Let’s take a look at the fields when created in the data extension:

(1) SubscriberKey is going to be our golden key for this data extension. We will be using the Lead ID from Salesforce and selecting this field as the Primary Key. Note we could have selected this field as 18 character length as that should be the max given Salesforce Lead Id length.
(2) For the Email field we’ll select the EmailAddress type because this is the email/field that we want to use for the send. Note that it auto populates the number max of 254. We decided to keep this field as not nullable or required because we are sending an email and don’t want to send if there’s no email address. This could cause an error but we’ll add a line in our query to only pull in leads that have an email address populated, I.E. WHERE L.Email IS NOT NULL.
(3) FirstName through OwnerID are not required so we’ll select nullable for each. Note that we are mindful of the length for each field to give plenty of room.
(4) We want to add a bonus date field using the Date type to populate a date each time a record is added. If you click on the plus sign to the left of the default field the current date will be added.
(5) Because our SubscriberKey will determine the unique ID in Marketing Cloud, not the email address we’ll select that key for the Send Relationship.
Step V: Test populating the data
To validate your settings run the automation or job that is populating the data in the data extension.
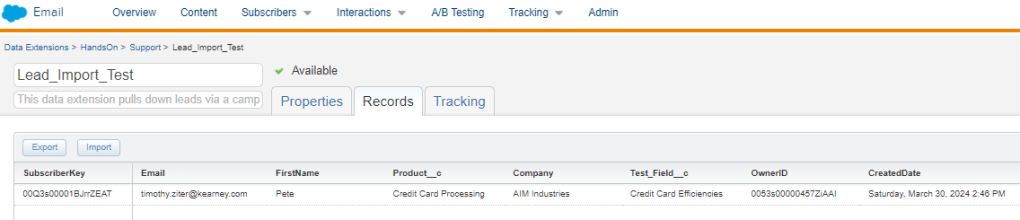
Success! Even the data field was populated when the record was created.
