Welcome to our new series on the amazing capabilities of Marketing Cloud Advanced which is part of Marketing Cloud Next. In this first session we’ll be build a custom form to rate the satisfaction level of a boat rental. This hands-on session follows the steps that Francois Peret walks through in his video as part of the Marketing Cloud on Core series: https://www.youtube.com/watch?v=u0ovDcj8NUY&t=2035s
Step I: Create a campaign

(1) In the nine dots in Salesforce type in and select the Marketing Cloud app.
(2) Select the Campaign tab.
(3) Click “New”.
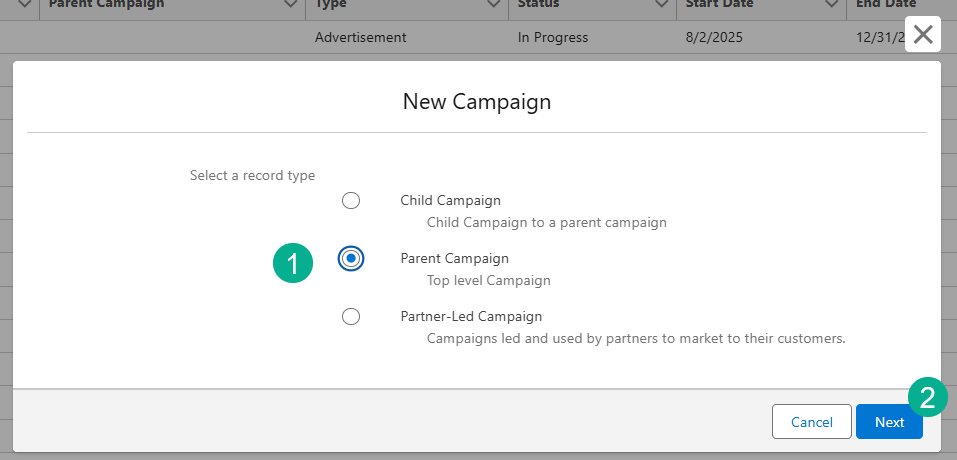
(1) Select a Parent Campaign.
(2) Click Next.
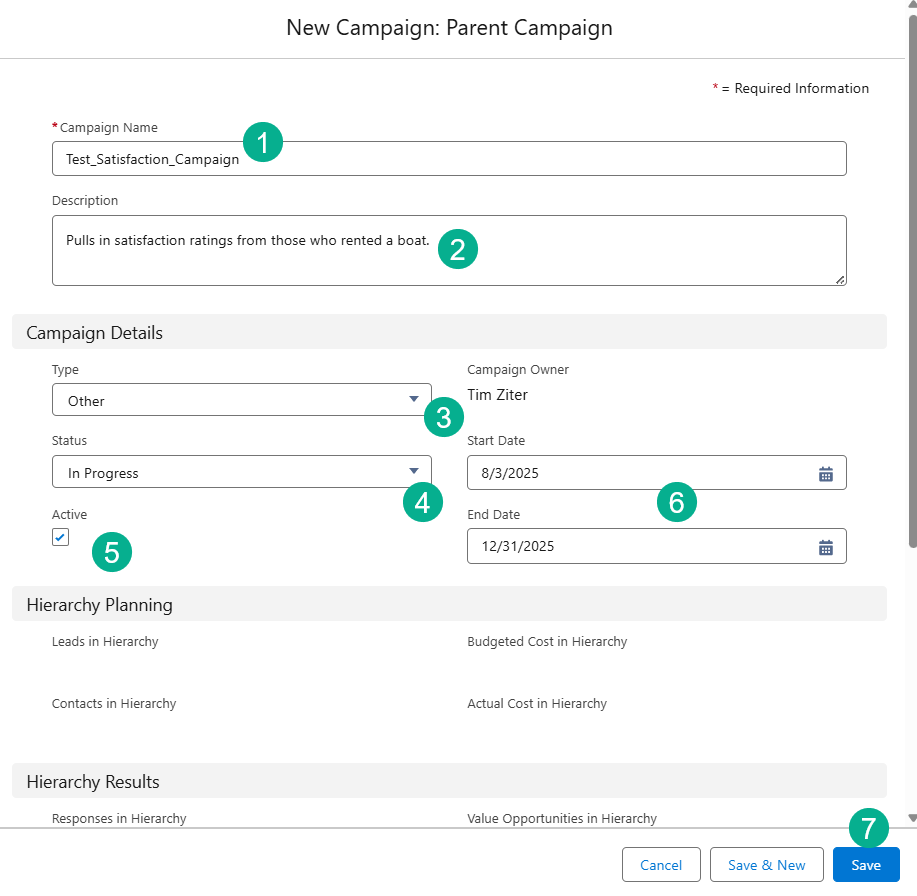
(1) Enter in a name, you can add Test to the beginning or end if you are testing.
(2) Enter in a helpful description.
(3) In this case there isn’t a customer satisfaction type so we are selecting “Other”.
(4) For Status select In Progress.
(5) Select the Active button.
(6) Enter in a relevant start and end date.
(7) Click Save.
Step II: Create the form
What’s pretty amazing in Marketing Cloud Advance/Next is once the campaign is created it offers you a variety of pre-created flows and assets to help you with your marketing automation.

(1) Once the campaign is created select Signup Form.
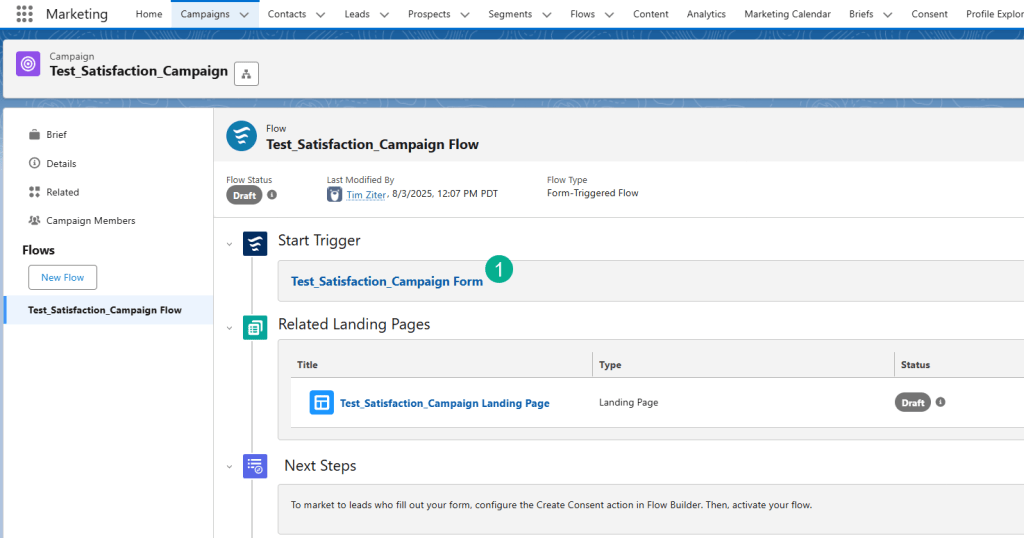
(1) Select the Form under Start Trigger.
You can see below the Landing Page where that form is embedded which we will review shortly.
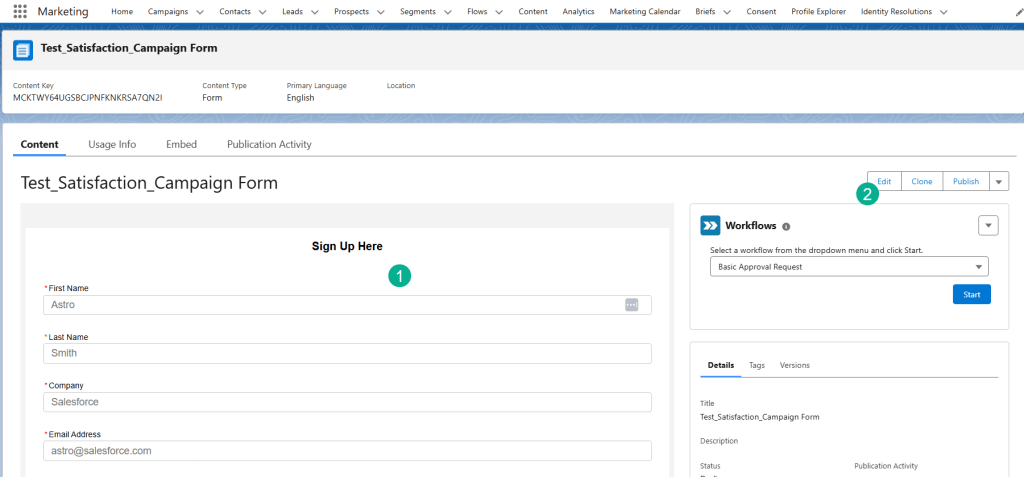
(1) Once in the form you will see the out of the box form fields added.
(2) Let’s Edit the form to modify to suit our needs/use case.
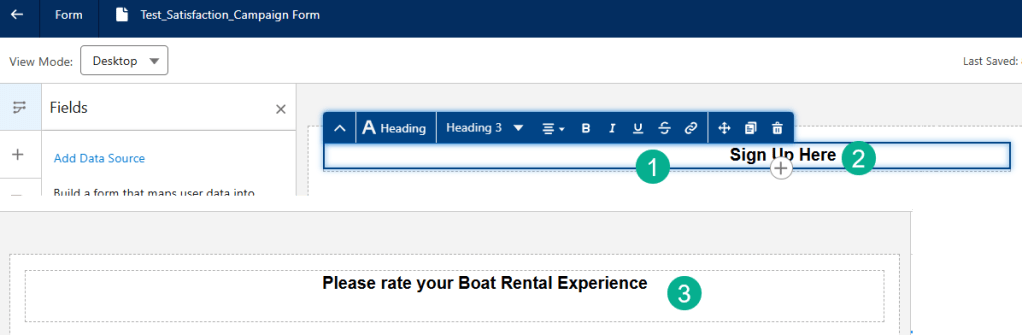
(1) Let’s click on the Heading block at the top of the form.
(2) Simply replace the type with the preferred heading.
(3) And you’ve started to personalize your form.
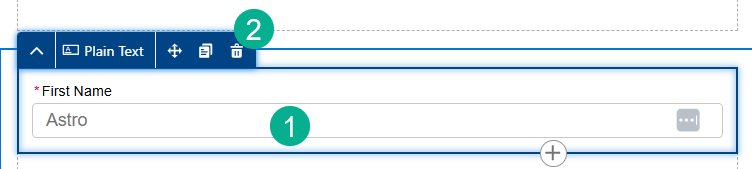
For our form we’ll not need First Name, Last Name, Company or Email Address so simply:
(1) Click on each field.
(2) And select the trash icon.
Repeat steps for Last Name, Company or Email Address.
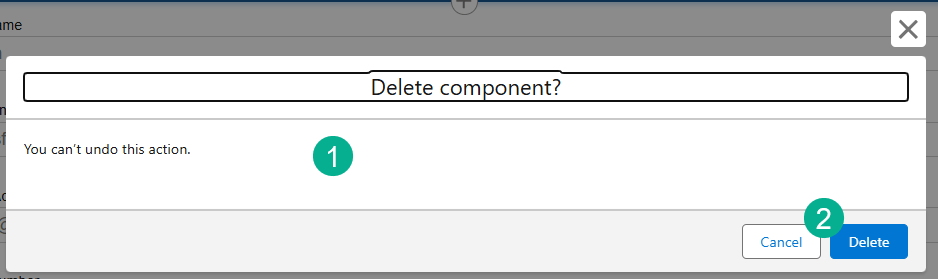
(1) You will see a pop up each time.
(2) Select Delete.

(1) We also want to delete the text at the bottom so select the Heading section at the bottom.
(2) And click on the trash icon.
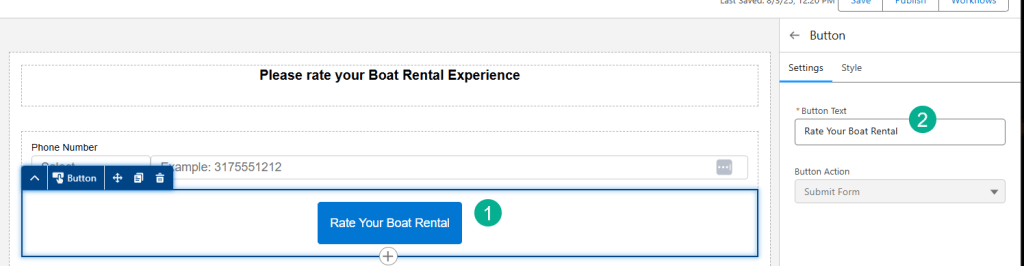
(1) To modify the Button, select the button.
(2) On the right under Button Text add in the copy.
Step III: Add a New Custom Field on the Form
Now let’s add a field where we can add in the rating for the Boat Rental.
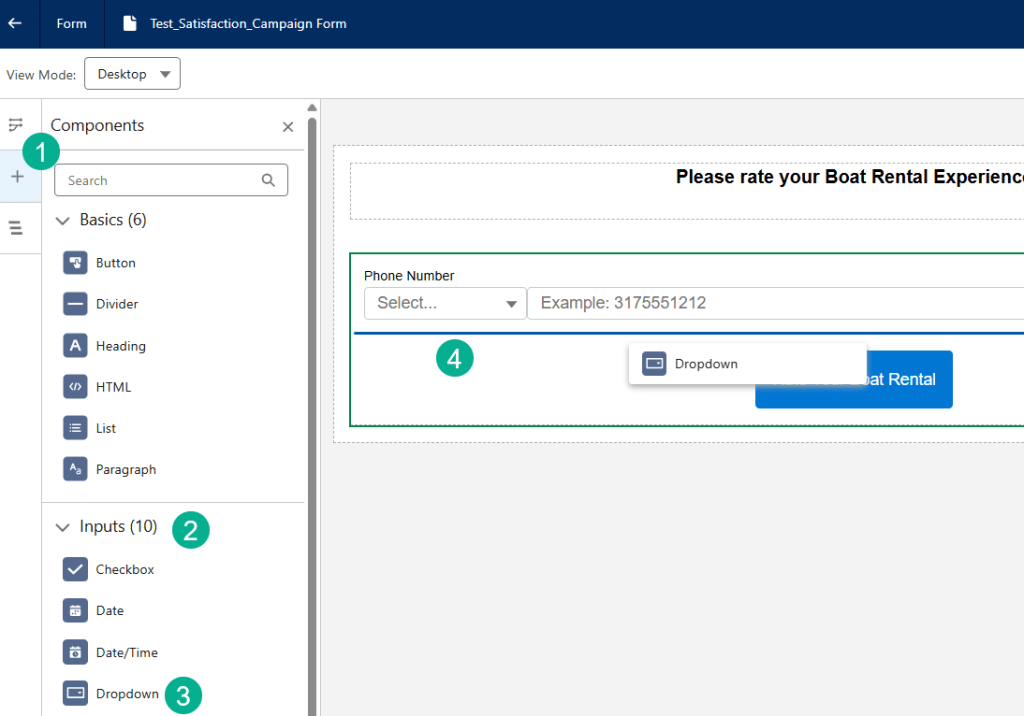
(1) On the left click on the Plus Sign tab.
(2) Click on the Inputs section.
(3) Drag the Dropdown input type.
(4) Over to just under the Phone Number field on the form.
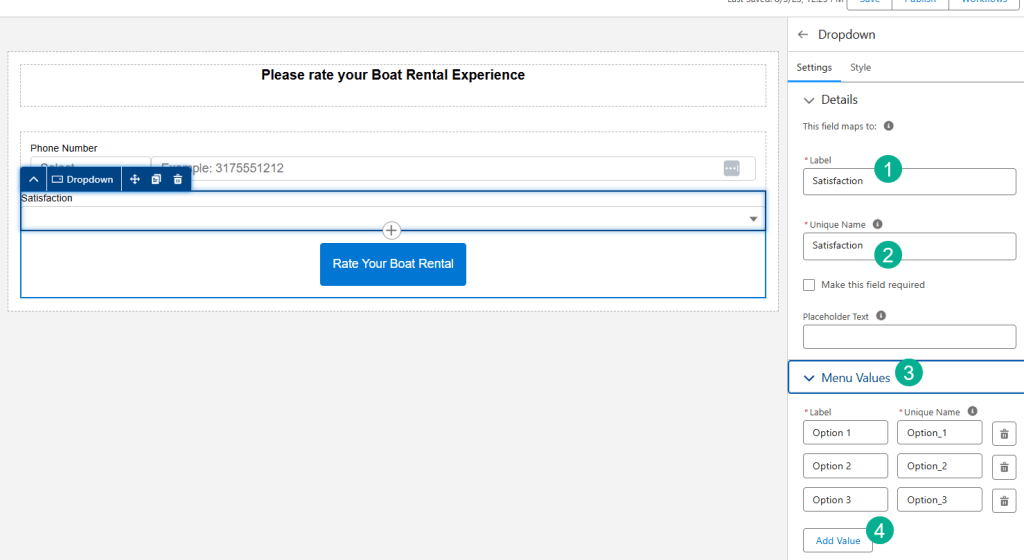
(1) Over on the right enter a label like “Satisfaction.”
(2) And repeat the name in the Unique Name field.
(3) Click on the Menu Values section to add each value.
(4) Add Values so you have 10 total as we are looking for a rating from 1 to 10.
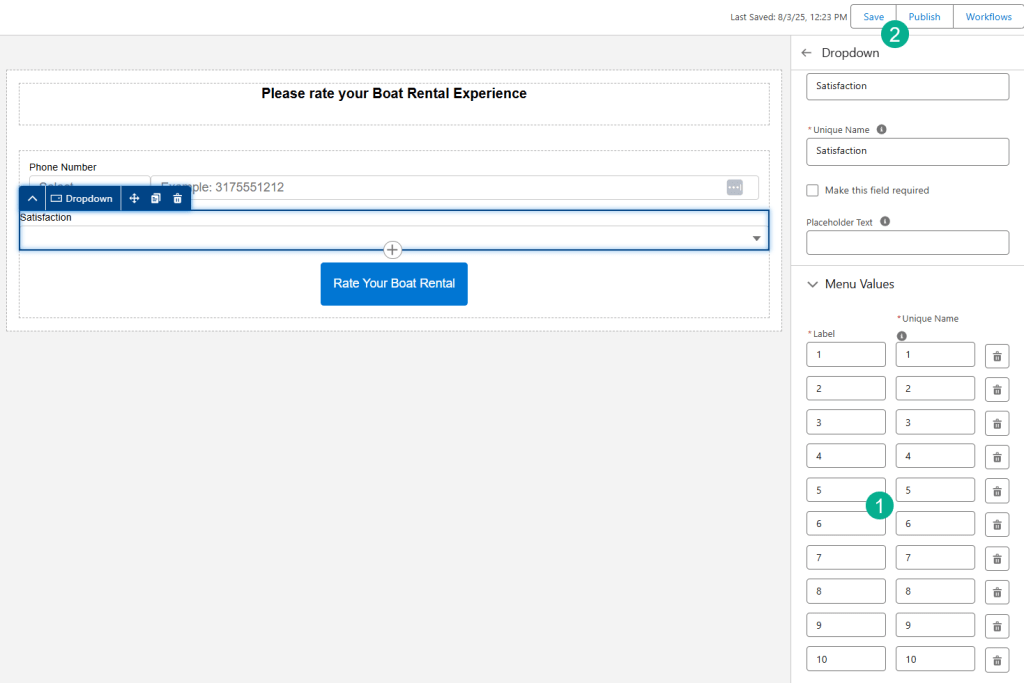
(1) Fill out the values from 1 to 10 for both the Label and the Unique Name.
(2) Click Save.
Step IV: Create/Edit the flow for the form/landing page
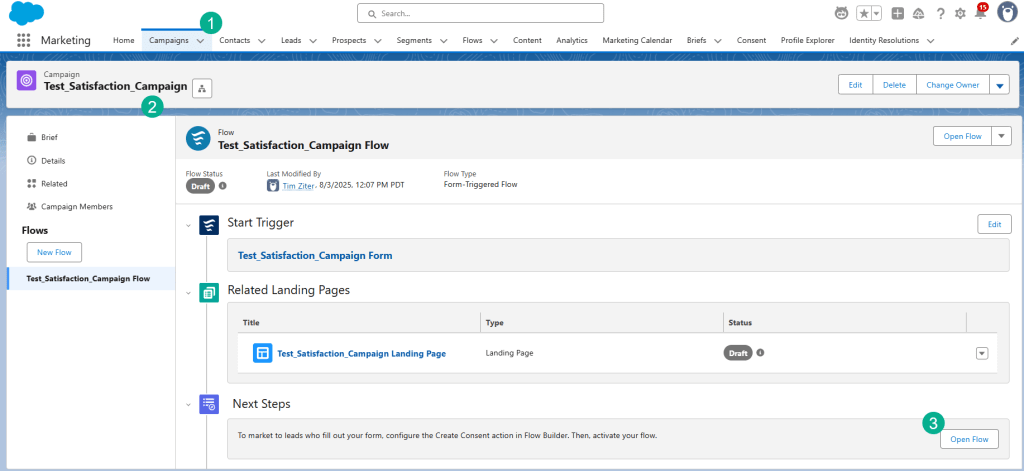
(1) Navigate back to the Marketing App and select the Campaign Tab.
(2) Select the campaign you created above.
(3) Click on the “Open Flow” button.
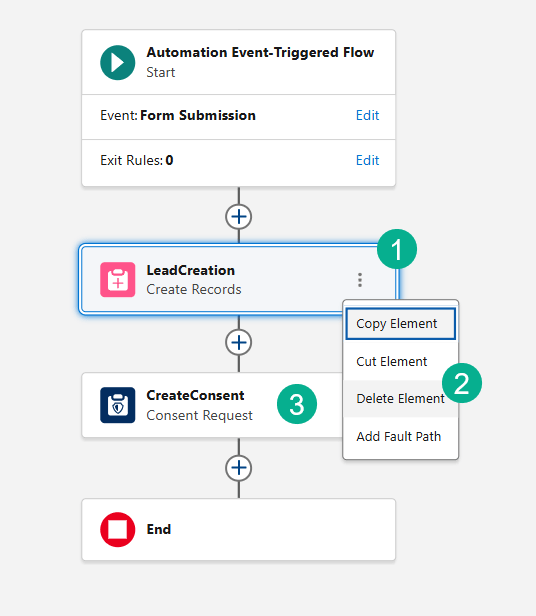
We don’t need the two default activities that come out of the box for this flow.
(1) Select the three dots by the LeadCreation and CreateConsent activities.
(2) Select Delete Element.
(3) Repeat for both activities.
And click Save in the upper right hand corner.
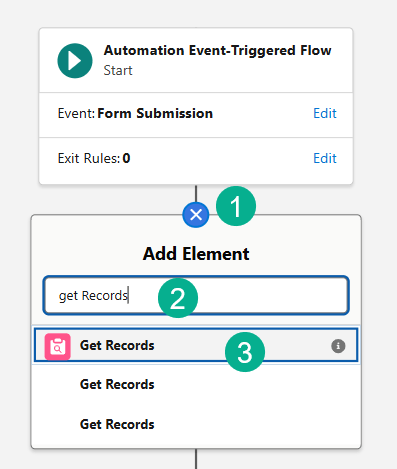
(1) Let’s add a new activity by clicking on the plus sign right below the trigger.
(2) Search for Get Records.
(3) Select Get Records.
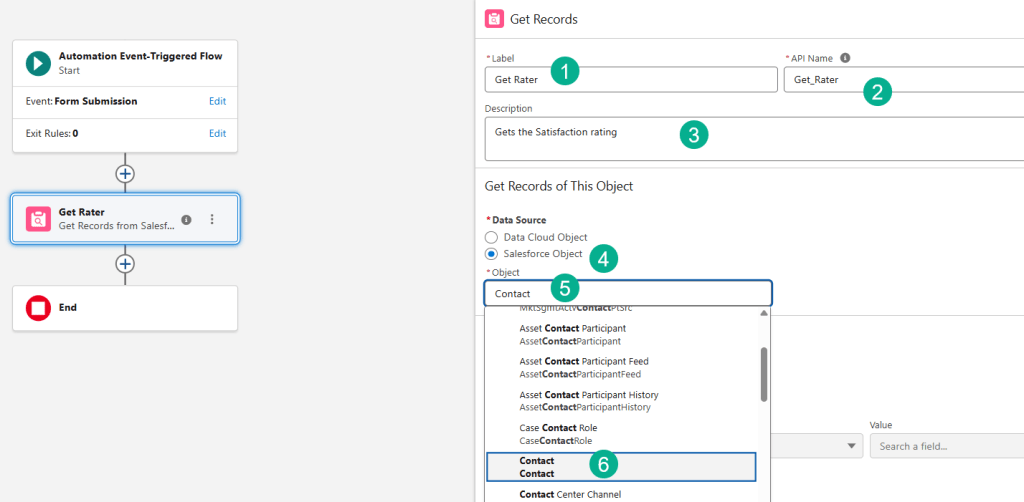
(1) Name the activity Get Rater.
(2) The API Name will automatically populate.
(3) Enter in a description.
(4) Our Data Source will be a Salesforce Object.
(5) Search for the Contact Object.
(6) And Select the Contact Object.
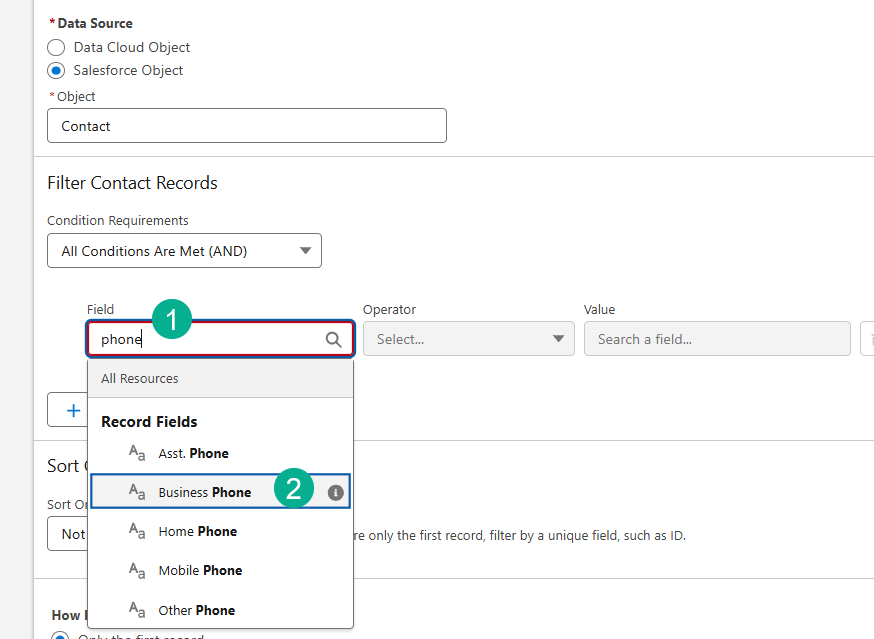
(1) In the field search for Phone.
(2) Select the Business Phone.
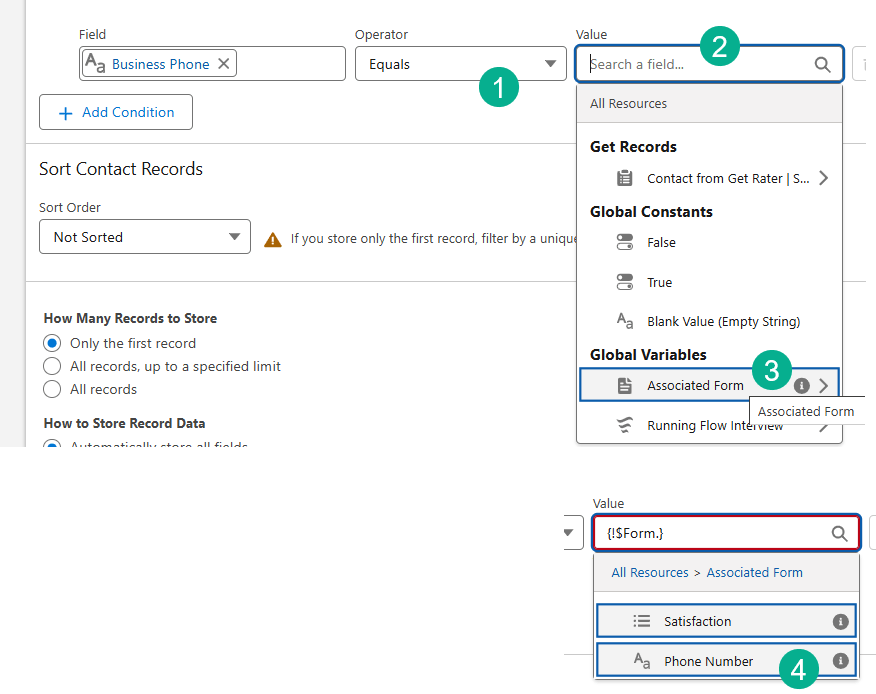
(1) The Operator will naturally default to Equals.
(2) Click on the Value field.
(3) Select the Associated Form.
(4) Select the Phone Number field.
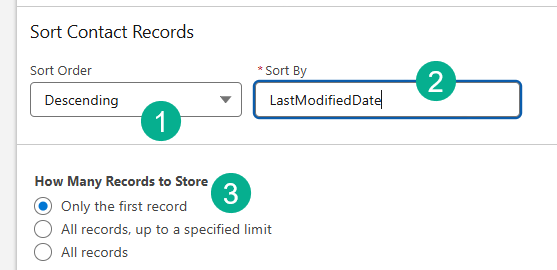
(1) In the Sort Contact Records section select Descending sort order.
(2) And Sort By: LastModifiedDate.
(3) The default value should be “Only the first record.”
Click Save to save your work.
Step V: Update the Satisfaction field on the Contact Record
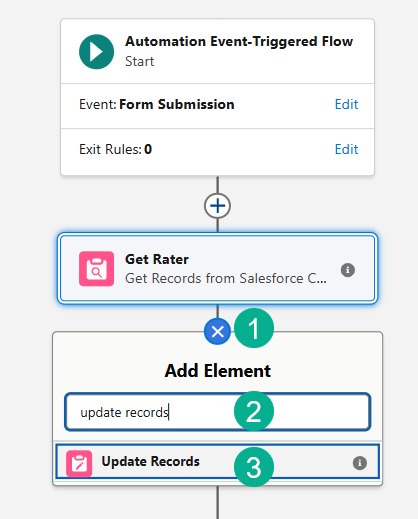
(1) Click on the plus sign after the Get Rater activity.
(2) Search for Update Records.
(3) Select the Update Records activity.
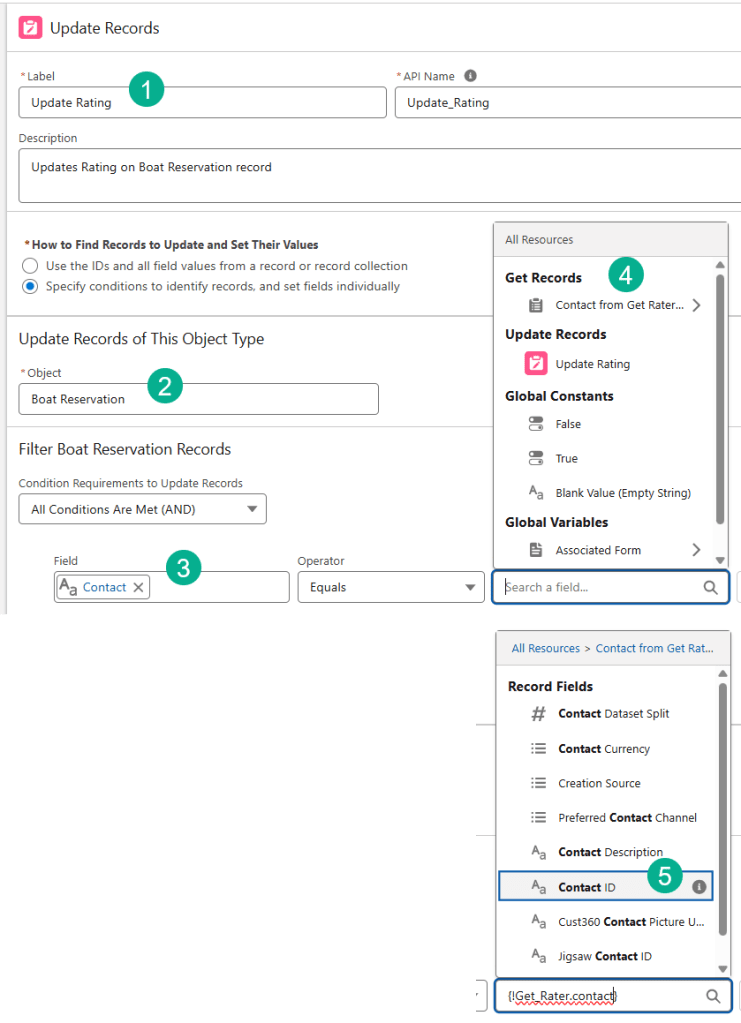
(1) Enter in a name like Update Rating.
(2) Select the Boat Reservation object. For more details on how to create a custom object and fields click here:
(3) Select the contact field.
(4) Select the Contact from the Get Rater activity.
(5) Search for Contact to find the Contact Id.
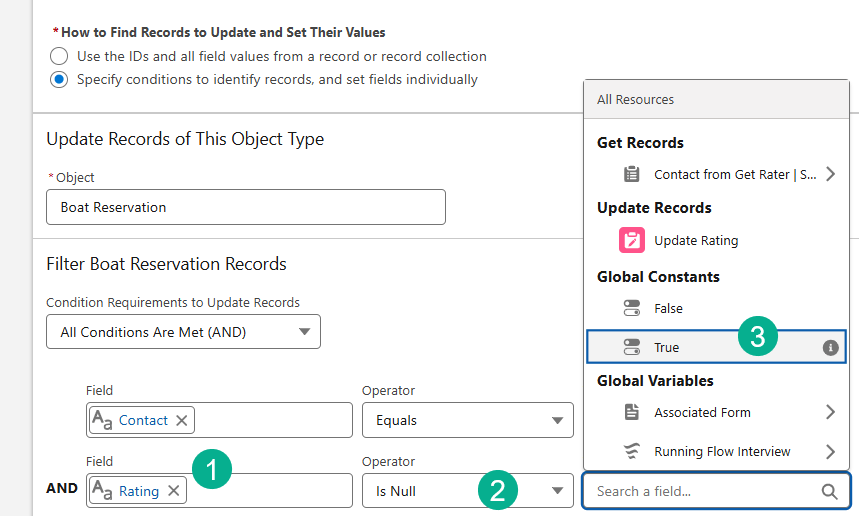
(1) next you want to check if the Rating field is Null.
(1) Select the Rating field on the Boat Reservation object.
(2) Select Is Null.
(3) Select True.
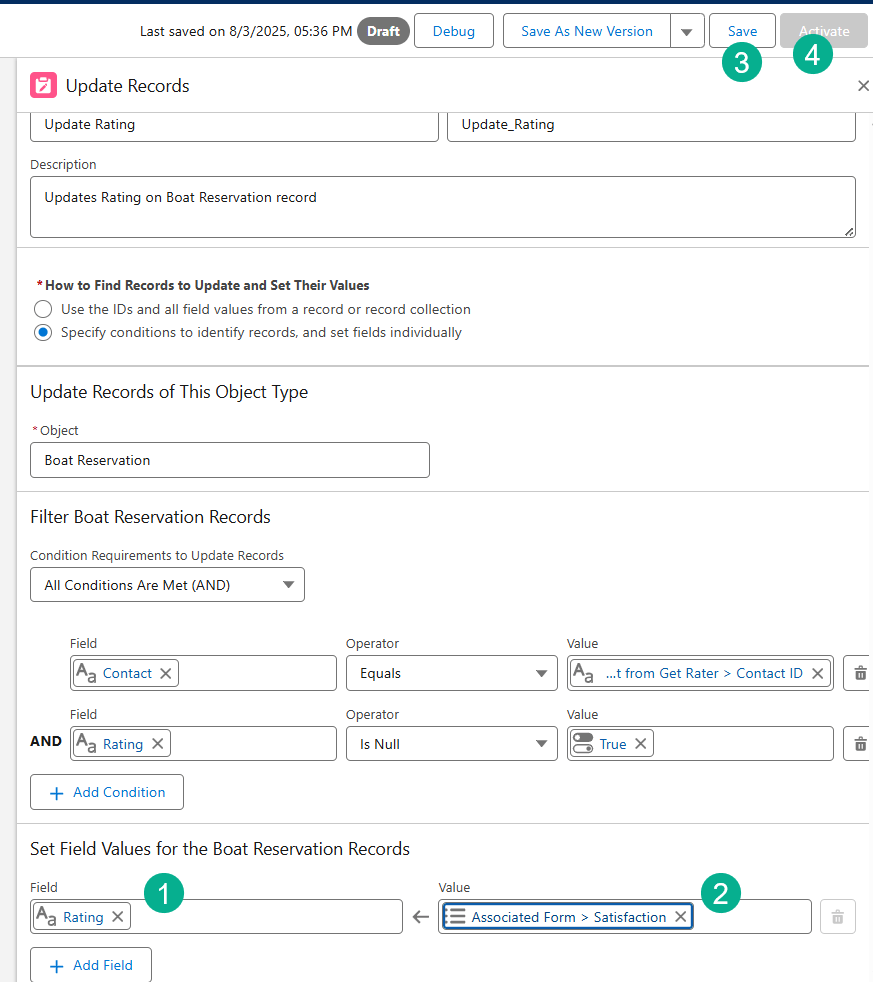
(1) Next you want to Select the field(s) to update. Select the Rating field.
(2) Select the Satisfaction field from the form.
(3) Click Save.
(4) Activate the flow.
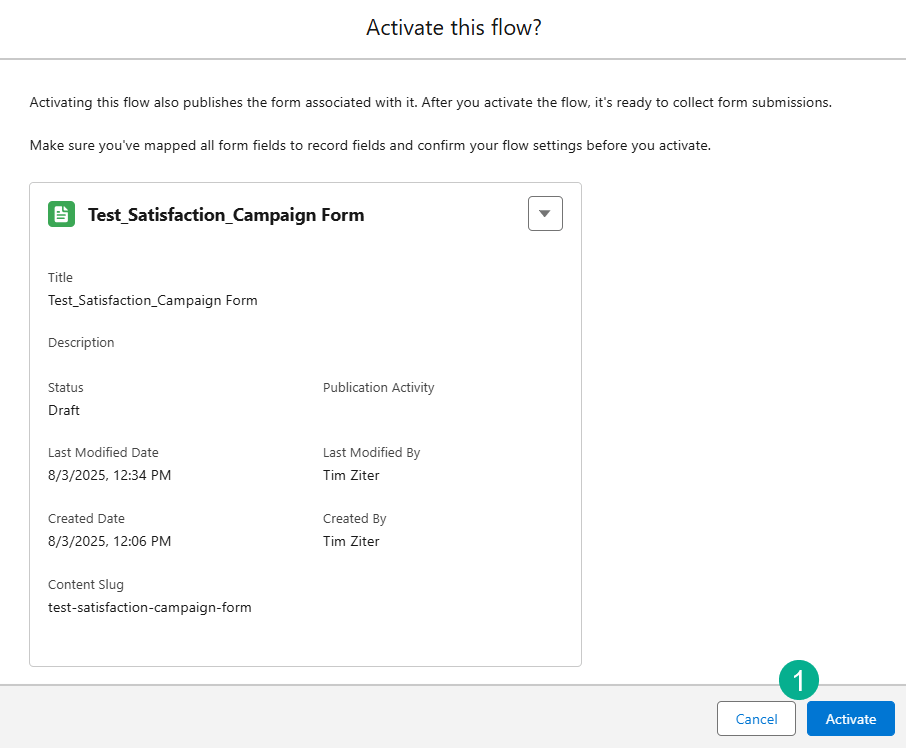
(1) Select Activate when the popup window appears.
Step VI: Publish and test the Landing page
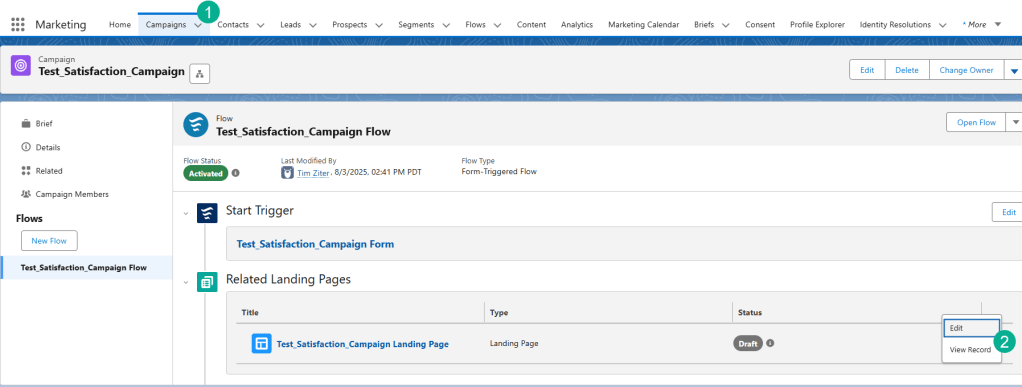
(1) Navigate back to your campaign.
(2) Click the box on the right of the Landing Page and select View Record.
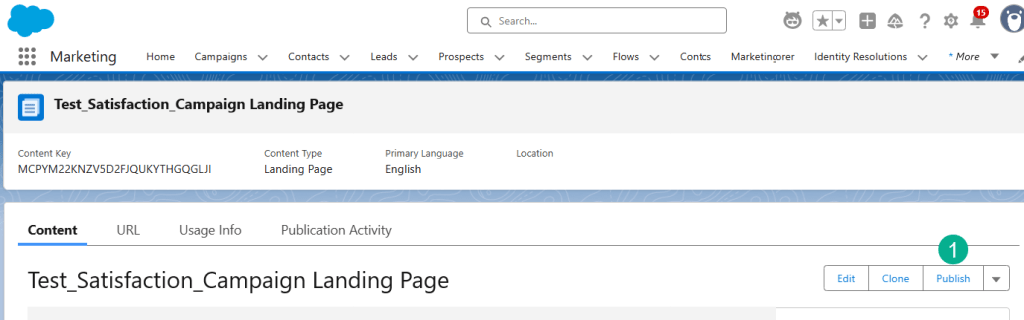
(1) Click Publish.
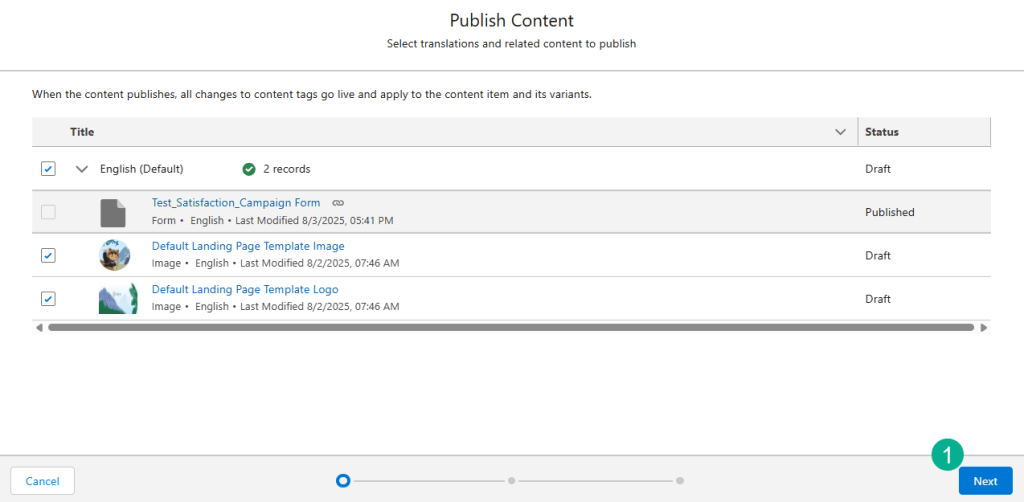
(1) Select Next.
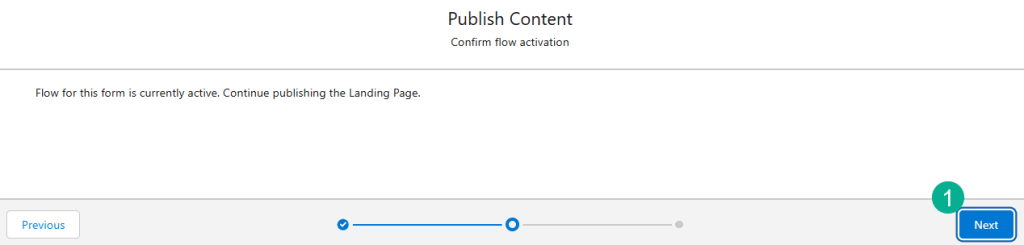
(1) Select Next.
Now let’s test the cloud page to see if it updates the Boat Reservation record. But first let’s take a look at the Boat Reservation object to see the before.
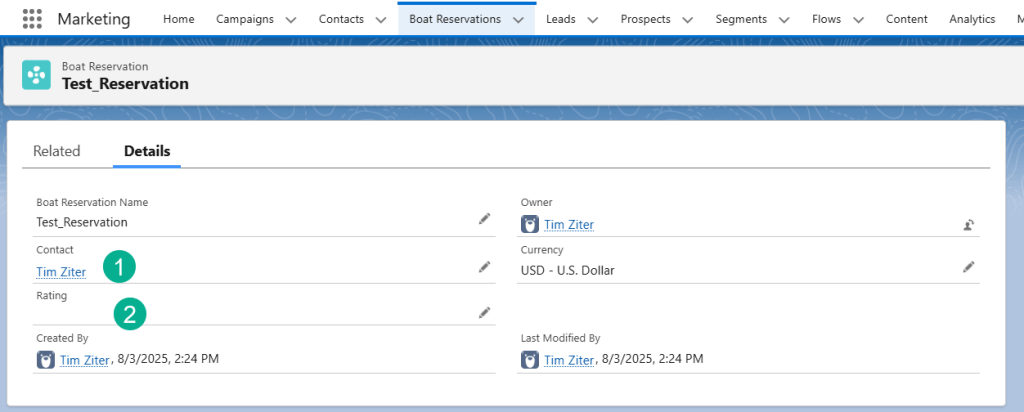
(1) For our test contact.
(2) The Rating field is blank
Now let’s navigate to our form page.
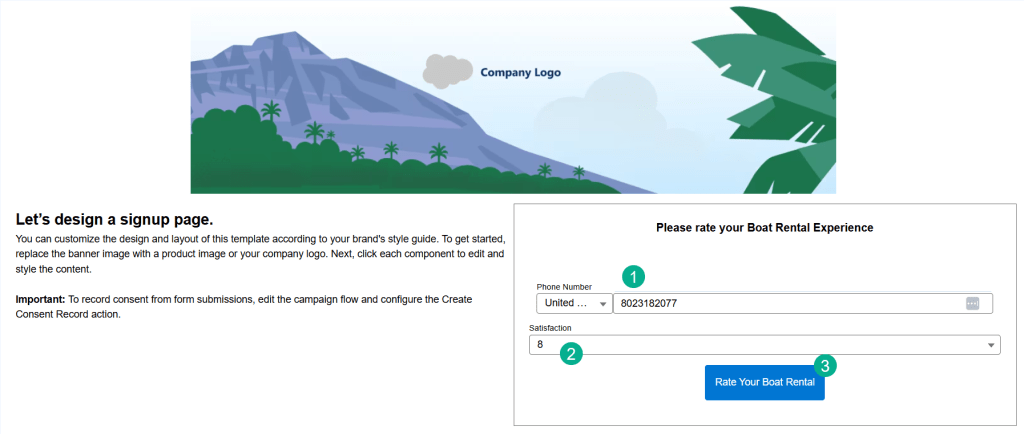
(1) I’m going to enter in the phone number for our test contact.
(2) Select satisfaction rating.
(3) Click Rate Your Boat Rental.
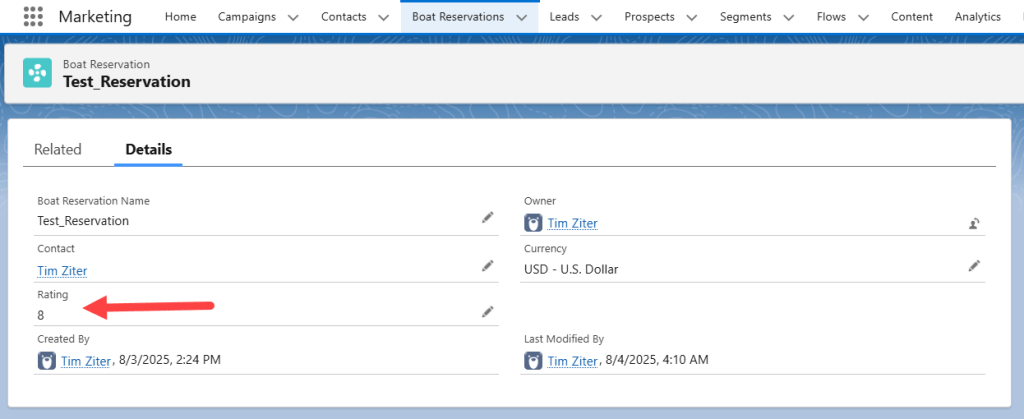
And when we refresh out Boat Rental record we see the rating populated.
Again a big thank you to Francois for the use case. In future blogs we’ll build out different variations of a landing/form page using Marketing Cloud Advanced.
Thanks for reading.
