
Calculated Insights in Data Cloud are a powerful tool to create dynamic segments of your unified data and drive personalized actions in Marketing Cloud. With a few easy steps you can use these segments with Data Actions to fire in a Journey send right in Marketing Cloud.
In our last blog we covered how to create a Segment to populate subscribers in Marketing Cloud. For more information on the segment path please read here:
https://handsonsfmc.com/how-to-create-a-segment-in-data-cloud-and-activate-it-in-marketing-cloud/
Use Case: Mobile Investment Application Launch
Like we detailed in our blog post above Cervello Bank has recently launched a new mobile investment application but the team isn’t seeing expected usage of the app. Digging into the data the team determines there are two bottlenecks in the overall process. We will be addressing bottleneck #2: How to alert those who just deposited funds to motivate them to place that first trade.
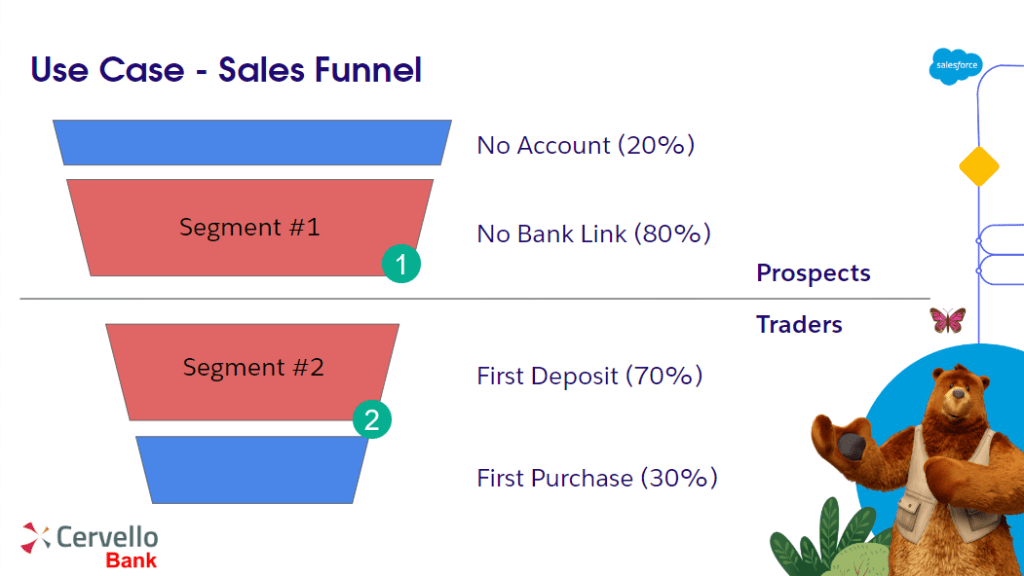
(1) Segment #1: No Bank Link. The first bottleneck are those who’ve signed up but haven’t linked their bank to the Cervello mobile trade account. Of all prospects 80% of subscribers are in this bucket. This was addressed in our Segment blog post.
(2) Segment #2: First Deposit. The next bottleneck are those traders who’ve made a deposit but haven’t committed to make their first trade. Of all trades 70% have yet to make their first trade. What’s more there is a 50% drop off in attrition once a trader makes that first trade.
GOAL: Create a Calculated Insights based Data Action that fires a notice to those newly created “Traders” to make their first Trade.
Data Overview
Before we create our Calculated Insight let’s first walk through what has been set up to prep our data.

(1) We are ingesting data into Data Cloud from four different sources.
(a) Enterprise systems which contains the operational data related to subscribers from Cervello Bank.
(b) The Mobile App data feed which includes any data collected on subscribers who are using the app.
(c) The sales team uses Salesforce Sales Cloud to track leads and contacts as they progress through their stages from sign ups to traders.
(d) Marketing Cloud provides engagement data to help determine intent of individuals at any stage of the process.
(2) Each data source is mapped to connect key identification data points to unify the data.
(3) The individual data from all streams has been unified so it can be leveraged in creating good quality Data Action subscribers.
Step I: Create a Calculated Insight
Part I: Calculated Insight Setup
When creating a Data Action you have two choices, either the Data Model Object or a Calculated Insight. Because our data model is a bit complex, selecting only one DMO won’t due so we’ll need to set up a Calculated Insight.

(1) Select the Calculated Insights tab and
(2) Click New

(1) Select your data space.
(2) Data Cloud offers a wide variety of options and we typically use the Create with SQL as it offers the most flexibility. If you are creating your first Calculated Insight the Create with Builder option is a good choice.
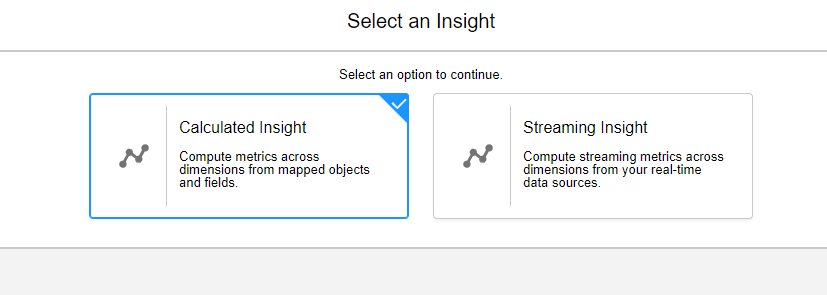
Select Calculated Insight.

Select “Select an Object”
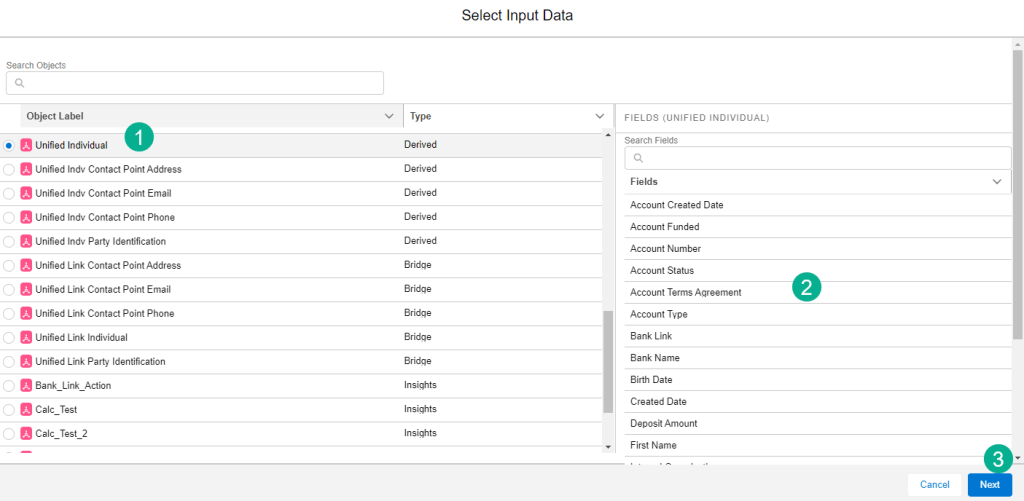
(1) Now it’s time to select the primary object that will be the main database in your query. In our use case we’ll select the Unified Individual.
(2) The fields for that object are displayed on the right.
(3) Click next.
Part II: Add first JOIN to the Unified Link DMO
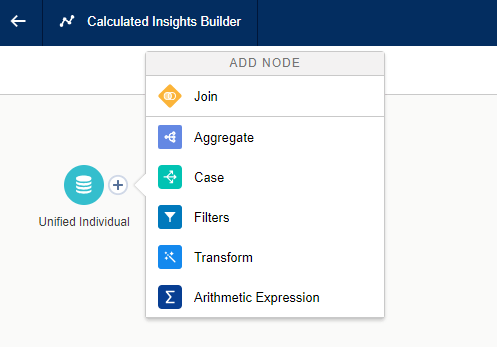
The builder canvas opens up next displaying the Unified Individual DMO along with a plus sign that gives you a window into additional options.
To complete our Calculated insight we’ll need to pull in or JOIN additional DMOs in order to identify the appropriate Subscriberkey, email address and data points for personalization.
To help visualize that relationship we’ve created a schema of the data path to identify all of those data points.

The first DMO we’ll want to join to the Unified Individual is the Unified Link Individual. We are going to select the JOIN icon and:
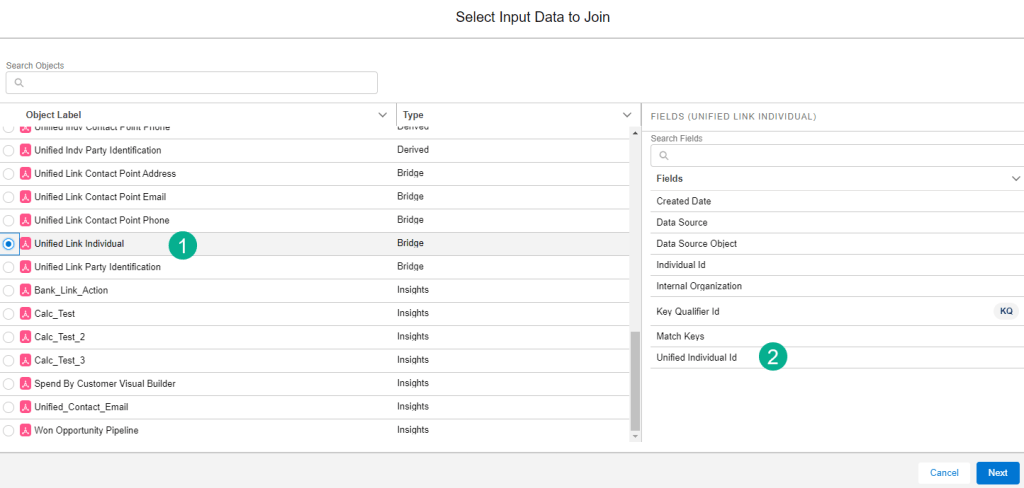
(1) Search for the Unified Link Individual.
(2) Verify that the Unified Individual Id is available on the object as it will be the link.

(1) The new DMO appears on the canvas.
(2) For our use case we’ll want to select Right Join for all of these objects as we only want individuals who are connected through the three dependent DMO objects.
(3) Link the ids between DMOs based on the schema.
(4) Hit apply and save the draft.
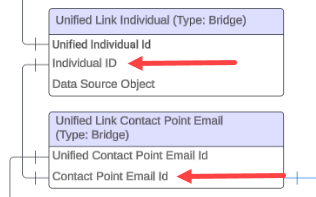
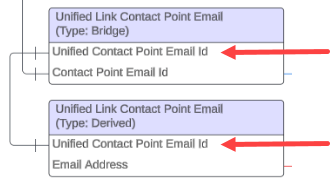
Part III: Add Second JOIN to the Unified Link Contact Point Email (Bridge)
Next up we’ll JOIN the Unified Link Contact Point Email (Type: Bridge), for our ON statement it’ll be the Individual ID from the Unified Link tied to the Contact Point Email ID.
Follow the steps above to add another JOIN to the canvas:
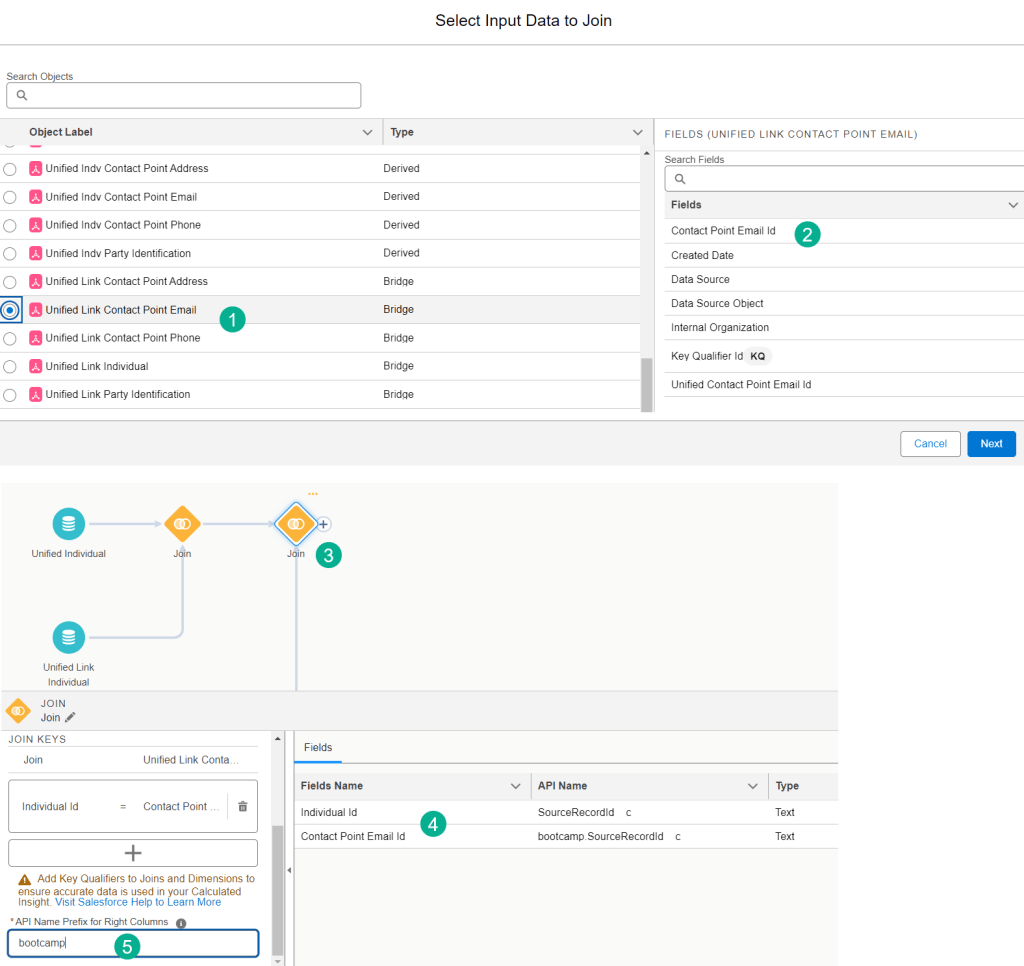
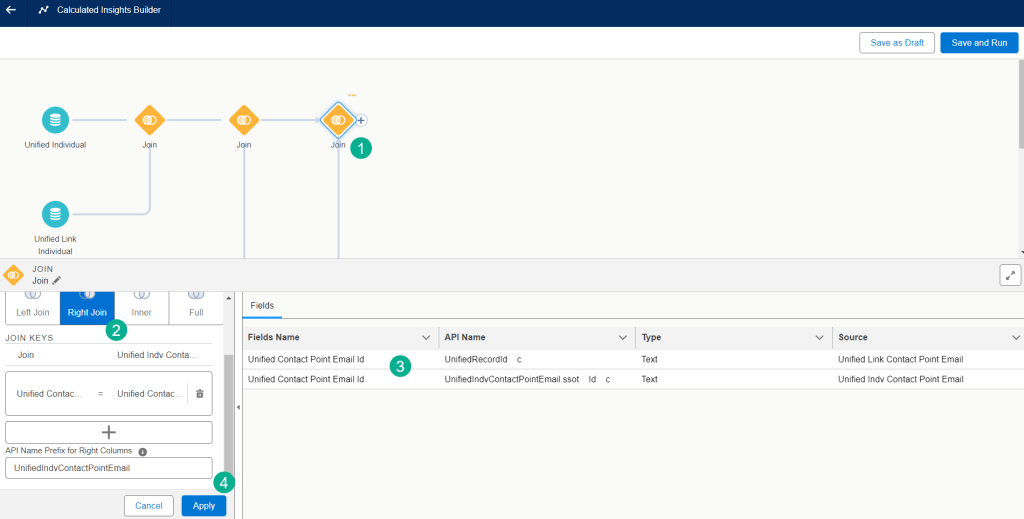
(1) Select the appropriate DMO – Unified Link Contact Point Email.
(2) Validate that the Contact Point Email ID is available on the DMO.
(3) The new JOIN activity on the canvas.
(4) In the data relationship set the two fields based on the schema.
(5) Given both of these fields have the same API name you’ll need to add a prefix for the right hand value.
Click apply and that adds your second JOIN.
Since this is a long and complicated Calculated Insight we recommend Save as Draft to save your work as you progress through the build.
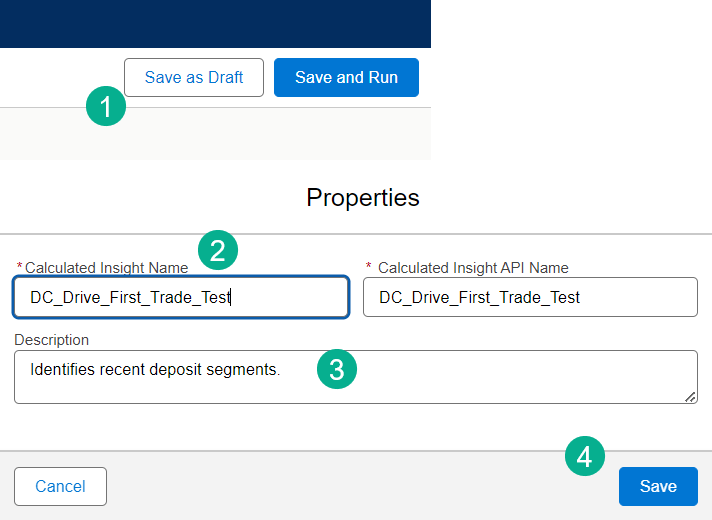
(1) In the upper right hand corner of the canvas select “Save as Draft”.
(2) Enter in a name for the Calculated Insight. Make sure it matches your Data Action Target if possible.
(3) Enter in a description.
(4) and Save. You’ll have to edit the Calculated Insight to get back to the canvas but it’s worth it as the canvas can time out and you might lose your settings.
Part IV: Add Third JOIN to the Unified Link Contact Point Email (Derived)
For the last JOIN we’ll want to bring in the Unified Link Contact Point Email (Type: Derived), for our ON statement it’ll be the Unified Contact Point Email ID.
(1) Add another JOIN and navigate to the Unified Link Contact Point Email (Type: Derived) DMO.
(2) Don’t forget to use the Right Join unless the DMO is linked to the first DMO. The linkage (or ON) will automatically be populate if the same field is in both DMOs.
(3) Validate the selection of the two fields.
(4) Click apply and that finish up the JOIN selection, now you want to move to the Aggregate activity to assign the attributes to be fed into the Journey.
Part V: Add the Aggregate Activity to add Attributes to the Calculated Insight canvas
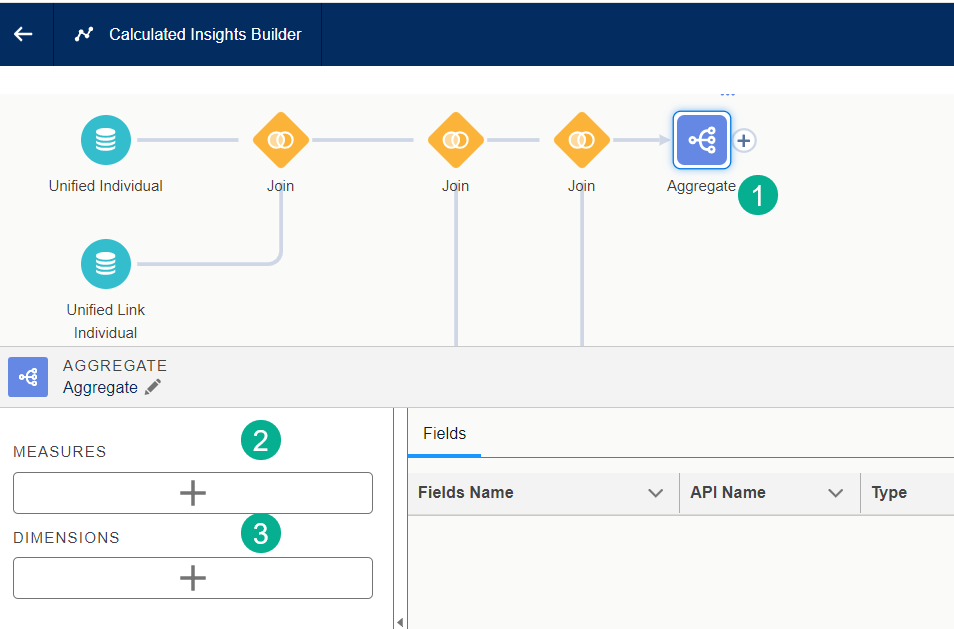
(1) Add the Aggregate activity to the canvas.
(2) Select Measures which is a requirement and can help SUM up the number of deposits.
(3) Select Dimensions to add attributes which will be data points in your journey data extension.
Let’s walkthrough how to add a Measure:
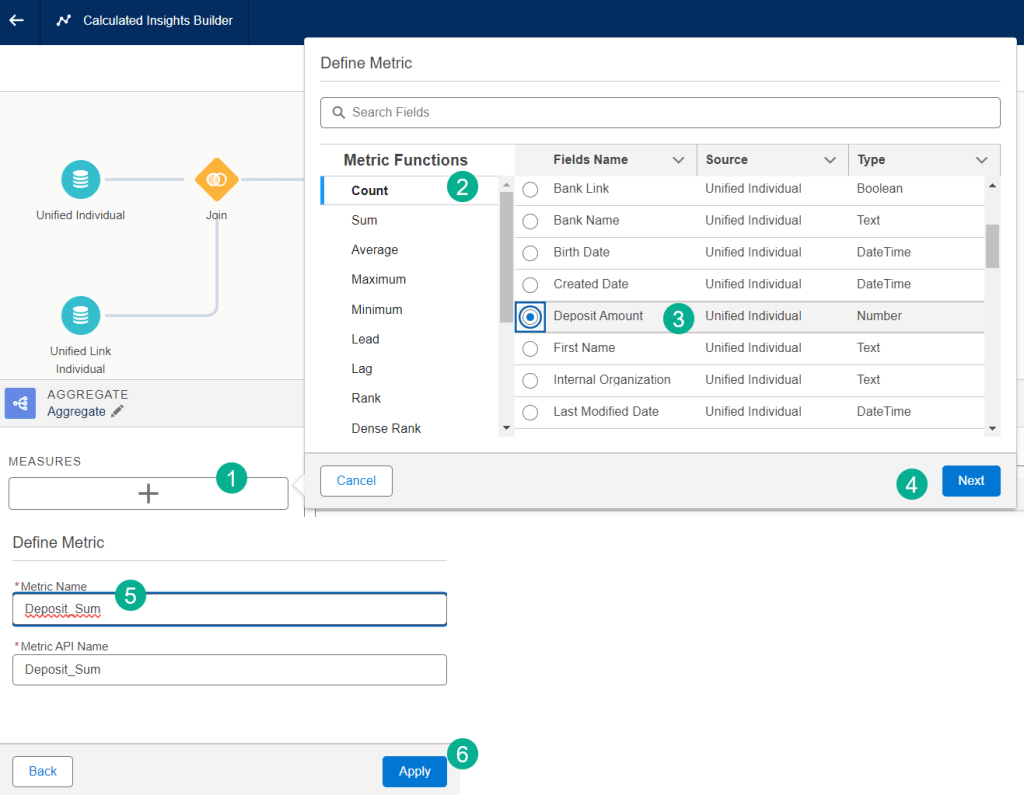
(1) Click on the add Measure button.
(2) We’ll select Count as we are looking to populate the count of the deposit amount field.
(3) Select the Deposit Amount field.
(4) Click Next.
(5) Enter in a name that will be part of the payload to the Journey data extension
Data cloud Tip #1: Use underscores instead of spaces when naming measures or dimensions as it will be easier in Marketing Cloud to have a data extension value without spaces.
(6) Click Apply.
Adding Dimensions is very similar in the UI. Be mindful of the fields you are selecting for your data extension values especially the subscriberkey.
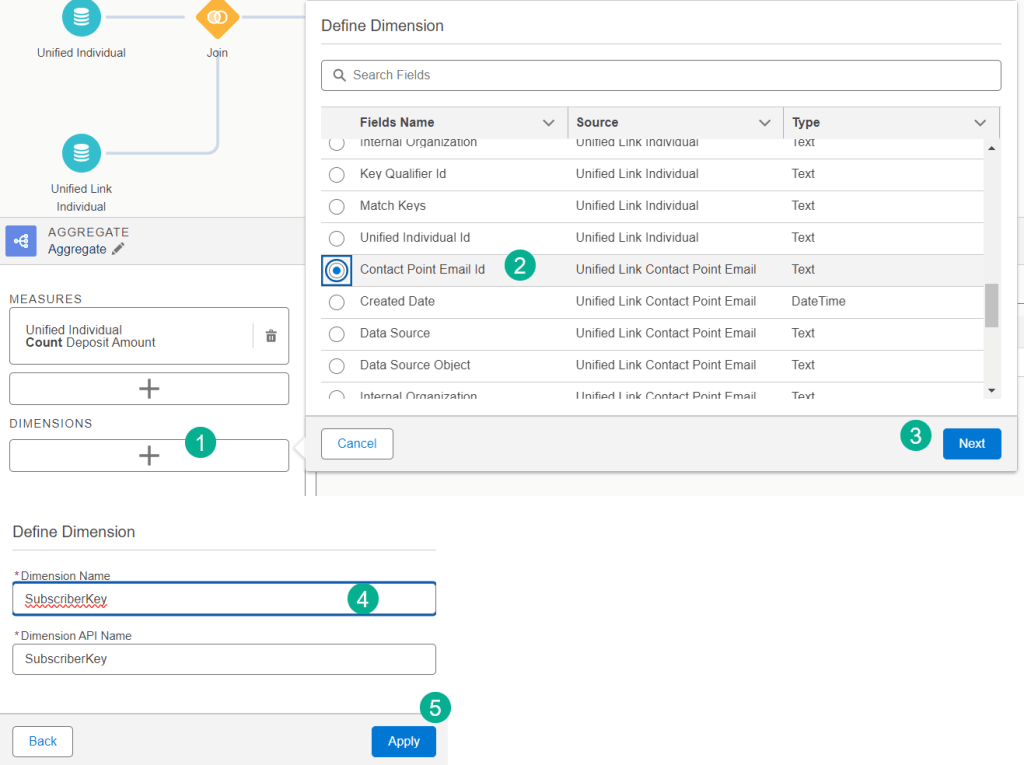
(1) Click on the Dimensions box.
(2) Select the first dimension which will be the subscriberkey based on the schema.
(3) Click Next.
(4) Enter a name that will be populated in your data extension in Marketing Cloud. Remember to avoid using spaces.
(5) Click apply.
Follow these same steps for all other dimensions needed to personalize your communication.
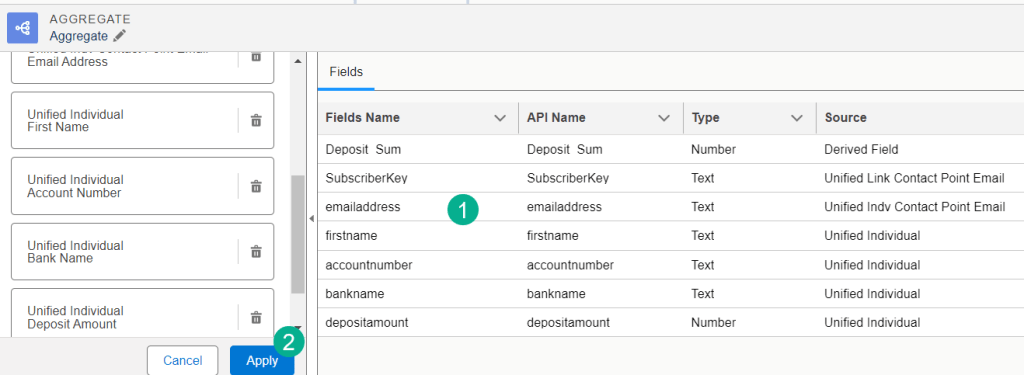
(1) Here’s the list of fields or dimensions we need for our communication.
(2) Click Apply once finished.
Part VI: Add the Filter Activity to the Calculated Insight canvas
The filter activity is optional but can be very useful to help refine your segment.

(1) Add the filter activity to the canvas.
(2) Once added following the steps below the selection will appear here.
(3) Add a condition and select the filter field.
(4) Define the filter, in this case we want only those segments who’s deposit amount is greater than 0.
(5) Select 0.
(6) Click apply.
Congratulations you’ve just completed setting up a Calculated Insight. Now you need to enable the Insight so that you can align the data with your Journey.
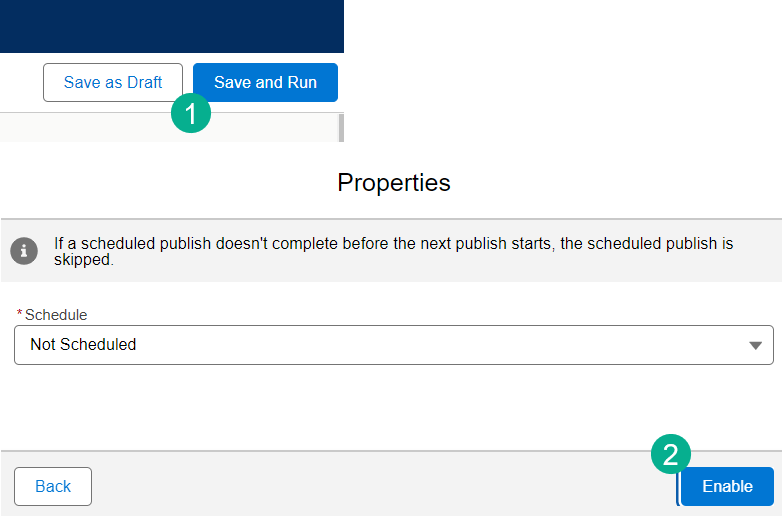
(1) In the top right click “Save and Run”.
(2) Click “Enable”.
Data cloud Tip #2: Do not schedule your Calculated Insight at this time. There are few more steps to complete.
Step II: Align Journey Data Extension with Calculated Insight Dimensions
In order for you to complete the Data Action creation successfully the fields in your journey data extension need to match the data points in your Calculated Insight.

(1) Navigate back into the Calculated Insight.
(2) Click on the Output tab.
(3) Each data extension field will begin with the Calculated Insight Object API Name.
(4) And then you’ll add the Field API Name to the end of each field.
Data cloud Tip #3: Use a notepad to create all of your data extension field names to facilitate the naming of each field in the data extension.
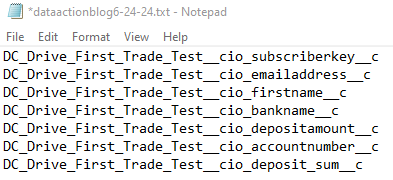
(5) Notice the data type for each dimension which will be helpful when adding to the data extension.
Now take all of those values and paste them into your Journey Data Extension.

(1) Paste in the full name from your notepad in each field name.
(2) Most fields were text except for the EmailAddress which should be the EmailAddress data type.
(3) And if you want to make calculations of the number values set them to Number.
(4) Be mindful of which fields will always be populated. If you aren’t sure best practices is to keep the nullable.
(5) Also consider if you need a primary key like possibly the Subscriberkey.
Step III: Publish the Calculated Insight
Once you’ve set up your Data Action which will be covered in the next blog you’ll want to schedule or publish the Calculated Insight. Feel free to publish right away if your Calculated Insight isn’t tied to a Data Action.
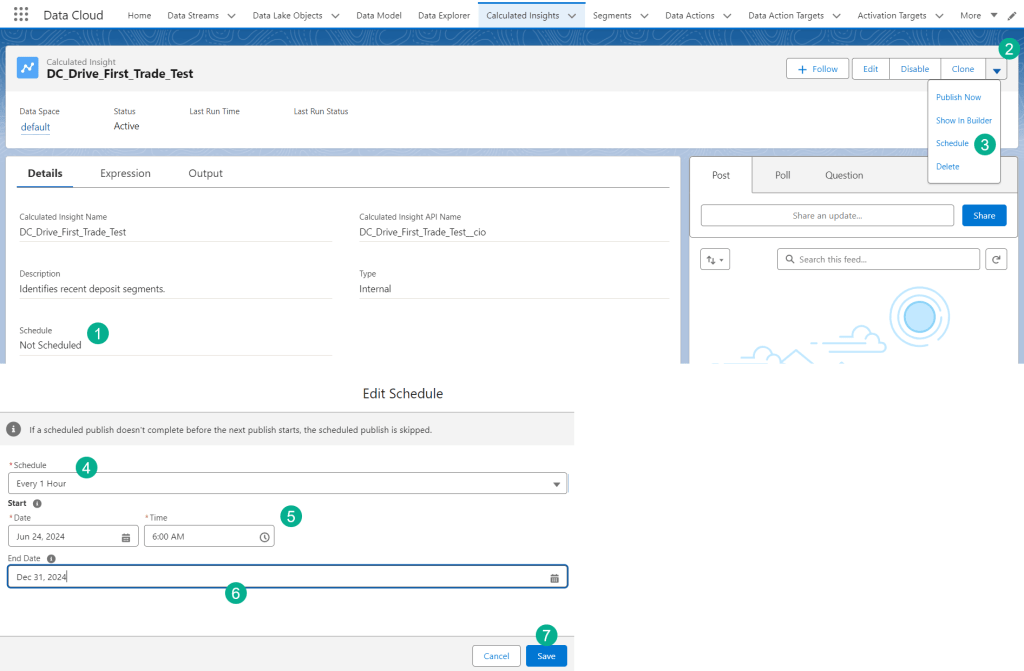
(1) In your Calculated Insight that was just created.
(2) Click on the arrow box.
(3) Click Schedule.
(4) Select schedule, we prefer hourly but it depends on your data use case.
(5) Select date and time.
(6) And End date.
(7) Click Save.
Step IV: Validate the data in Data Explorer
Once your Calculated Insight has been published you’ll be able to verify the data fields to validate the setup was correct.

(1) Click on the Data Explorer tab.
(2) Select the data space.
(3) Select Calculated Insights.
(4) Select the Calculated Insight just created.
(5) Validate all the fields that were populated. In this case our most important field to validate is our subscriberkey as our data model in Marketing Cloud uses either the contact or lead id.
In our next blog we’ll cover creating a Data Action, Data Action Target and firing these amazing Calculated Insight segments into custom journeys in Marketing Cloud.

Leave a comment