The decision split is a powerful activity in Journey Builder as it creates the custom paths to send subscribers based on their characteristics. In this blog today we’ll break down the basics of how to configure the decision split activity and provide two different variations of configuration from simple to complex.
Decision Split Setup #1: Allow only Test Records
We’ll use this first set up as the use case to show the basic configuration of a decision split.
Use Case: At the beginning of the Journey we want to add a decision split that only allows emails with our company domain to go down the journey path. All others should be diverted to a path that ends their journey experience.
Let’s take a look at how to add a Decision Split to a journey canvas:
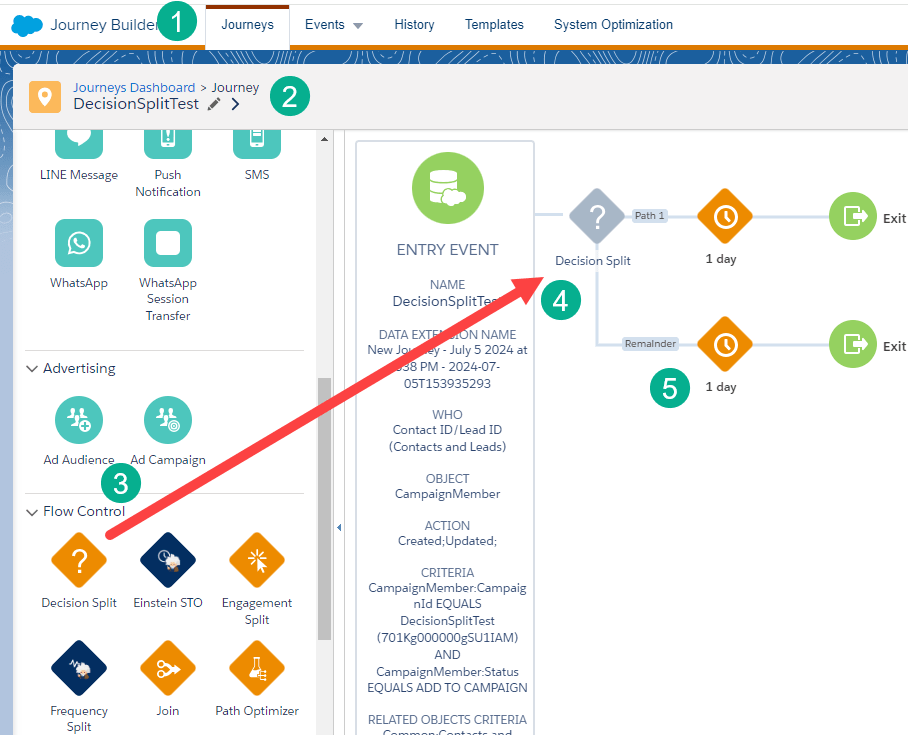
(1) Start in Journey Builder.
(2) Create/edit an existing Journey.
(3) Under the Flow Control section drag over the Decision Split activity.
(4) And drop it anywhere on the canvas, for our use case the Decision Split will be the first activity.
(5) Notice as soon as you add a Decision Split a second path gets created on the canvas.
Clicking into the activity you can name the different paths:
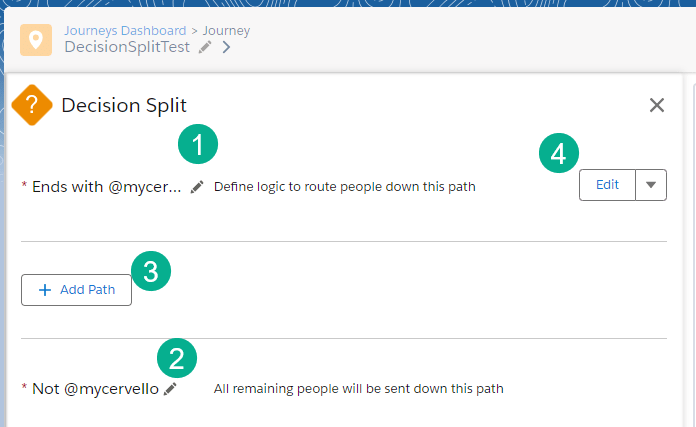
(1) In the top path, clicking on the pencil icon allows us to edit the path name to “Ends with @mycervello.com”. So that we can safely test our journey we are only going to allow records to enter the main path if their email address ends with @mycervello.com.
(2) We’ll name the alternate path “Not @mycervello.com”.
(3) You can add as many paths as you want, we’ll add additional paths in Setups below.
(4) Once you’ve named the primary path click edit.
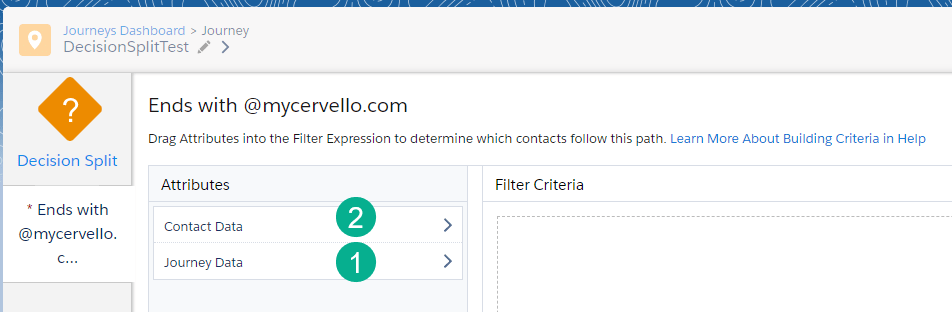
(1) Clicking Edit will bring you to a screen where you can choose whether the data comes from the Journey Data or Journey Data Extension or from Contact Data which will come from attributes in Contact Builder. We’ll select Journey Data for this use case.
(2) We’ll be walking through the Contact Data path in Setups below.
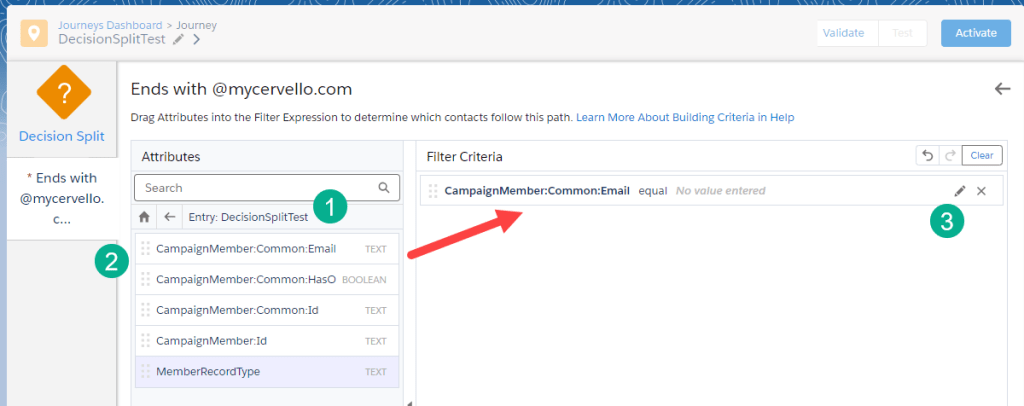
(1) Clicking through the Journey Data path you’ll see the name of the Data Extension which will list all of the available fields.
(2) Select the field in the data extension, in our case we want the CampaignMember:Common:Email and drag the field to the Filter Criteria canvas.
(3) Click on the pencil to edit the settings.
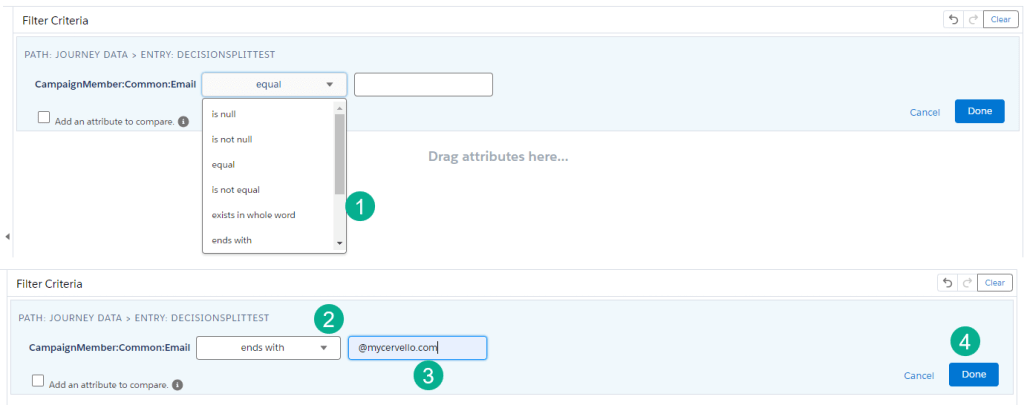
(1) When editing the field the drop down offers a wide variety of options.
(2) For this use case we’ll select “ends with”.
(3) We’ll enter in the @mycervello.com.
(4) And click Done.
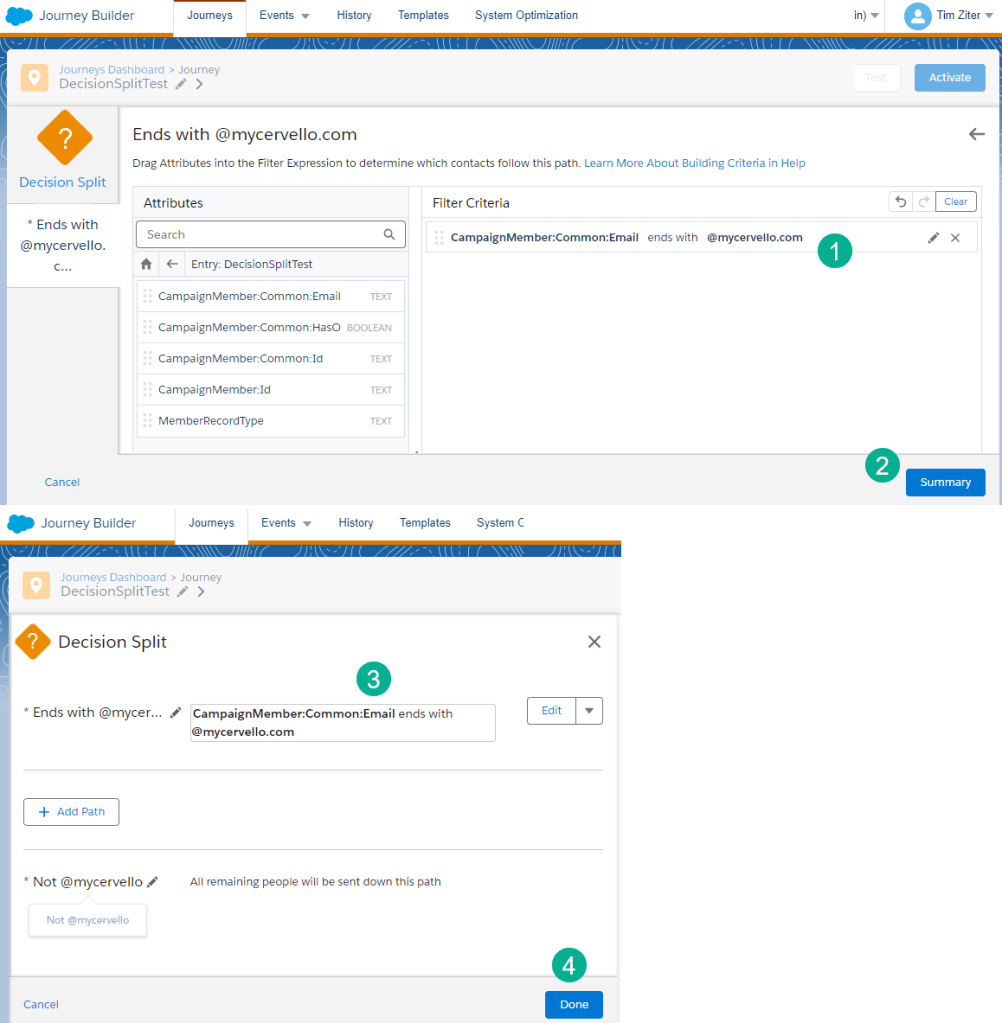
(1) Add additional filter criteria and validate the criteria just added.
(2) Select Summary.
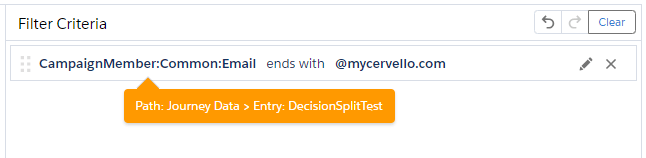
(3) This will take you back to the main configuration where you will be able to see the filter criteria.
(4) And click Done.
Decision Split Tip #1: Hover to see the Journey Path to get a view of the path for the field simply over over the field in the configuration. The path to the field in the decision split can be very complex including multiple objects especially on the Contact Data side. Hovering is a quick way to validate you’ve selected the right path.
A couple of notes before we activate and test Setup #1.
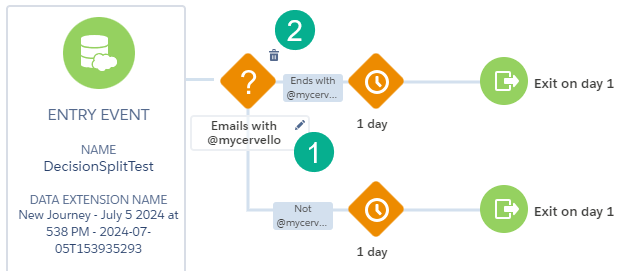
(1) Edit and name the Decision Split by clicking on the pencil. In a complicated Journey this will help you understand the functionality at a glance.
(2) To delete the Decision Split hover over the activity and click on the trash button.
Decision Split Tip #2: Be careful when deleting a Decision Split as it will delete all activities to the right. To solve this issue you can either move all the activities to the left of the Decision Split or move the Decision Split to the right or the end of the path.
Testing Setup #1: Activate the Journey
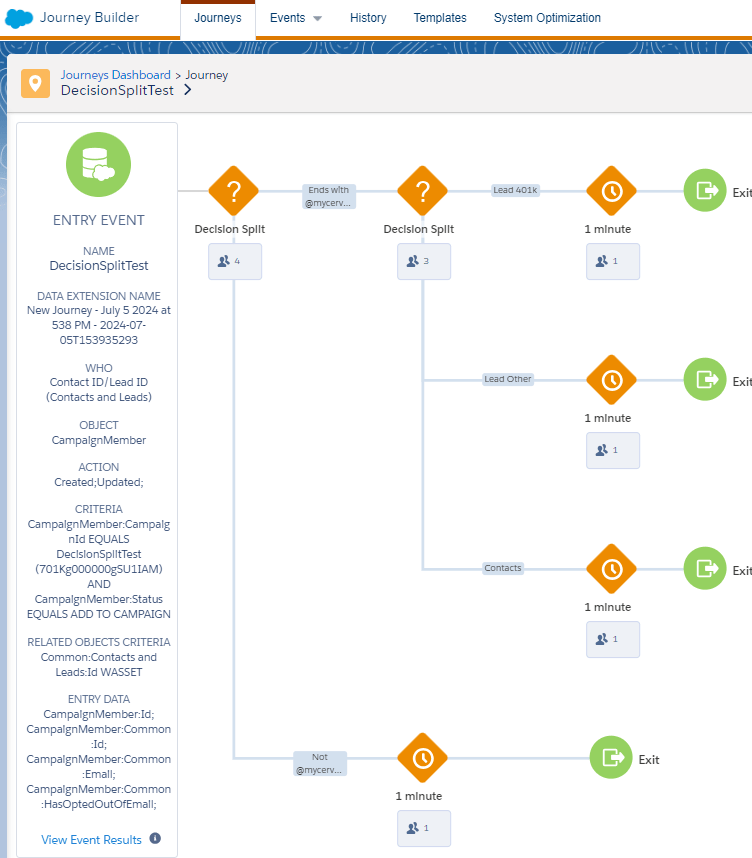
First off you’ll want to activate your journey. Let’s walk through the entry event we’ve chosen for this test journey.
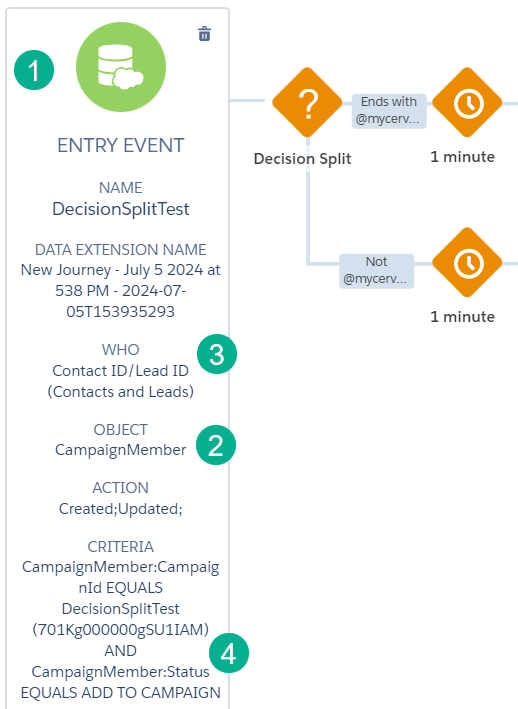
(1) Our Entry Event is a Salesforce Data Entry Event.
(2) We are connecting this to a Salesforce Campaign so our subscriber will be the Campaign Member.
(3) We are allowing for both Contacts and Leads to be entered.
(4) The contacts/leads must come from the DecisionSplitTest campaign we’ve set up with a status of : ADD TO CAMPAIGN.
For more on how to set up a Salesforce Data Extension entry event please check out our blog here: https://handsonsfmc.com/how-to-create-a-salesforce-data-entry-event/
Testing Step #2: Create Test Records
In Sales Cloud let’s create a lead and a contact to test our our Decision Split.
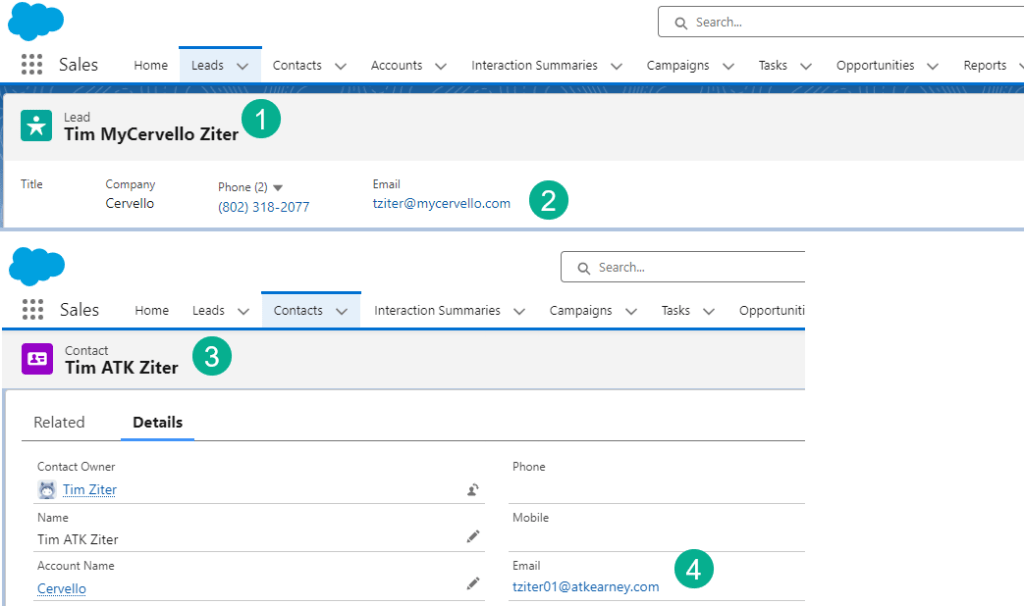
(1) First we’ll create a new lead,
(2) using a @mycervello.com email address.
(3) Second we’ll create a new contact,
(4) Using a non @mycervello.com email address.
Testing Step #3: Add the Lead and Contact to the campaign
All that’s left to do is add the lead and contact to our campaign that’s tied to the Journey.
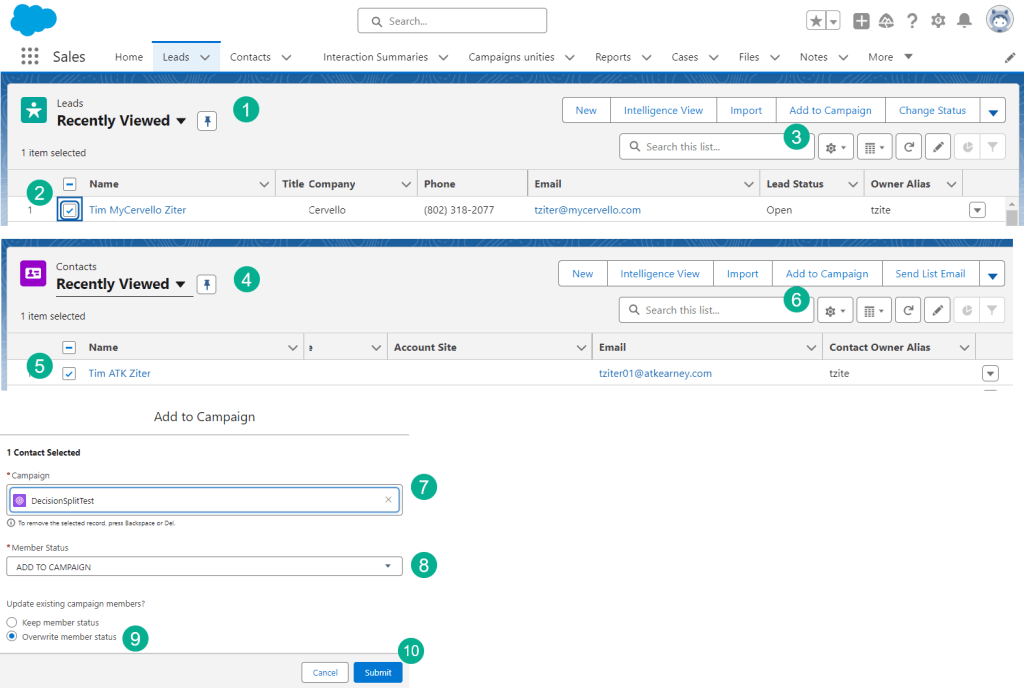
(1) In your Lead list view.
(2) Select the box to the left of the newly created lead.
(3) Select Add to Campaign.
(4) Same for the Contact, click on the list view.
(5) Click on the box to select the Contact.
(6) Click Add to Campaign.
(7) Select the campaign, in our case: DecisionSplitTest
(8) Select the status of Add to Campaign.
(9) It’s best practice to select Overwrite member status.
(10) Click Submit and you are done!
Testing Step #4: Validate your results
Let’s verify we configured our Decision Split correctly.
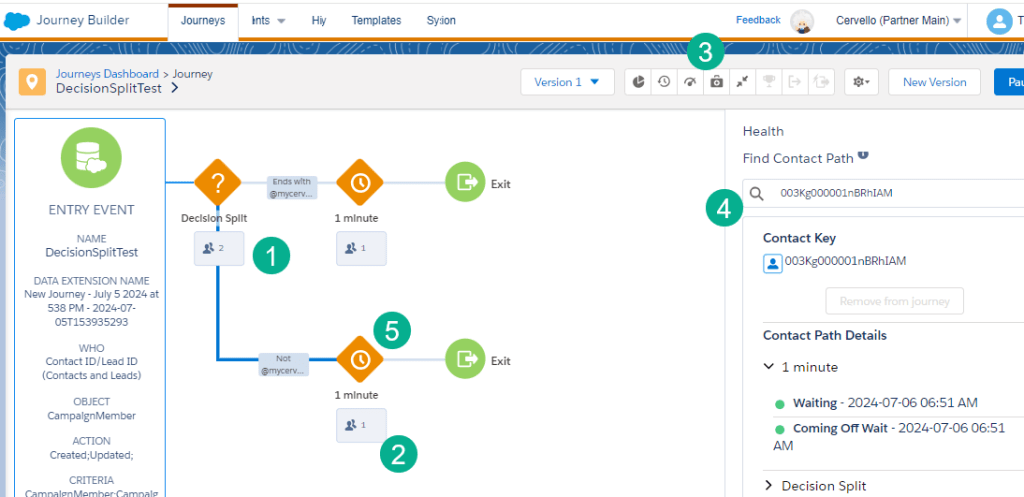
(1) We see both records entered the Journey.
(2) And we can see a record went down the Not @mycervello path.
(3) To validate which record went down that path click on the Health icon.
(4) Paste in the Contact ID from Sales Cloud for the record that had the @atkearney email address.
(5) A blue line will appear on the canvas showing the path of that record.
Decision Split Setup #2: Look up fields on the Contact Model
For our second use case we want to do some advanced filtering to first identify Contacts vs Leads and we want those leads that are interested in our 401k offering to go down a separate path.
Step #1: Break out Leads to a separate path
Let’s add a second Decision Split to our canvas and start the configuration.
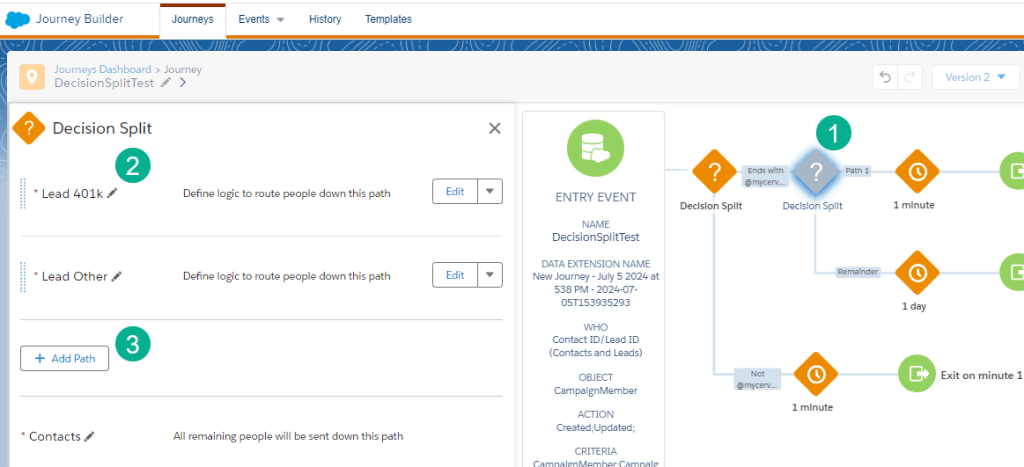
(1) Add a new Decision Split on the @mycervello path.
(2) Our main path will be Leads with the 401k product selected.
(3) In this setup we’ve selected the “Add Path” button to create a third path.
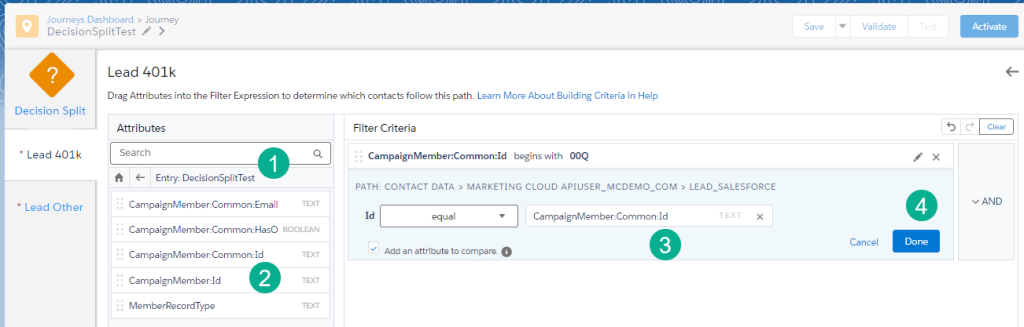
Clicking edit into the Lead path first we want to send only leads down this path. We know from our data set that Lead records from Sales Cloud always start with a 00Q vs a Contact starts with 003. So first we’ll select the Journey Data field that has that ID.
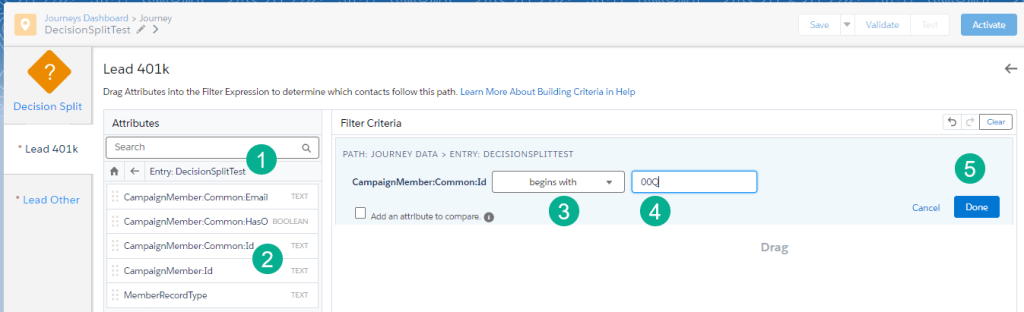
(1) We’ll select Journey Data and navigate to the Journey Data Extension.
(2) We’ll drag over to the filter canvas the Common:ID field. To verify this is the correct field, review the data in the Journey Data Extension:

(A) Navigate to the data extension for your Journey.
Journey Tip #1: Always name your journey before your save!
As you can see from the name of this journey above, I accidentally hit save before naming the Journey to DecisionSplitTest. Remember to name your journey first before anything else to avoid the “New Journey” default naming convention.
(B) Scrolling through the data fields, you’ll see the Common:ID field has the contact or lead Id.
(3) Select “begins with”.
(4) Enter in “00Q”.
(5) Click Done.
Step #2: Break out leads with 401k Products to a separate path
To add our second filter we’ll need to navigate to the Contact Data path:
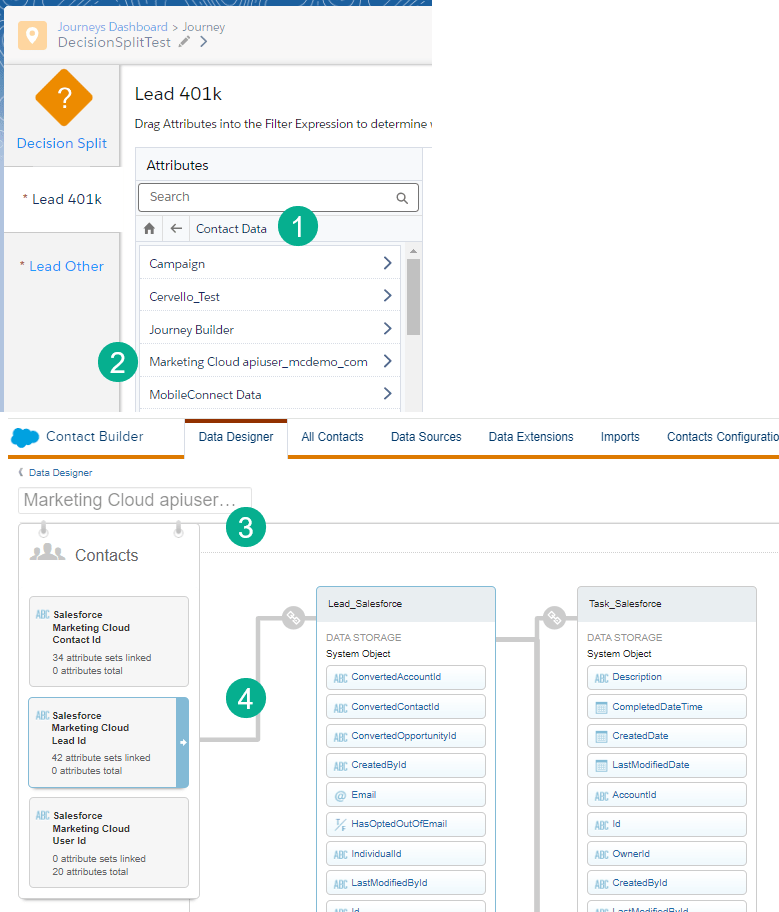
(1) Under the Contact Data path.
(2) Select the custom attribute that is automatically created if you have the Marketing Cloud Connector and have synched down synched data extensions.
For more on setting up the Marketing Cloud Connector click here: https://handsonsfmc.com/how-to-setup-marketing-cloud-connect/
For more on setting up a synchronized data extension click here: https://handsonsfmc.com/how-to-create-a-synchronized-data-extension-in-marketing-cloud/
(3) For reference in Contact Builder/Data Designer here is the default attribute that’s created.
(4) You can see the association of a lead ID and the different data extensions the ID can link towards. In this use case we’ll be looking to pull in real time data from the Lead_Salesforce data extension.
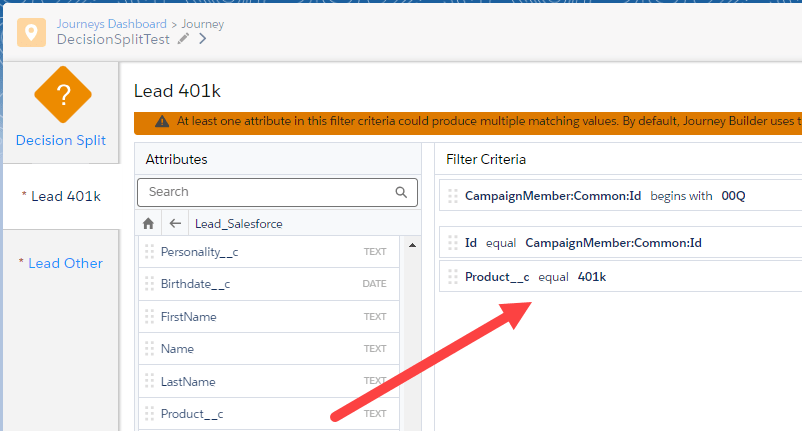
Before we select the product field on the lead we first want to make a 1:1 relationship with the records in the Lead_Saleforce synchronized data extension. This isn’t required for this use case as there will be a 1:1 match of the lead in the journey with the lead in the synched data extension, but it’s best practice to follow these steps when there can be a 1:many relationship. We’ll break down this use case in an upcoming blog.
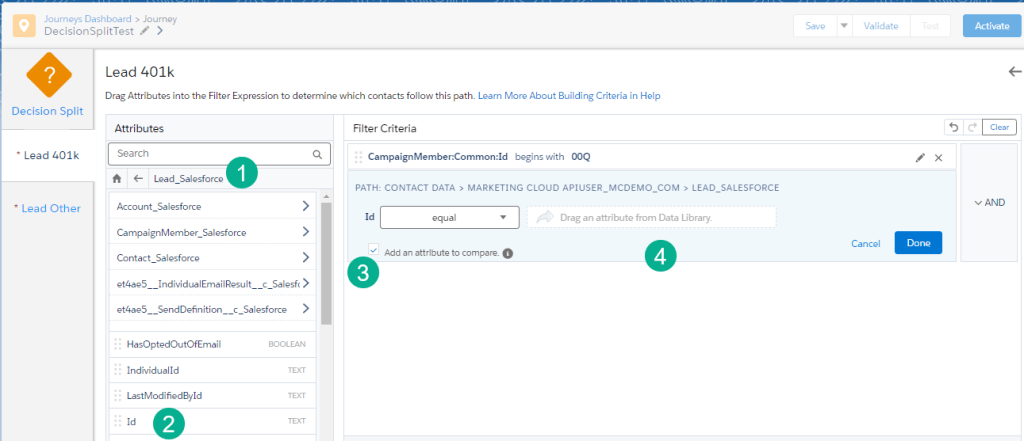
(1) Select the Lead_Salesforce synched data extension.
(2) Select the ID field which identifies the Lead ID.
(3) Click the “Add an attribute to compare” checkbox. For more on this checkbox read here: https://help.salesforce.com/s/articleView?id=sf.mc_jb_attribute_comparison.htm&type=5
(4) Next you’ll want to drag over the Lead ID from the Journey data extension.
(1) Navigate back to the Journey Data tab and select the Journey Data Extension.
(2) Select the Common:ID field and
(3) Drag it over and drop it into the field on the right.
(4) and select Done.
now you can add in the product field as well and set it equal to “401k” and select Done.
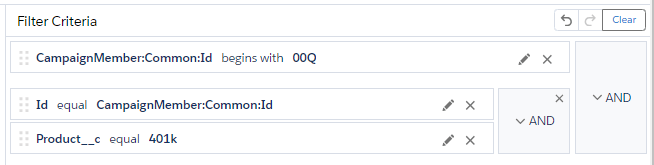
Decision Split Tip #3: Combination of AND and ORs
If you need to have certain fields be grouped into a nested AND or OR pairing stack them on top of each other in the Filter Criteria and hover over both fields.
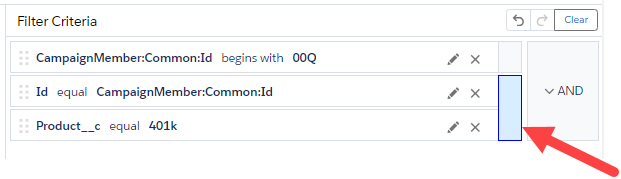
This will highlight both fields and allow you to select an AND/OR between those fields.
Now that we’ve finished the Lead/401K Path we can create the Lead Other path:
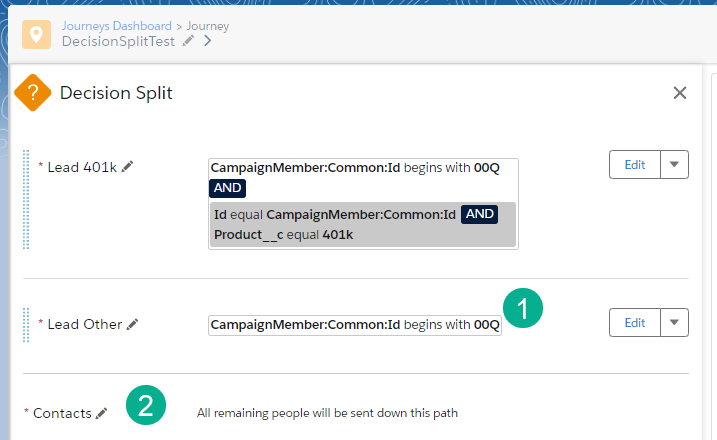
(1) The Lead Other path is simpler as all we need to check is the Common:ID begins with 00Q.
(2) And we’ll leave the Contact path as all others.
To test out this configuration, first we’ll activate the journey and then send in a test record that will validate all four paths:
@mycervello email test records
– A lead with a product of 401k
– A lead with any other product
– A contact
Non @mycervello email test records
– A contact or lead
Dropping all four of those test records in our campaign we can see entrants in all four paths that were created by our Decision Split.
In future blogs we’ll dig into a complex use case that showcases the need for the “Add an attribute to compare”. Hopefully this gave you a brief overview of the capabilities of this amazing activity in Journey Builder.
Please share your experiences and use cases with the Decision Split activity.
