For us Marketing Cloud experts Flow Builder has to be one of your tools to leverage the power of Marketing Automation across platforms in Salesforce. That’s why we’re starting a series of How to build Salesforce Flows for us Marketers.
Our first flow will be to simply add a lead to a campaign when they qualify for a certain lead rank or status.
Use Case: Conference invite
Let’s say you are working with the event team in your organization, say it’s Cervello Bank as a fictious company. They just held a large conference on banking generating a bunch of leads. The next stage in the funnel is to offer them a seat at an upcoming more tailored conference, but we don’t want to invite all of the leads, just the ones that are most qualified to attend.
Sales is actively working the leads and as soon as they indicate that a lead is “Hot” we want Salesforce to add them to a campaign which will trigger a Conference invite Journey set up in Marketing Cloud.
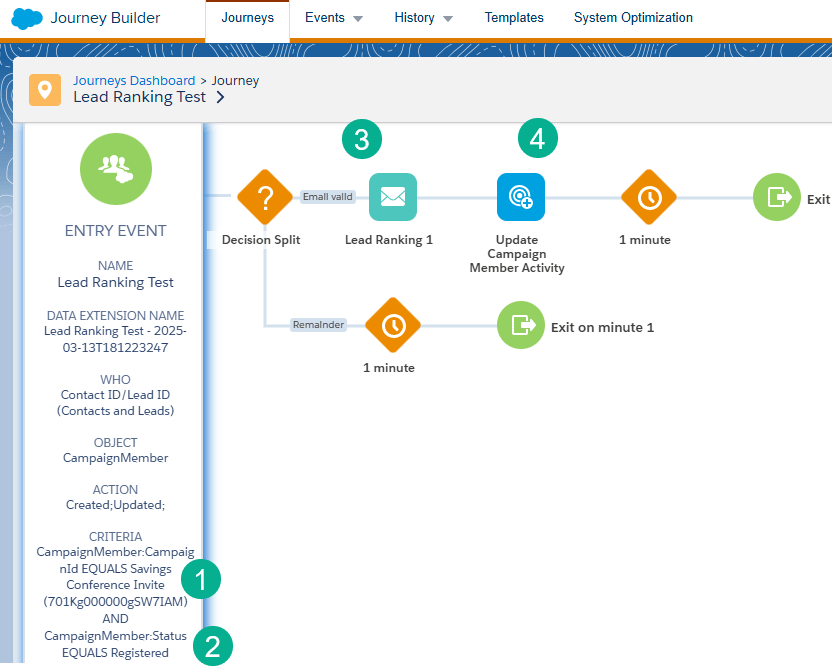
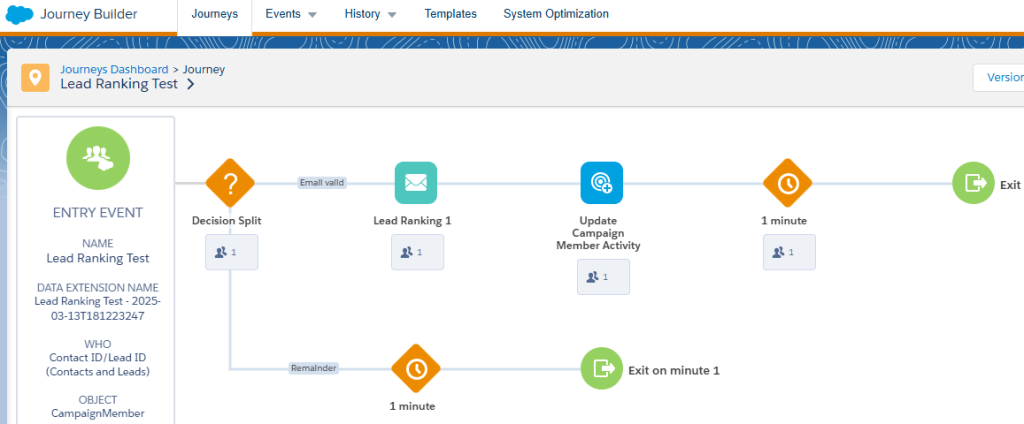
(1) Here’s the Journey in Marketing Cloud that’s using a Salesforce Data Extension entry event where the criteria is that if a campaign member is added to the Savings Conference Invite campaign.
(2) With a status of “Registered”.
(3) They will enter the journey and be sent a registration email.
(4) And their campaign member status will be updated.
And in Salesforce Service or Sales Cloud we can see the campaign set up.
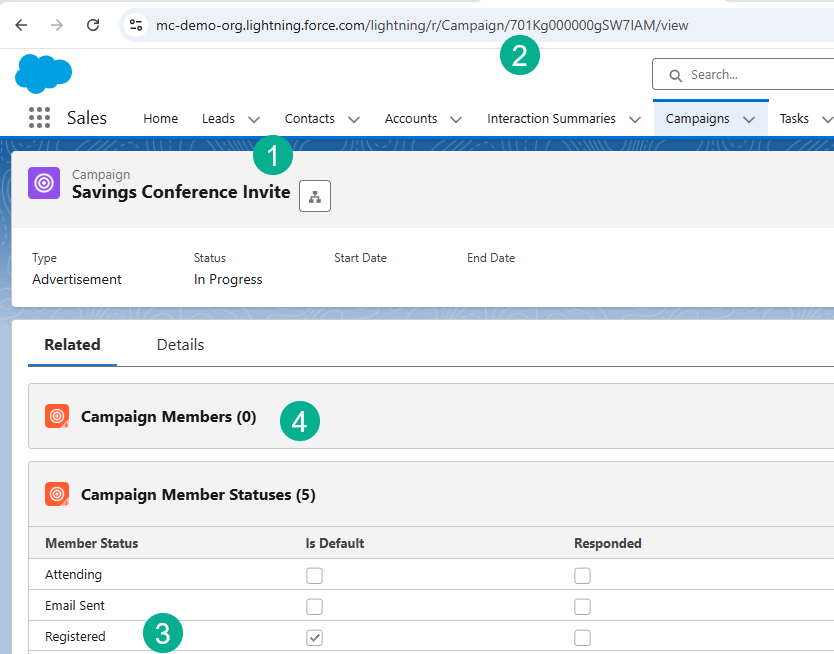
(1) The Savings Conference Invite campaign.
(2) The campaign ID: 701Kg000000gSW7IAM.
(3) The Registered status has been added to the campaign.
(4) And we can see currently no campaign members are added.
And last but not least let’s take a look at the trigger field on the lead itself.
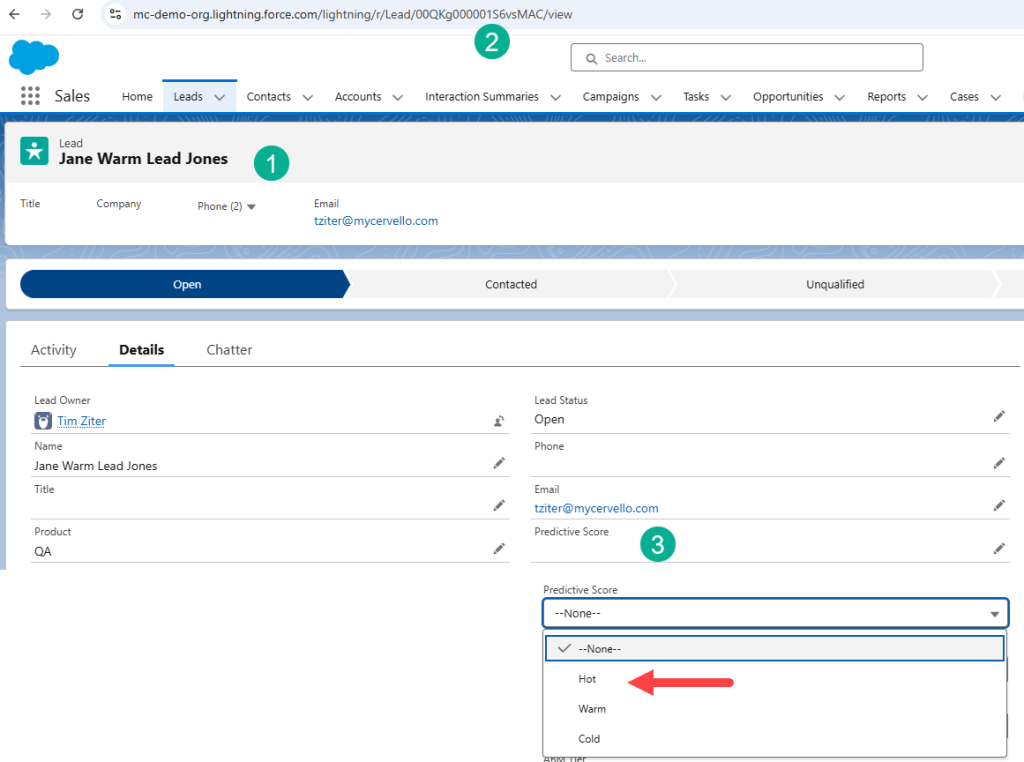
(1) We’ll be using Jane as a test lead today.
(2) Her lead ID will be the subscriberkey in Marketing Cloud.
(3) The Predictive Score will be the trigger field to add them as a campaign member when the field is selected as ‘Hot’.
So let’s review our data points:
1.) Campaign ID: 701Kg000000gSW7IAM or Campaign Name: Savings Conference Invite
2.) Campaign status: ‘Registered’
3.) Lead field: ‘Predictive Score’
Step I: Create a new flow
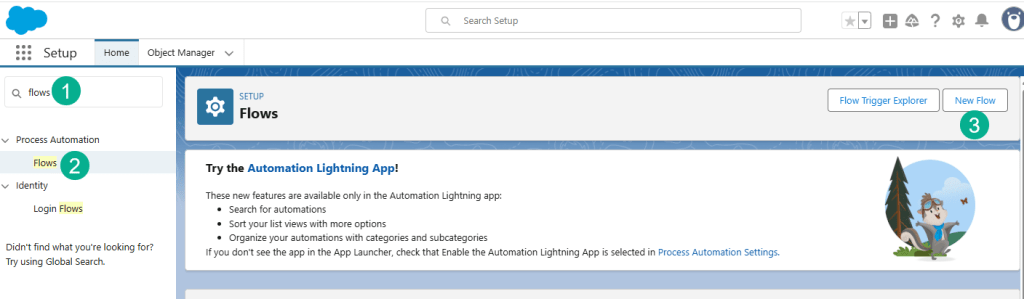
(1) In Setup search for Flows.
(2) Select Flows.
(3) Create a New Flow.
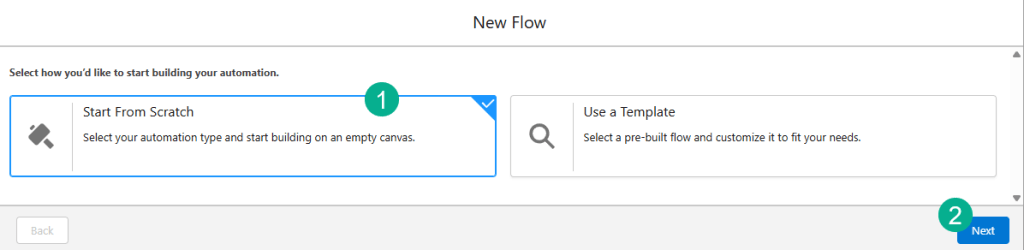
(1) For this flow we’ll start from scratch.
(2) Click Next. We will cover some of the cool templates that are offered another time.
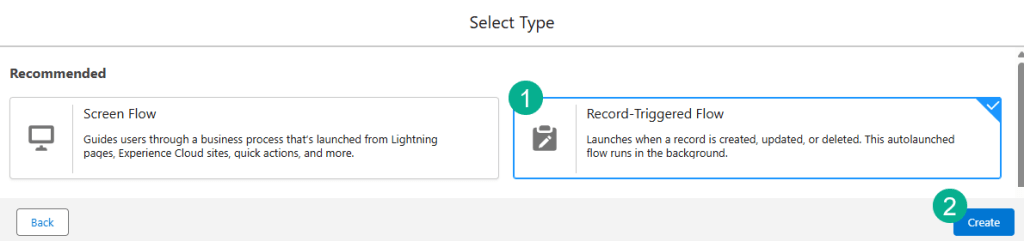
(1) Select a Record Triggered flow as our use case is that a record (Lead) is going to trigger this flow based on a field being created/updated.
(2) Select Create.
Step II: Set up the Trigger
As soon as you create the trigger the screen will ask you to detail the trigger details for the flow.
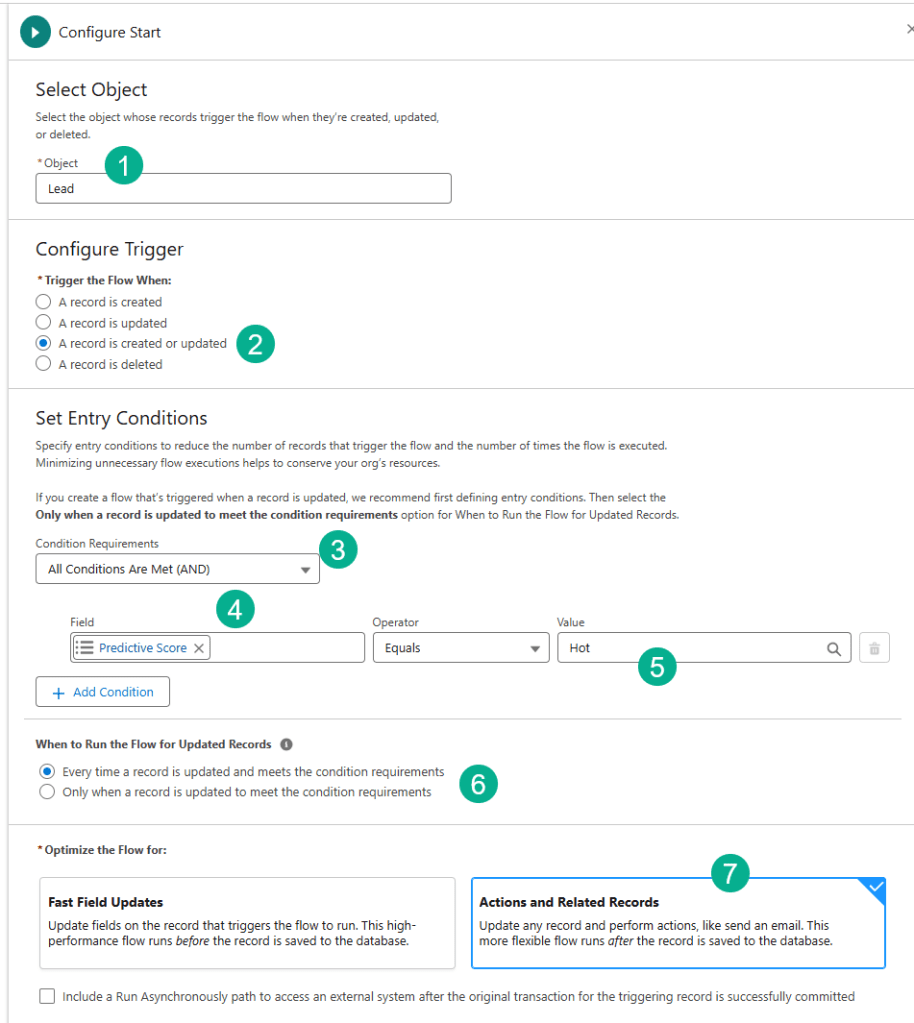
(1) First we’re going to select the Lead object.
(2) We want both created or updated as a lead could be created as Hot and also could go from another value to Hot.
(3) We want to add one more condition so we’ll select the AND option here.
(4) We’ll search for the Predictive Score field on the lead.
(5) Enter in the value of Hot.
(6) We’ll keep this as the default every time.
(7) And have it triggered when the record is saved.
And don’t forget to save.
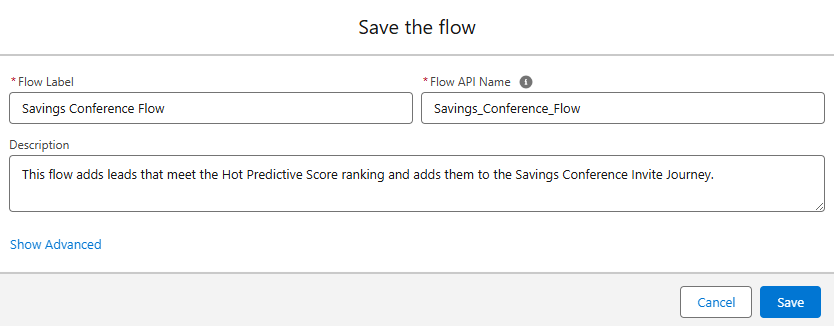
And fill out a memorable name as well as a description.
Step III: Get the Campaign
Now that we have the leads entering the flow (when they meet the criteria, we need to pull in the campaign.
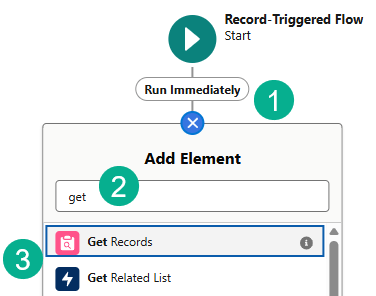
(1) Click the plus sign right after the trigger to add an action.
(2) Search for Get in the search box.
(3) Select Get Records.
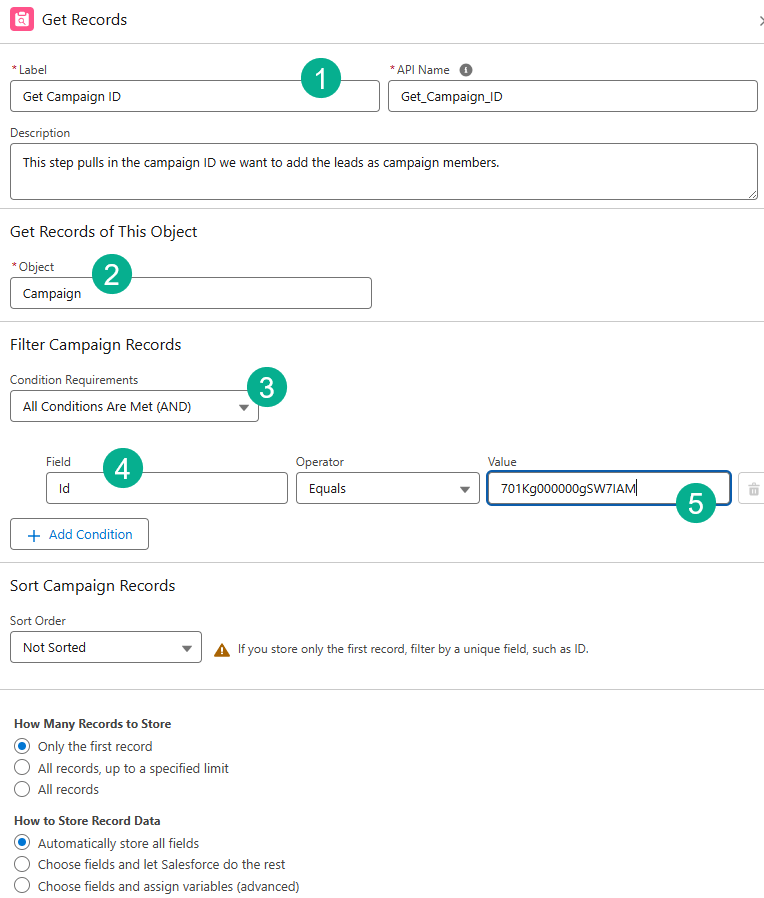
(1) Create a memorable name so that in your flow you can easily tell each step.
(2) Select ‘Campaign’ as we want to pull in the campaign ID.
(3) Select AND.
(4) Select the record ID.
(5) And enter in the Campaign ID.
Step IV: Create Record
Last step we need to create the campaign member record which will require a different flow action.
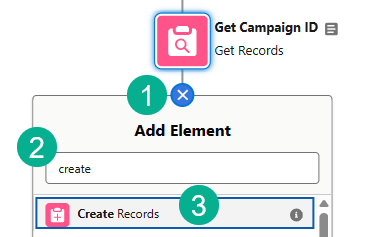
(1) Click on the plus sign below the Get Record activity.
(2) Search for “Create”.
(3) Select Create Records.
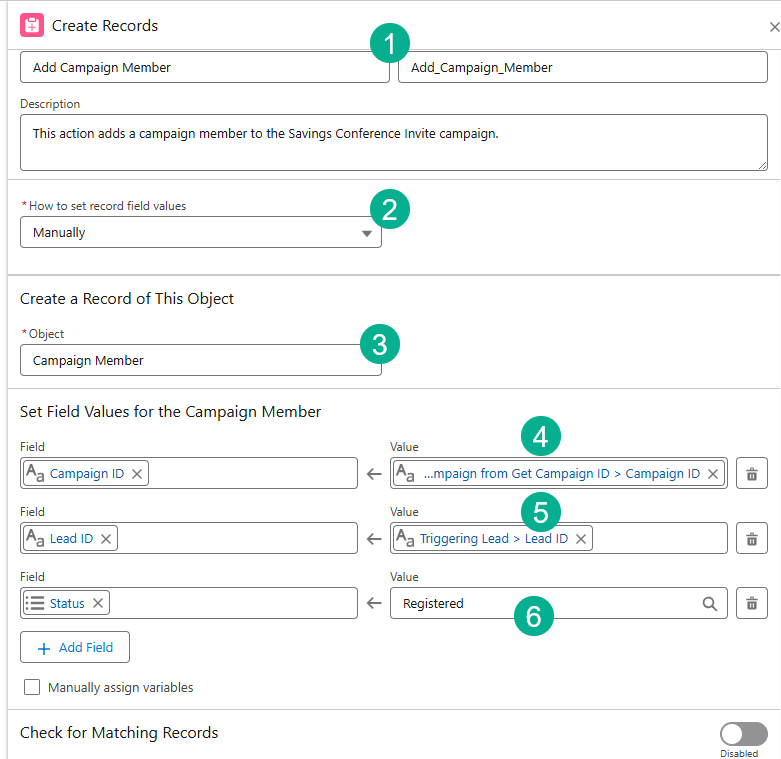
(1) Name your activity.
(2) Select “Manually”.
(3) Select the Campaign Member Object.
(4) For your first field select the Campaign ID
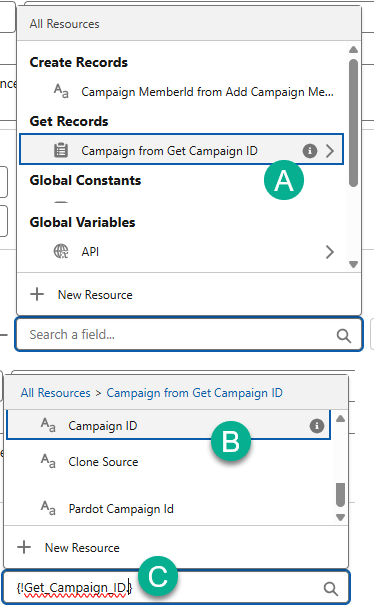
(A) Select the Campaign ID from the previous activity.
(B) And the Campaign ID.
(C) Notice the formula being created below.
(5) Select the LeadID. Similar to the Campaign ID you need to be mindful of how you select this id.
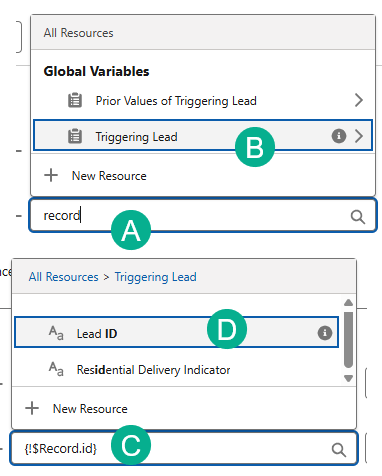
(A) Start typing “record”.
(B) Select the Triggering Lead.
(C) Type in “id” after the Record.
(D) and Select the Lead ID.
(6) Lastly hard code the Campaign Member Status.
And don’t forget to hit save! That’s it. Now let’s activate and test this flow End to End.
Step V: Testing the Flow End to End

First let’s start by activating your flow.
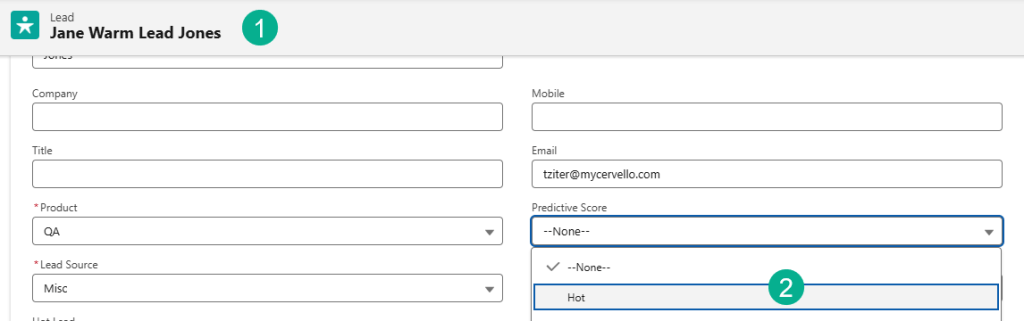
(1) We’ll navigate to our test Lead.
(2) And select a ‘Hot’ status for the Predictive Score field and hit save.
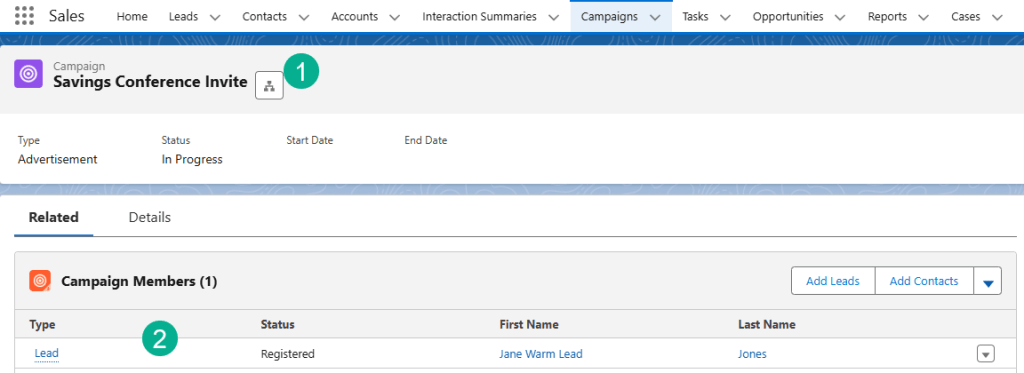
(1) We’ll navigate to our Savings Conference Invite campaign.
(2) And verify that Jane was added to the campaign.
In Marketing Cloud we verified that Jane entered the Journey.
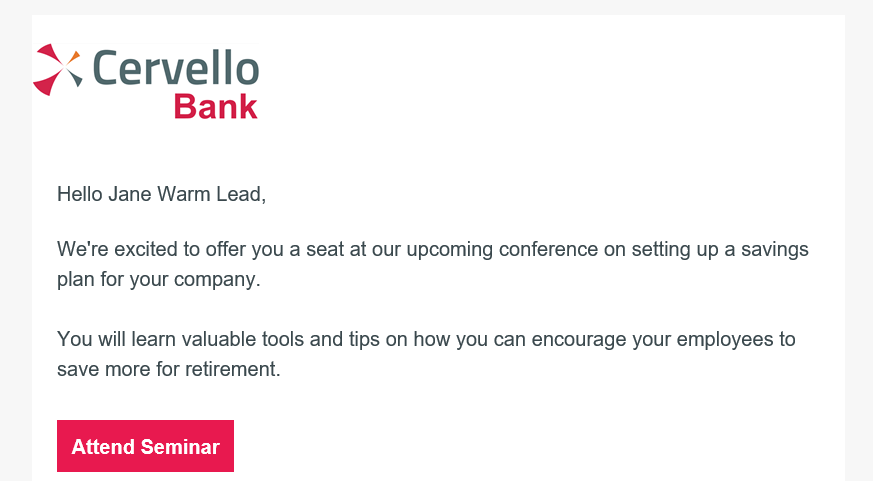
And the email was received for Jane.
Flows are pretty amazing especially when they help you enhance your Marketing Automation in Marketing Cloud. We’ll explore more complex flows in future articles. Have fun exploring Flows!
