
Data Cloud is a powerful tool that allows organizations to ingest data from a wide variety of sources, unify that data, create targeted segments and drive impactful marketing actions.
In this session our focus will be on how to create and activate segments in Data Cloud. For more information on how to ingest data into your Data Cloud environment please see our blog posts on the following topics:
– How to build the schema file for the Ingestion API: https://handsonsfmc.com/data-cloud/how-to-build-the-schema-file-for-data-cloud-ingestion-api/
– How to create a data stream for the Ingestion API: https://handsonsfmc.com/2024/04/08/how-to-create-a-data-stream-for-data-cloud-ingestion-api/
– How to create a connected app for the Ingestion API: https://handsonsfmc.com/2024/04/08/how-to-create-a-data-stream-for-data-cloud-ingestion-api/
A video walkthrough of this blog post is available on Youtube here: https://www.youtube.com/watch?v=RpyO–EFAPg&t=2633s . This was part of our Data Cloud Bootcamp Hands On sessions where we invite community volunteers to build right in the platform.
Let’s set the stage for context on why it’s important to create and activate segments.
Use Case: Mobile Investment Application Launch
Cervello Bank has recently launched a new mobile application that allows users to make trades and investments right from the convenience of their mobile phone. They ran an all out marketing blitz to acquire new users. A few months into the launch the team is seeing a dramatically lower number of trades on the app than was forecasted.
The analytics team does an in depth evaluation of the sign up process and determines there are two bottleneck areas that are limiting trade volume.

The team visualizes the road to trading in a sales funnel detailing the path from new sign up to first trade. The team breaks down the funnel into two main audiences:
(a) Prospects – subscribers who have signed but haven’t made a deposit into their Cervello mobile trade account.
(b) Traders – subscribers who have deposited money and may have begun making trades.
(1) Segment #1: No Bank Link. The first bottleneck are those who’ve signed up but haven’t linked their bank to the Cervello mobile trade account. Of all prospects 80% of subscribers are in this bucket.
GOAL: Segment the No Bank Link-ers and use marketing to incentivize them to like their bank
(2) Segment #2: First Deposit. The next bottleneck are those traders who’ve made a deposit but haven’t committed to make their first trade. Of all trades 70% have yet to make their first trade. What’s more there is a 50% drop off in attrition once a trader makes that first trade.
For our example today we’ll focus on the No Bank Link-ers and in a future blog we’ll use the Data Action functionality in Data Cloud to target the First Deposit segment.
Data Overview
Before we create our No Bank Link-er segment in Data Cloud let’s first walk through what has been set up to prep our data.

(1) We are ingesting data into Data Cloud from four different sources.
(a) Enterprise systems which contains the operational data related to subscribers from Cervello Bank.
(b) The Mobile App data feed which includes any data collected on subscribers who are using the app.
(c) The sales team uses Salesforce Sales Cloud to track leads and contacts as they progress through their stages from sign ups to traders.
(d) Marketing Cloud provides engagement data to help determine intent of individuals at any stage of the process.
(2) Each data source is mapped to connect key identification data points to unify the data.
(3) The individual data from all streams has been unified so it can be leveraged in creating good quality segments.
(4) Now that the data has been ingested, mapped and unified proper segments can be created.
Step I: Create the Segment
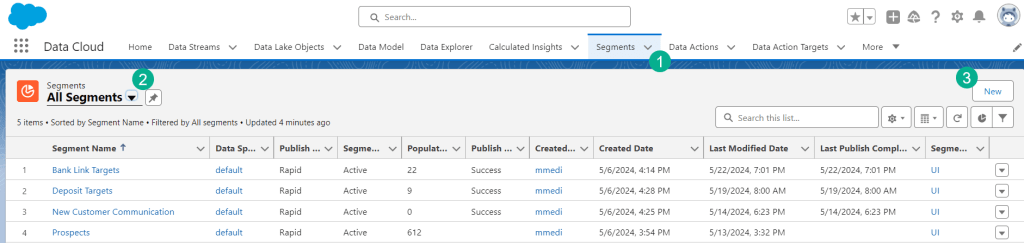
(1) In your Data Cloud environment click on the Segments tab.
(2) Select “All Segments”.
(3) Click New
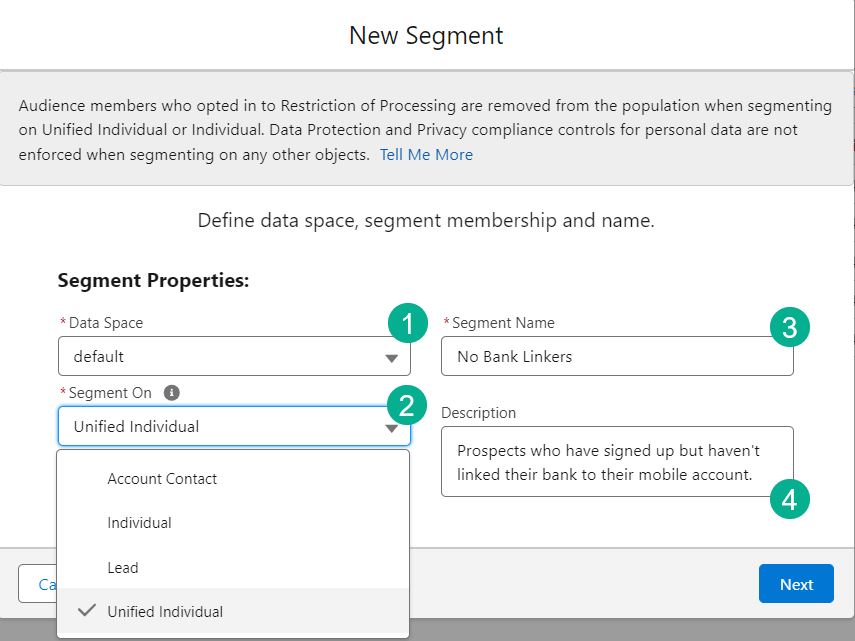
(1) Choose the data space you are using. In our environment we have only one space which is the default.
(2) There are several options in the Segment On drop down. We’re going to select our Unified Individual for this segment as these individuals will be the best group to target first. Once we find success with Unified we can expand to the regular Individual group.
(3) Name your segment.
(4) Add a description to provide context in the future.

(1) For this use case of new account sign ups the Rapid Publish makes the most sense. If you were looking to create a segment of 6-12 month buyers or individuals with a certain affinity to be used for a regular newsletter then Standard Publish would be the way to go.
(2) The 1 hour publish frequency is as fast as Data Cloud can push new individuals to the segment which works well for this use case.
(3) The settings for start and end data are intuitive.
Step II: Include/Exclude Segment attributes
With the shell of the segment created now you’ll want to include or exclude the combination of attributes which will determine the segment. For our use case we’ll want to select those individuals where an Account has been created but the Bank Link field hasn’t been populated.
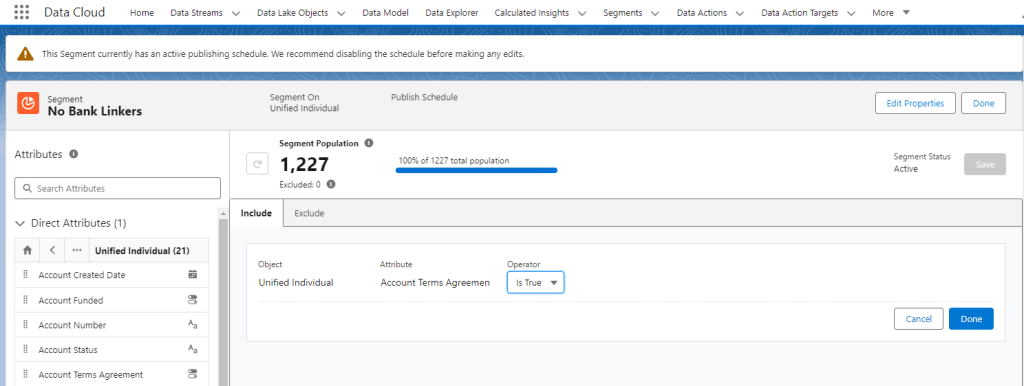
(1) In the segment screen the population details the count of individuals which will be reduced as attributes are added.
(2) Drag attributes from the left onto the canvas in the center.
(3) Pulling over Account Create Date we select that the field has to be populated.
(4) Simply click Done
(5) Clicking Save will refresh the population based on adding the attribute.
We are being a little conservative to start out with this segment as there are a large number of individuals that don’t have an account that we could target with our drive to Bank Link campaign. We recommend narrowing down your segment as much as possible to start then expand out once that segment has proven successful

Of the 1,227 individual records only 60 have an Account Created Date field populated so already our segment is getting targeted.
We’ll add in the Bank Link filter to round out this segment.
Segment Tip #1
To create a nested pairing of attributes with their own AND or OR group the two attributes together and hover between the two attributes. This will create a block that combines both attributes where you can select a separate AND or OR qualifier.

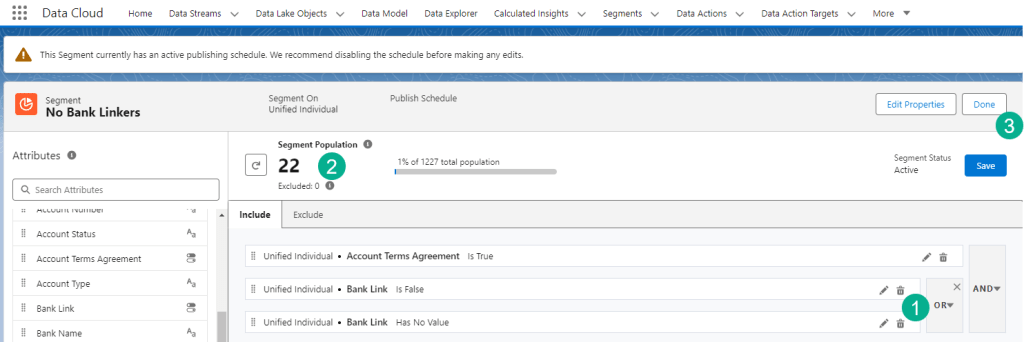
(1) Here’s our final segment where we’ve created a sub group for the Bank Link attribute.
(2) And our final count has been reduced to 22 individuals.
(3) Click Done and that ends the Rules section of the segment setup.
Step III: Create an Activation Target
An activation target designates where the segment will be populated. Data Cloud offers a wide variety of Salesforce and external options.

(1) In the Activation Target tab,
(2) Select the New button
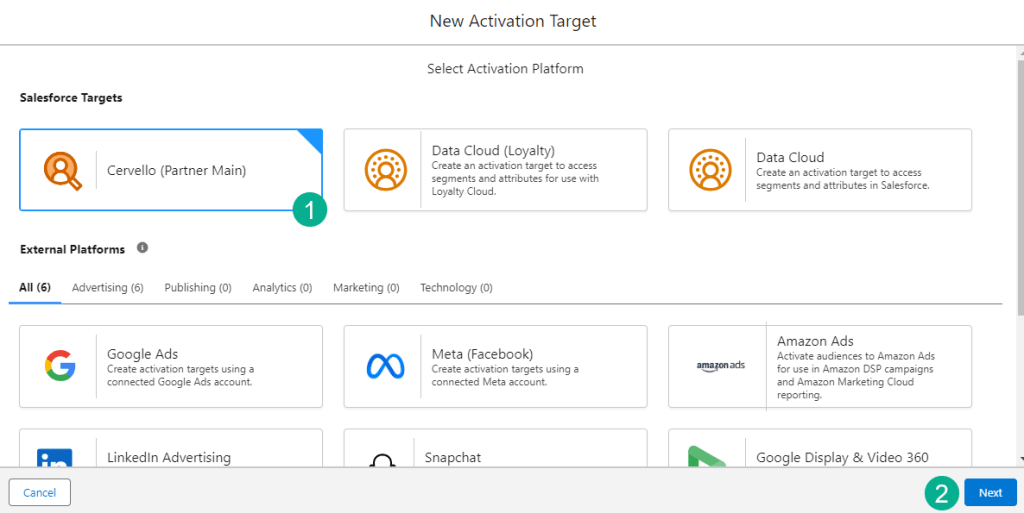
(1) For our use case we want to select the Marketing Cloud option
(2) and click Next
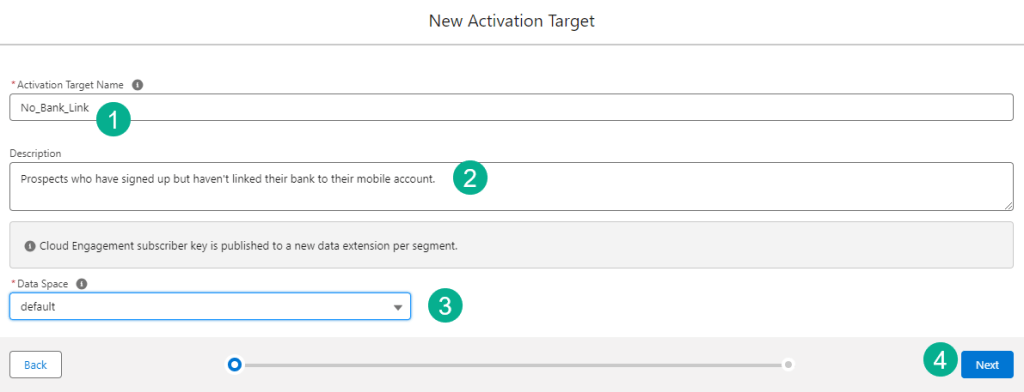
(1) Add in the name. At this point we’d recommend avoid using spaces in the name to avoid having spaces created in the data extension in Marketing Cloud.
(2) Add a description,
(3) Select the data space
(4) And click Done.

The last step select the Marketing Cloud business unit to send the segment.
Step IV: Create the Activation
The activation is used to determine the specific characteristics needed to set up the segment in Marketing Cloud.

(1) Select the Activations tab.
(2) Click New
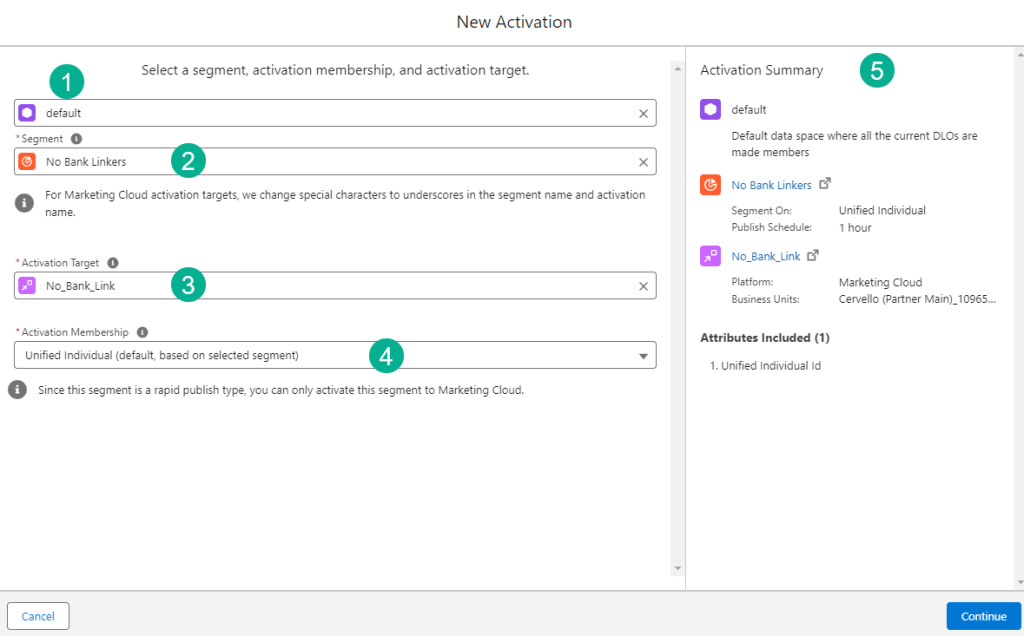
(1) Select the space,
(2) Select the Segment,
(3) The Activation Target
(4) and the Membership.
(5) All of the selections are displayed on the right.
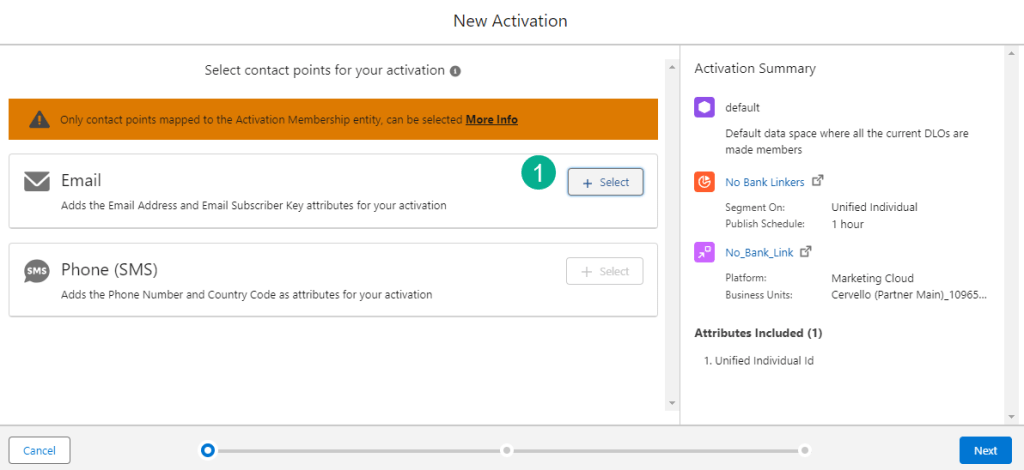
(1) Select Email
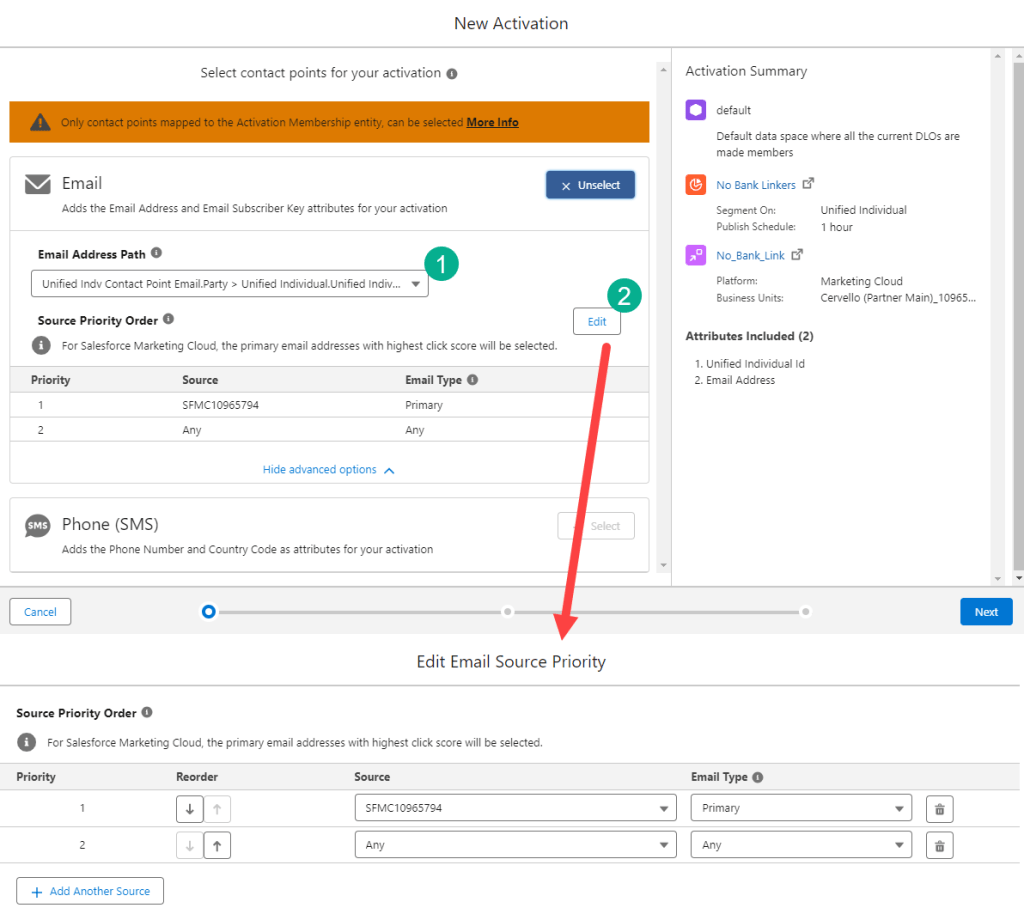
(1) Select the Email Address Path. There may be a variety of different paths to the email address depending on how your data is set up.
(2) You can also set the source priority in this case linked to the subscriber in Marketing Cloud.
(1) See the confirmation of the email address field,
(2) the default value for the subscriberkey
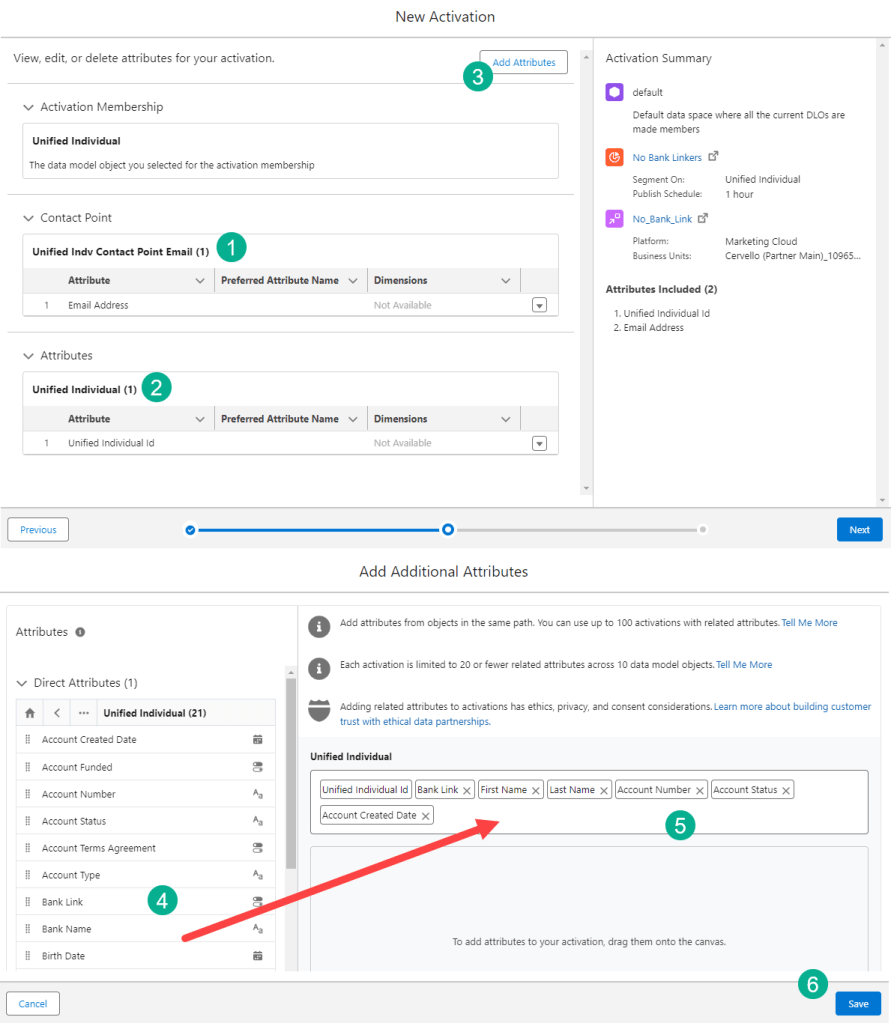
(3) And add additional attributes to build out your data extension in Marketing Cloud.
(4) Simply select the attribute on the left,
(5) and drag it over to the Unified Individual section
(6) and select Save.
And that completes the setup of a Segment in Data Cloud synched to Marketing Cloud. Clicking into the segment we can see the summary information displayed.

(1) The population for the segment.
(2) The activation attached to the segment.
(3) The publish history which includes the status for the Activation which will be
(4) In “Publishing” state for about an hour once the activation is created.
Step V: Publish the Segment
The last and easiest step is publish the segment which will activate the activation and write segment into Marketing Cloud.
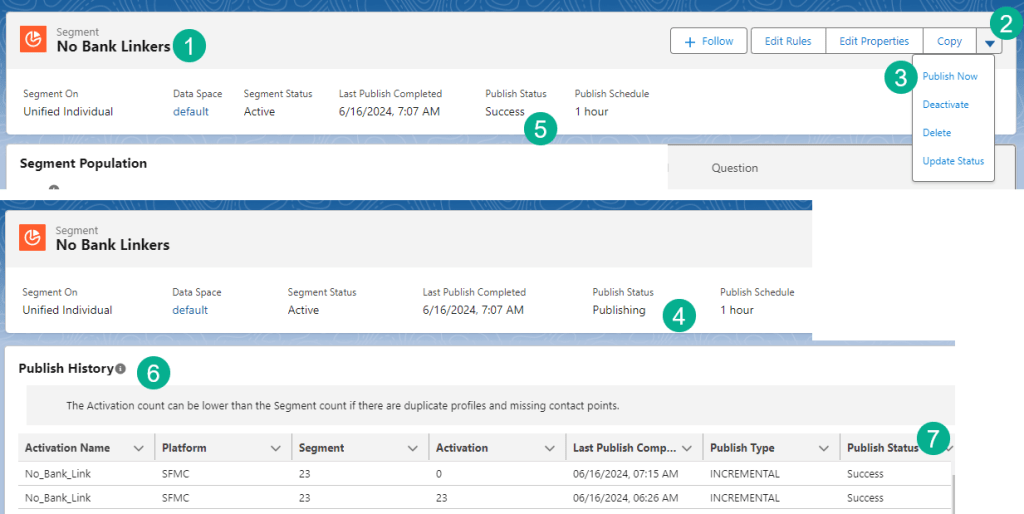
(1) Navigate back to the segment
(2) Click on the arrow box in the upper right hand corner
(3) Select Publish Now
(4) In the Segment you’ll see the Publishing Status change to “Publishing”
(5) In about 5 minutes depending on the size of your segment that will change to “Success”
(6) Scrolling down on the segment you’ll find the Publish History section where you should see rows of successful publications of the data
(7) And hopefully they will mostly if not all be “Success”
Step VI: Validate the subscribers in Marketing Cloud
Give the Segment and the Activation about an hour and the data will be populated in a data extension in Marketing Cloud.
First check the Publish History of the segment.

(1) The Publish Status should be listed as “Success”
(2) And the Activation field should show a count.
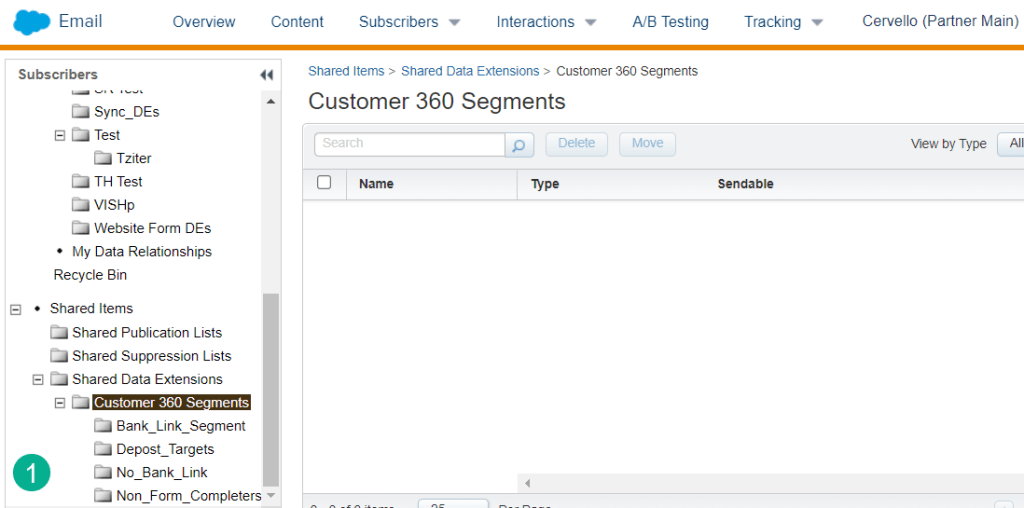
In Marketing Cloud under the Shared Data Extensions a data extension should be created under the Customer 360 Segments folder.
Taking a closer look at the data in the data extension:
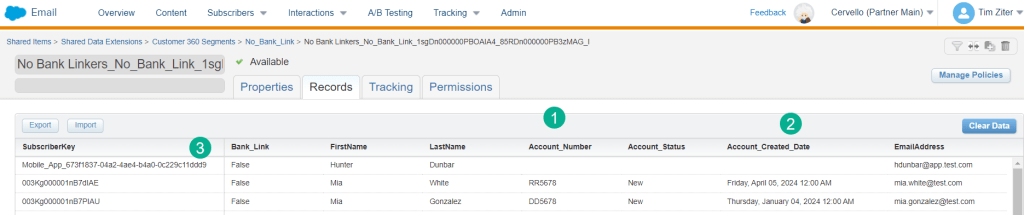
(1) All the fields have been populated based on what was designated in the Activation.
(2) We might use the Account_Created_Date in our query to pull out newly added account signups.
(3) We’re noticing a SubscriberKey that isn’t a contact or lead ID which we’ll want to alert the data team to modify the unification settings.
Now that this amazing data is in Marketing Cloud we can create a Automation Studio fed Journey to incentivize these new account sign-ups to link their bank.
Don’t miss our next blog post on how to set up Data Actions in Data Cloud synching subscribers into Marketing Cloud.
