In our earlier post How to create a bounce suppression list data extension, we discussed how to identify your subscribers with recently bounced messages, and how important it is to be able to suppress future sends from going to them to maintain a healthy sender reputation.
While a data extension is great for suppressing recipients when you’re using the send flow, it’s not available as a suppression source for Journey Builder sends. In this case, we’ll need to create a Suppression List and develop an ETL solution to populate it with our bounced subscribers.
In this blog we’ll cover how to:
- Create a Suppression List
- Extract your bounced subscribers from a data extension
- Transfer that extract to an accessible SFTP
- Import those subscribers to your newly created Suppression List
- Use the list to suppress recipients in a Journey Builder send context
Create a Suppression List
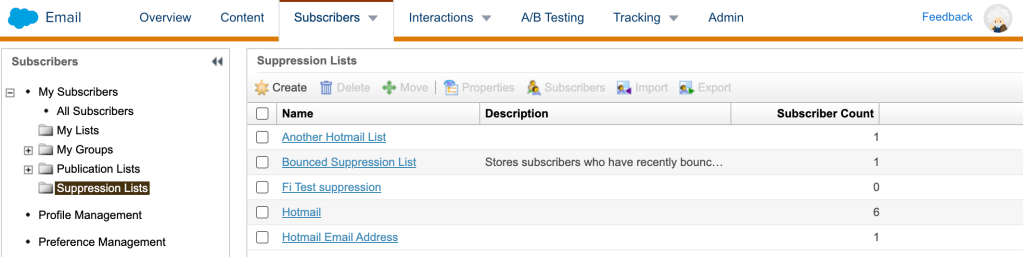
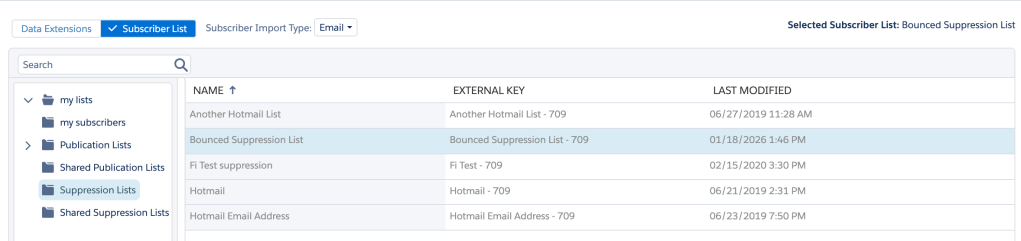
- In Email Studio, navigate to Subscribers > Suppression Lists.
- Select “Create” and give your suppression list a relevant name and description
- Optionally, under the ‘Attributes’ section, select “Public” if you’d like users to be able to add themselves to this list via the subscription center
- Save
Create an Automation for ETL Activities
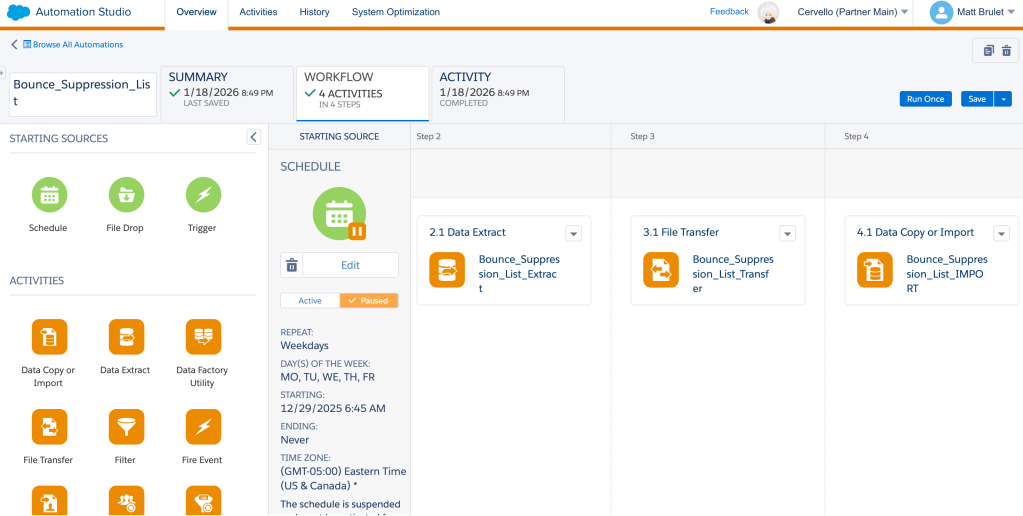
In Automation Studio, we’ll need to create or modify an automation to house the activities needed to populate the new Suppression List you created above
- You can optionally include the SQL Query used to identify bounced subscribers to be suppressed as the first activity.
- In this use case it makes sense to bundle them together to ensure we’re grabbing the most recent data. Your data may already exist elsewhere.
- A Data Extract activity
- A File Transfer activity
- A Data Copy or Import activity
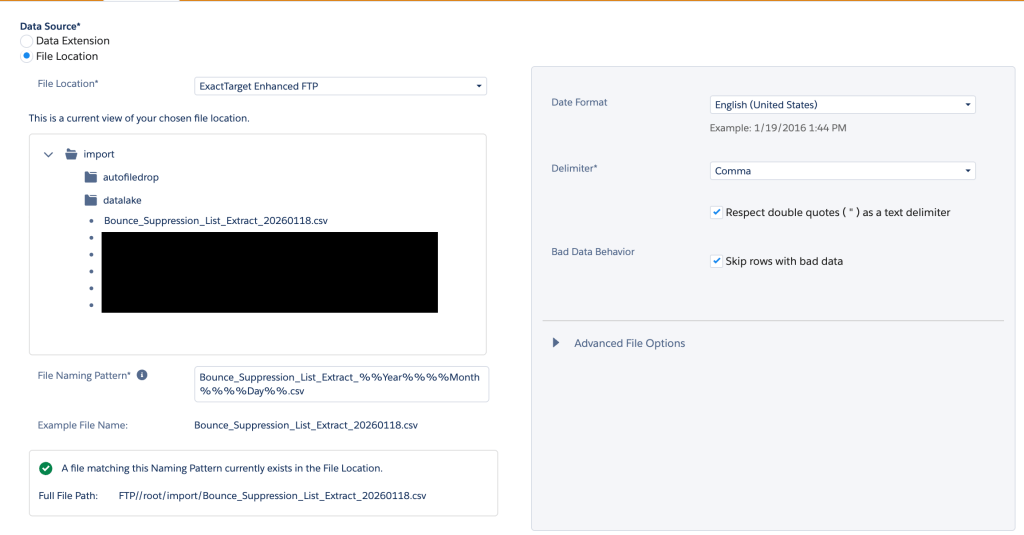
Configure the Data Extract Activity
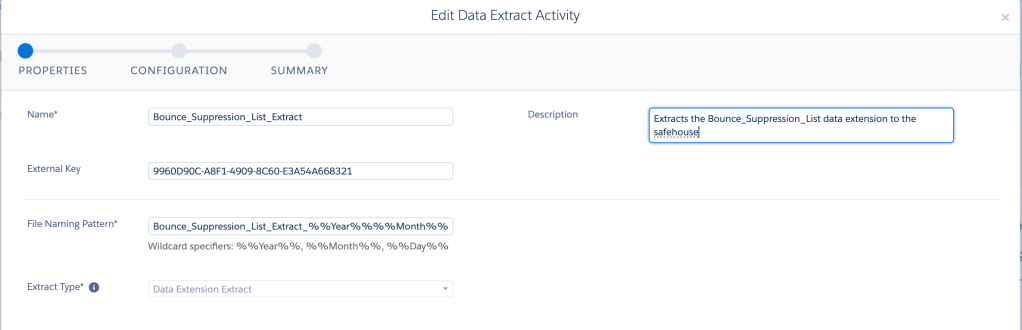
- Give your Data Extract Activity a sensible name and be sure to fill out the description for future reference
- Configure a file naming pattern that will allow you to identify the specific file you want in the safehouse/SFTP.
- Using the %%Year%%%%Month%%%%Day%% wildcard string ensures you’re grabbing today’s file.
- Including the .csv file extension will allow you to pull the file down from the SFTP in the future for analysis if needed
- Select “Data Extension Extract” as the Extract Type.
- Leave comma in place as your delimiter
- Check Has Column Headers as True
- Review and Save
Configure the File Transfer Activity
- Give your File Transfer Activity a sensible name and be sure to fill out the description for future reference
- Select “Move a File From Safehouse” and click Next
- Reuse the file naming pattern from your Data Extract Activity to identify the file to be transferred
- Select ExactTargetEnhancedFTP as the Destination and click Next
- Review and Save
Configure the Import Activity
- Give your Import Activity a sensible name and be sure to fill out the description for future reference, then click Next
- Select ExactTargetEnhancedFTP as the File Location
- Input the File Naming Pattern used throughout prior activities to identify the file to be imported
- If you’ve been testing your activities as you go, a notification should appear telling you that a file matching this Naming Pattern currently exists in the File Location
- Review date and delimiter configuration, then click Next
- Select Subscriber List as the destination type, and then select the Suppression List we created in our very first steps as the destination. Click Next.
- Select Add and Update as the data action to ensure new records are added, and any changes to existing records are updated.
- Configure your mapping, ensuring that header rows match exactly. If they do not, you can use Ordinal mapping to map manually. Click Next.
- Review and Save
Use the Suppression List in Your Sends
Now that our Bounce Suppression List is populated with records, it’s time to suppress them from sends:
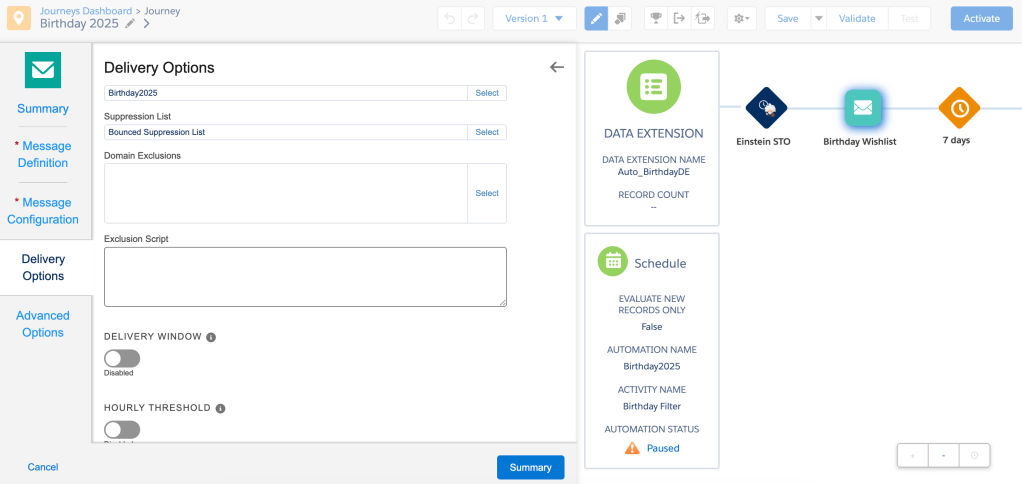
- Navigate to the journey that you would like to implement your suppression list in and select an Email Activity.
- Select ‘Edit’ under the Delivery Options section
- Select the newly created and populated Suppression List
- Click ‘Summary’. Review and click ‘Done’ to save and deploy your changes.
With that, your suppression list is in place and will prevent records contained within it from being sent emails. Be sure to schedule your automation for ongoing runs in the future to make sure it stays up date, and enjoy not sending emails for once!
Questions or Comments? We love feedback, please don’t hesitate to leave it in the comments section below.
Interested in more? Join us for our Marketing Cloud Mondays weekly hands-on sessions where we create and build these solutions live.
Sign up here: https://trailblazercommunitygroups.com/salesforce-marketer-group-boston-united-states/

Leave a comment