To maintain a healthy IP reputation it’s best practice to suppress certain types of bounced subscribers from you regular sends. Marketing Cloud gives you the ability to identify all bounce types so that you can prevent sending to ‘Hard’ and ‘Blocked’ bounced records.
In this blog we’ll cover the following:
1.) Overview of the _Bounce Data View
2.) How to create a query to identify ‘Hard’ and ‘Blocked’ bounced records
3.) How to create a Bounce suppression list data extension
4.) How to create an automation to update a Bounce suppression list
5.) How to suppress the data extension in an Adhoc send
1.) Overview of the _Bounce Data View
Marketing Cloud Data Views are amazing data extensions that contain engagement data created behind the scenes at time of send and thereafter. Mateusz Dabrowski has an amazing guide of these data views, let’s take a closer look at the _Bounce Data View: https://mateuszdabrowski.pl/docs/salesforce/marketing-cloud-engagement/config/system-data-views/#_bounce
By simply adding the _Bounce source in the From statement of a query you unlock all of the bounce data from your sends. As we’ve covered in our Bounce reporting blog article, there are numerous fields that can be helpful providing additional detail on each bounce: https://handsonsfmc.com/how-to-create-a-bounce-report-in-marketing-cloud/
For our purposes today we are interested in the field called: BounceCategory. This identifies Hard or Block bounces. Let’s create that query to identify those bounces!
2.) How to create a query to identify ‘Hard’ and ‘Blocked’ bounced records
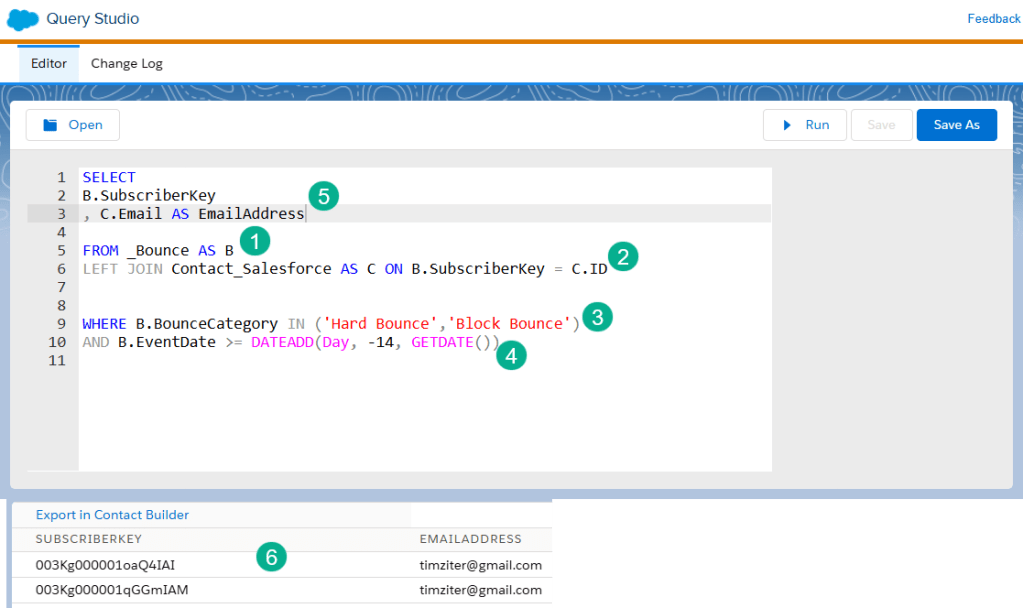
(1) In the FROM statement leverage the _Bounce data view.
(2) JOIN relevant data extensions to pull in the email address. For this use case we’re using the contact synchronized data extension. You might create another query for Leads as well.
(3) In the WHERE statement we are listing out the two different bounce types we want to extract.
(4) And for our use case we are looking back 14 days each time. You don’t have to use this long of a timeframe, 3-4 days should be adequate.
(5) In our Select statement we are outputting only two values, the Subscriber Key and email address. You ideally only need the SubscriberKey but to be safe it may make sense to include the email address as well.
(6) And the result of our query gives us a few subscribers that qualify to be suppressed.
3.) How to create a Bounce suppression list data extension
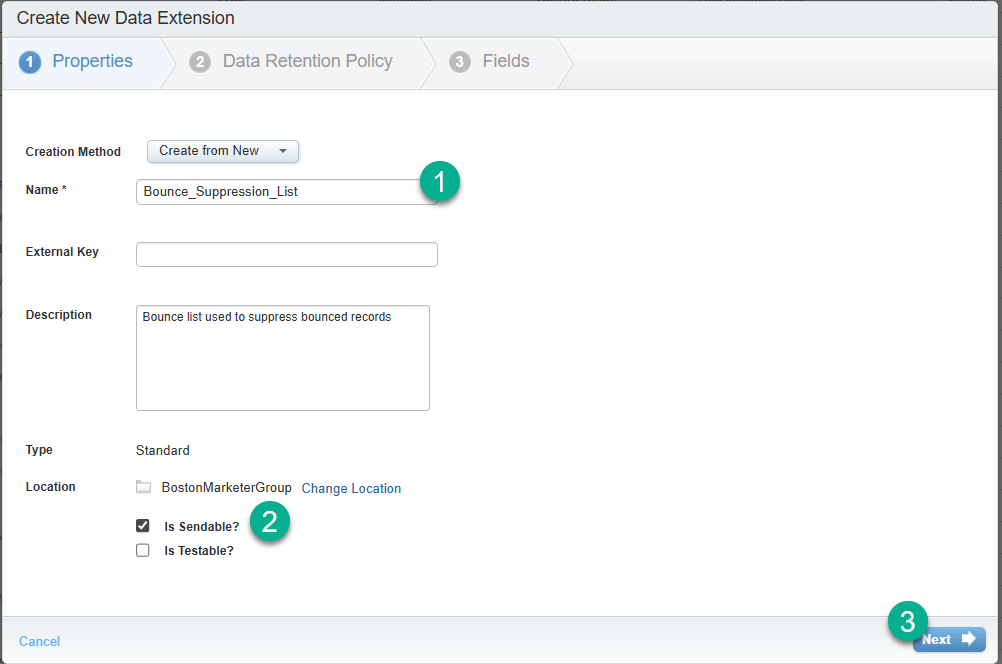
(1) Enter in a name ideally without any spaces because it makes it easier to write queries when your data extension doesn’t contain spaces.
(2) Don’t forget to select Sendable for this list. You won’t be actually sending it, but in order for it to appear in the suppression list menu you need to make sure it’s sendable.
(3) Select Next to move onto the next step.

(1) This is a tricky one as you typically want to select retention settings for all of your data extensions especially now that Salesforce is charging for data extension data. But in this case you really don’t want this data deleted even after several years.
(2) Select Next to move onto the next step.
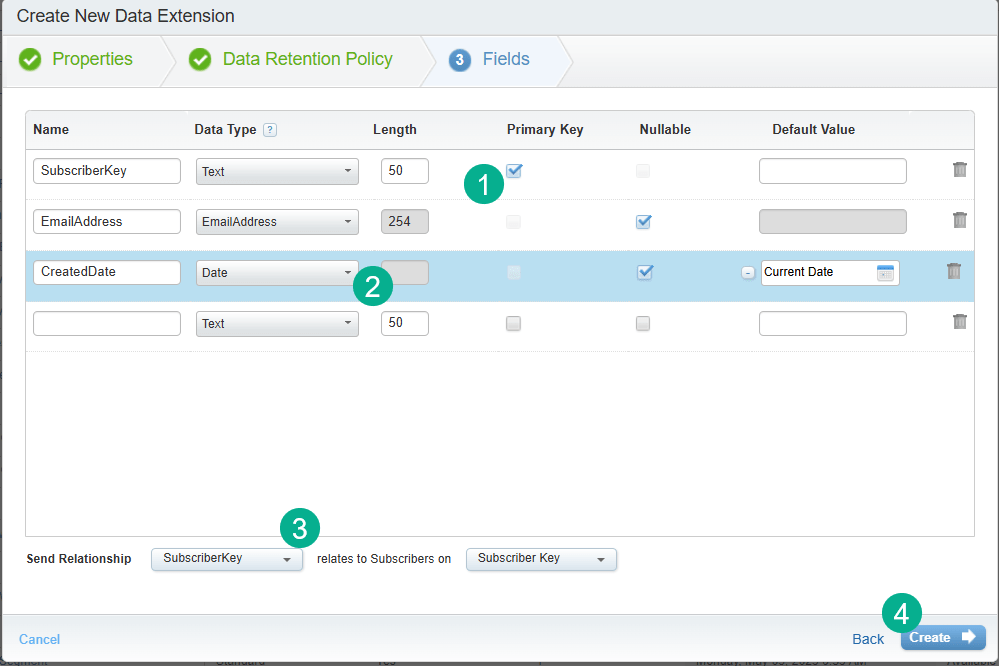
(1) The data extension will be pretty simple. The most important field will be the subscriber though. Make sure you select the primary key to avoid duplicates.
(2) It can be helpful to add a createddate field that will indicate when the person was added to the suppression list.
(3) Don’t forget to select the SubscriberKey as the send relationship as this will align to the right field to determine your subscriber. If you selected EmailAddress and your subscriberkey is something like a Salesforce CRM Contact ID it won’t accurately suppress the record from the send.
(4) Select Next to move onto the next step.
With the data extension created you can now create the automation to populate the suppression list.
4.) How to create an automation to update a Bounce suppression list data extension
If you are in Query Studio you can use the Save As function to have Query Studio create the query automatically for you.
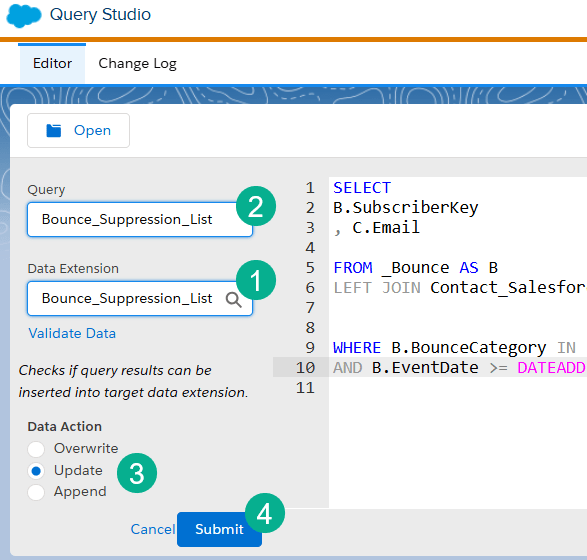
(1) Search for the Data Extension you just created.
(2) Paste in the same name for your query.
(3) For this data extension we want to update, not overwrite or append. Overwrite will wipe out previous records and we want a running list. And Append could work, but it doesn’t prevent duplicates.
(4) Click Submit.
Note: Don’t forget to track down that newly created query and save it into the appropriate folder as this method will save it in the top level folder.
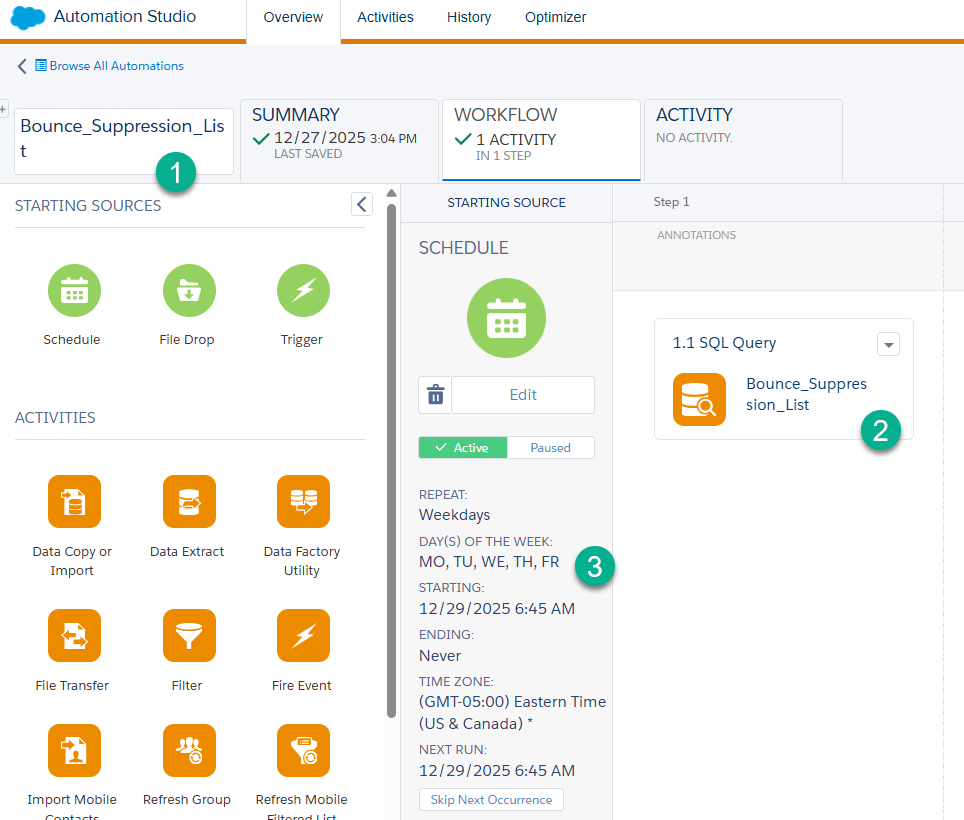
(1) Create a new Automation and you could name it the same as the DE and Query.
(2) Drop in the query.
(3) Depending on how often you email you could run the automation daily, once a week or in this case on weekdays.
5.) How to suppress the data extension in an Adhoc send
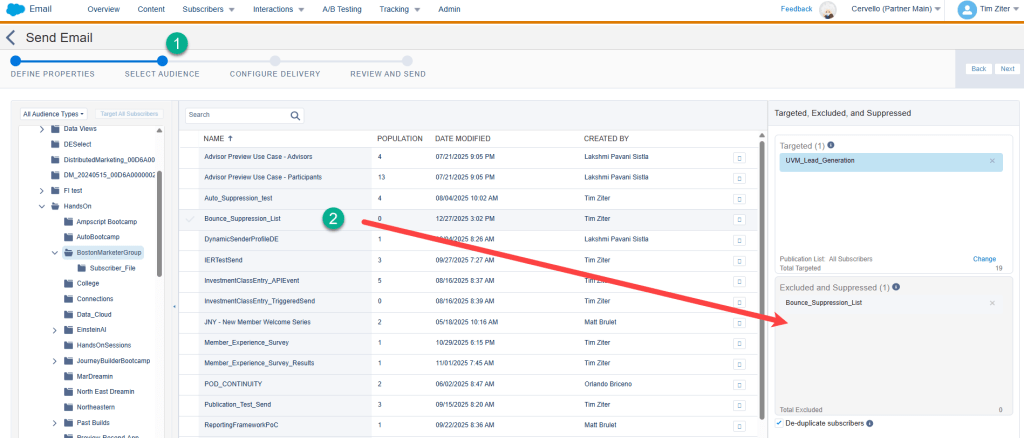
In our last step we’ll walk through how to add the data extension to the Excluded and Suppressed section of a Ad Hoc send.
(1) In Step 2 of your Ad Hoc send.
(2) Find the Bounce_Suppression_List and drag it over to the Excluded and Suppressed section.
In our next blog we’ll cover how to create a suppression list in Marketing Cloud and using the ETL functionality to update a suppression list so that you can use this list in Journeys.
Thanks for reading!
Join us for our Marketing Cloud Mondays weekly hands-on sessions where we create and build in Marketing Cloud these types of solutions.
Sign up here: https://trailblazercommunitygroups.com/salesforce-marketer-group-boston-united-states/

Leave a comment