There are many ways you can test Journeys in Marketing Cloud. In this blog post we are going to cover the Send Test feature in Journey Builder that allows you to test functionality before activating your Journey.
Let’s go over the basic steps on how to leverage this very cool functionality in Journey Builder. At the end of the article we’ll list the pros and cons of the tool as well as ways you can test safely in your environment.
Step I: Validate your Journey to be able to test
The Send Test feature isn’t available right away in Journey Builder.

(1) In Journey Builder once you create a journey.
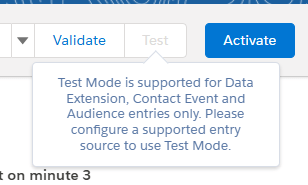
(2) You’ll see the Test button in the upper right hand corner which will be greyed out.
To activate this feature once your journey is created simply click on the Validate button.
Journey Tip #1 – When testing try a simple Journey first
If this is your first time using the test functionality try it out with a simple test journey to experience the functionality before using it on a complex journey.
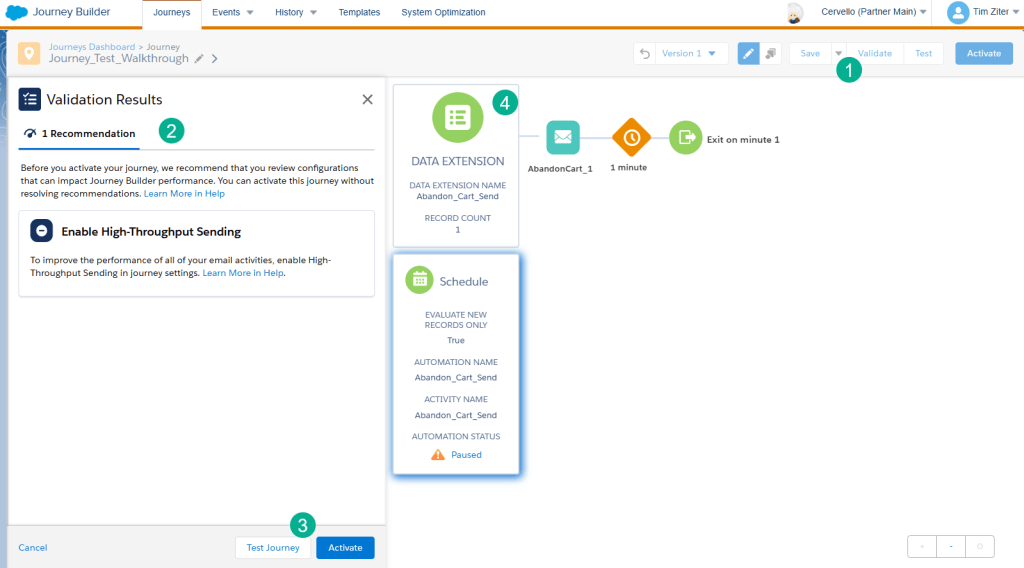
(1) Click on the validate button – once you have filled in all of your Journey activities and completed the Journey settings.
(2) Recommended suggestions are provided by Journey Builder which are optional.
(3) You can select Test Journey here or if you click cancel on the left the Test button will now be available to be used.
(4) Please note that the Send Test functionality only works with certain types of Entry Sources – the primary being the Data Extension Entry Source.
Step II: Configure the Send Test functionality
First select contacts by selecting the checkbox and you can select multiple contacts to test.
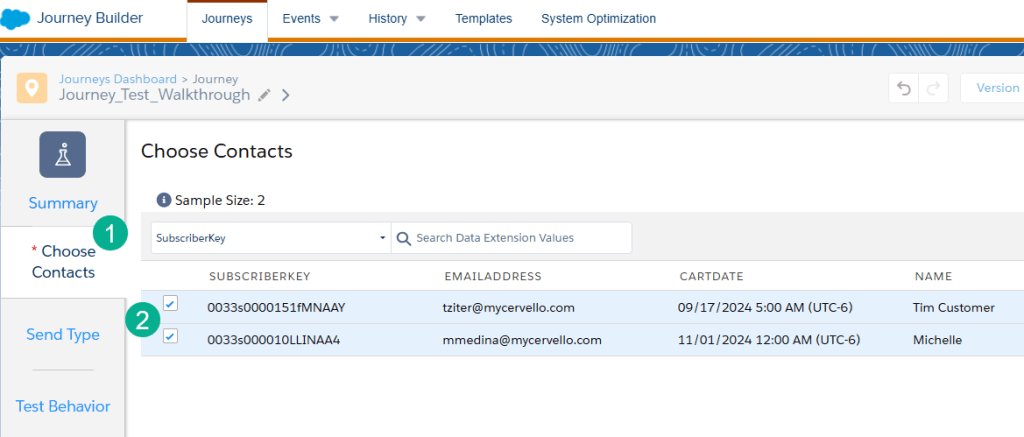
(1) The Choose Contacts tab will pop up first. Select one or multiple contacts.
(2) Simply click on the checkbox for each contact to add.
Next up select the Send Type either send test email messages or not.
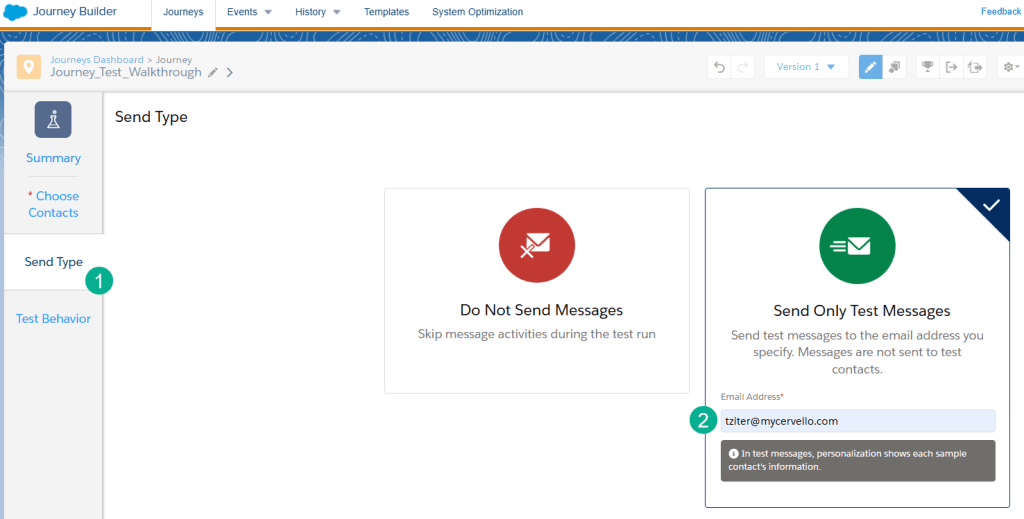
(1) Under Send Type.
(2) We recommend to send test email messages unless you are just validating the basic path of the journey. What’s cool is that the email sent to the designated email will act just like it was sent to the contact. Incredibly helpful for validation.
And last but not least the Test Behavior which summarizes what functionality will be tested.
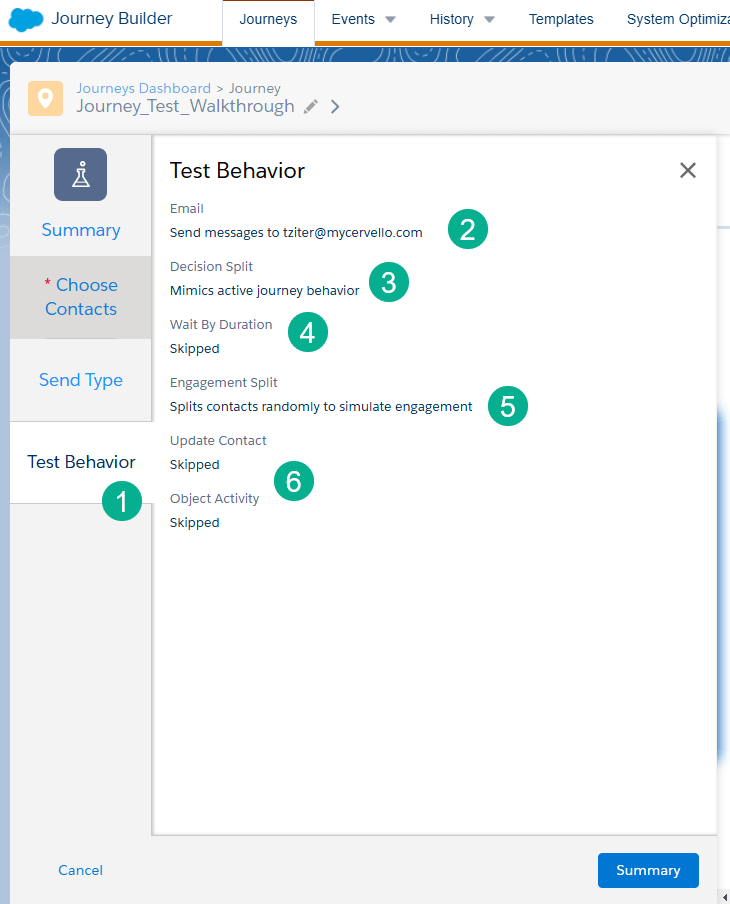
(1) Test Behavior is the last step. We will overview the major functionality that can be tested in Journey Builder.
(2) Email will confirm where the test messages will be sent.
(3) Decision Splits actually work based on the data in the Journey DE and or the custom attributes that you configure. So cool!
(4) Wait by durations are skipped which is excellent as you can have your full wait duration in the journey and not change them to minutes for testing purposes.
(5) Engagement Splits don’t really work, they randomly send you down either path.
(6) Major Journey functionality like Update Contact and updating CRM with Object Activity don’t work, but that makes sense.
Once everything is configured you are ready to:
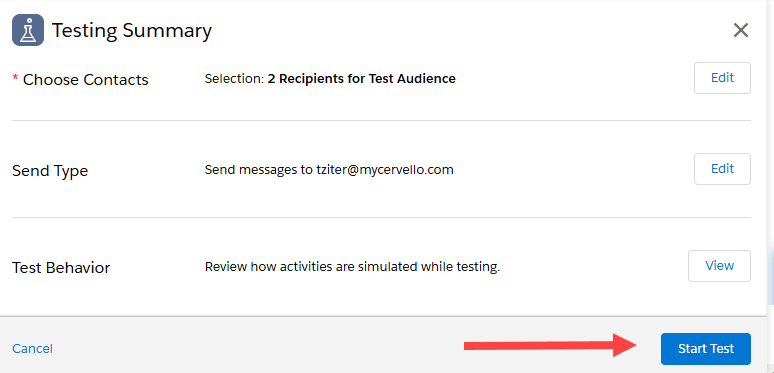
Step III: Validate testing
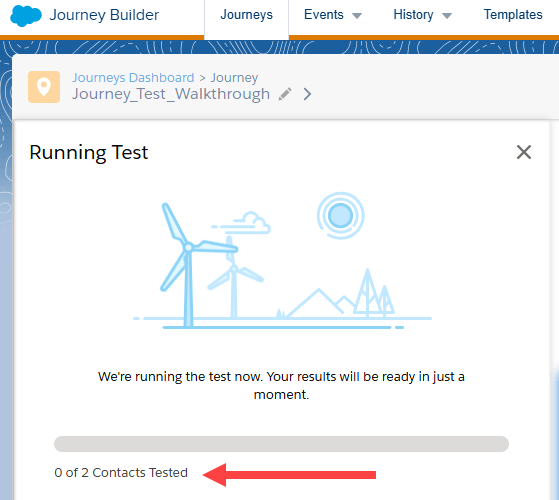
It takes Journey Builder a minute or two to process your test and it will confirm the # of contacts being tested. And then test results!
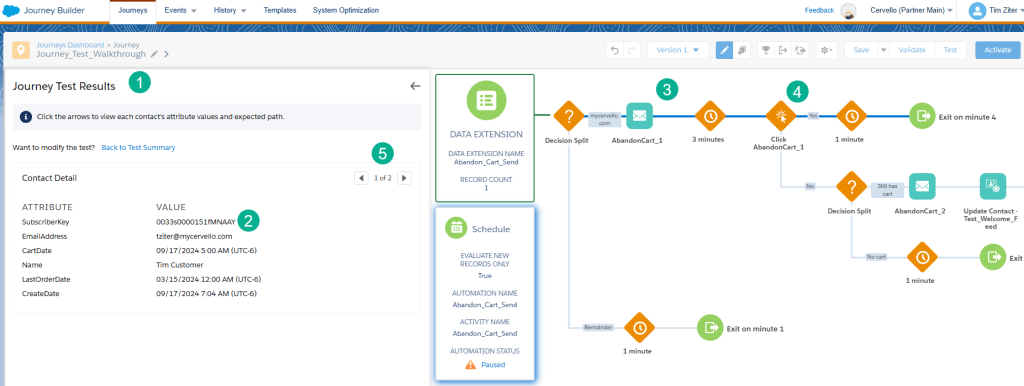
(1) You are presented with Journey Test Results.
(2) Where you can verify the contacts and their data points you selected as it displays all the fields in the data extension for verification.
(3) On the journey canvas you can see the path the subscriber took.
(4) As mentioned above the Engagement Split chooses a random path for each subscriber.
(5) You can toggle to review results by contact.
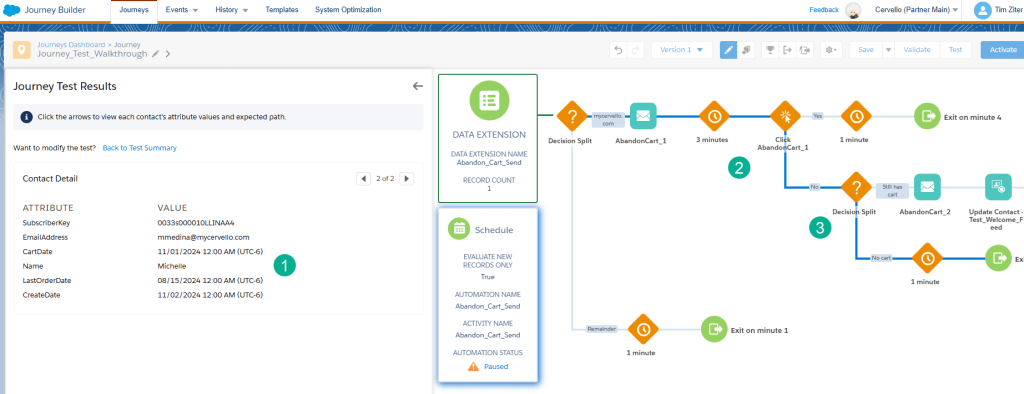
(1) For our Michelle contact you can see her unique data set.
(2) And the different path she went down based on the randomization of the Engagement Split.
(3) And validate the Decision Split functionality as we were using the Michelle record to validate the skip Abandon Cart email #2 path.
The best part is that you receive the emails to the address you selected to verify how the emails would render by each contact.

(1) As we can see here for the Tim contact the dynamic greeting populated as expected. Check!
(2) And the cart displayed as expected. Check!
When we check out the email proof for the Michelle record we notices an unexpected result.
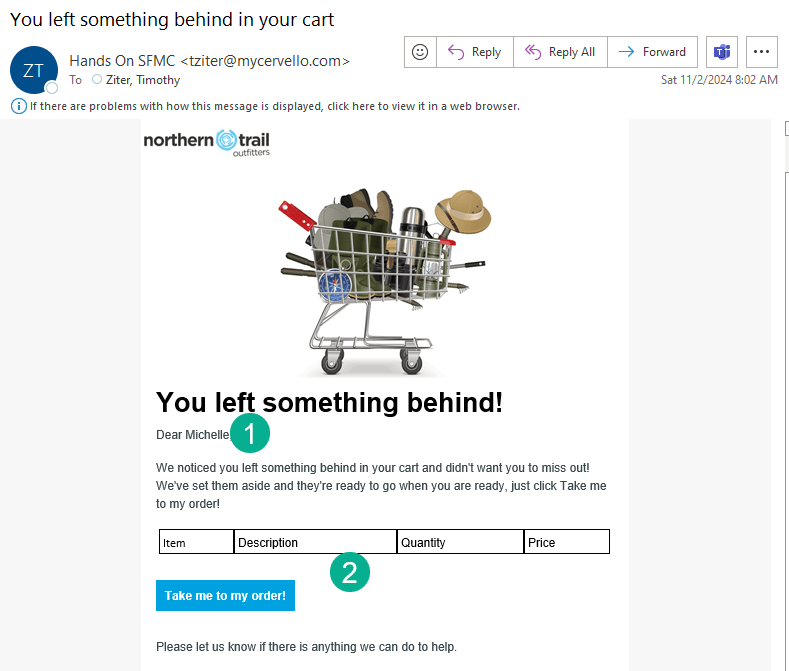
(1) We see the greeting personalization work as expected.
(2) But Michelle’s cart isn’t rendering so we’ll need to go back to validate the data as Michelle either needs to not receive the email or we need to find her cart data.
Pretty cool functionality in general, thank you Marketing Cloud and Journey Builder team!
Summary – Pros & Cons of Journey Builder Send Test functionality
Overall: The Send Test tool is a fantastic tool that everyone building Journeys should use as it has a variety of fantastic functionality. It’s not a complete testing tool, but covers major functionality and is worth being part of your testing mix.
Pros
– Major Journey Functionality can be tested – The Send Test tool allows for the user to test major journey functionality whether that’s how the email will display when sent to how a Decision Split will function.
– Pre-activation testing – You don’t need to activate the journey to test the functionality.
– Wait By Duration activities are skipped – There’s an advantage to the Send Test functionality skipping certain Journey activities like the Wait By Duration. This allows you to not have to change the timing on these activities when testing which can be a big time saver. You can keep the wait steps at days and not switch to minutes.
– Easily send emails fully personalized – It’s very easy to send test emails that display how the actual personalized content will render.
Cons
– It’s not a complete QA Tool – The Send Test feature will not test every functionality in your journey or allow you to test every path. Given that the functionality is leveraging a non-active journey it makes sense that there are limitations to what it can test.
– Only works for Data Extension Entry Sources – We get why this is the case as for example SF Data Entry Sources would need an actual record in the DE to test and that only happens after activation. But still it’s a limitation that you can only use the tool for certain journeys.
– Doesn’t have Preview & Test functionality – The send type functionality is very easy to use. It would be great if the functionality could mirror what’s available in the preview and Test functionality in Content Builder.

(1) You can select multiple people to receive test messages
(2) And select different send classifications and sender profiles
Recommendations on ways to test in Journey Builder
Here are a few ideas on how you can test successfully in Journey Builder validating every Journey end to end.
(1) Stand up a Marketing Cloud test environment(BU). It’s not ideal and it requires an additional expense plus time and energy to stand up and maintain a test SFMC BU. But it’s worth it in the end. You can test every aspect of a journey E2E in a test environment.
(2) Isolate and test specific functionality separately. If you are adding new Journey Builder functionality test that functionality in a simple journey before adding it to your complex journeys. Creating a journey that doesn’t have an email send, just the new journey activity is a great way to validate and isolate potential problems.
(3) Add a email domain Decision Split at the beginning of your journey.
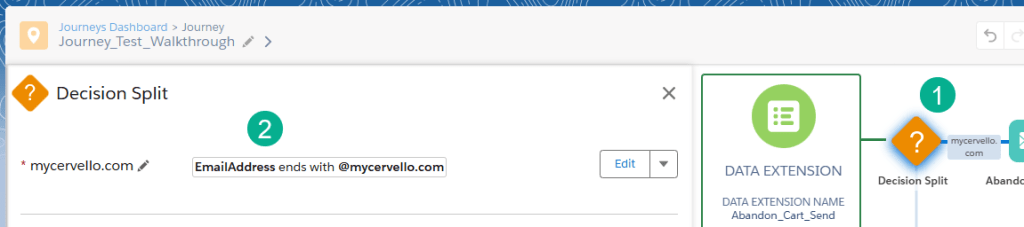
(1) Add a Decision Split at the beginning of your journey.
(2) Add that the email address entering the journey ends with your company domain so only internal subscribers will enter the journey.

Leave a comment