
In this How-To video we will walk through how you can enhance the tracking information that is populate in Salesforce CRM based on the Marketing Cloud email sends.
Why is this important?
Salesforce Sales Cloud or Core is typically the database of record when used in concert with Marketing Cloud. In Salesforce the Individual Email Results object records provide a wide variety of data about each email send, but not a complete picture. Additional data points can be helpful.
Use Case
Cervello Bank is looking to promote their annual investors conference. They provided a custom email Distributed Marketing Quick Send for the sales team to reach out and invite current and prospective customers. Two weeks before the event they noticed that sign ups for the conference were significantly lower than expected and want to dig into understand why.
When they run a report on those Distributed Marketing sends they can see the basic engagement stats like sends, opens and clicks, but they can’t see who sent the emails to determine which sales people needed to be reminded to send more emails.
They want a way to enhance the data in the Individual Email Results records to include send from name and email.
Here’s the video which covers the solution end to end. We will highlight the major sections of this solution below as well:
Steps to Write tracking data from Marketing Cloud to Salesforce
1.) Understand the data flow between platforms (8:12)
2.) Understand the Individual Email Results object (10:50)
3.) Create a Contact with IER report to validate the data (12:11)
4.) In the email add functionality to write fields in the Send Log (15:41)
5.) Create Automation to populate IER records to update via the Journey (33:51)
6.) Create a journey to update the IER records in Salesforce (38:58)
7.) Test and validate end to end (43:49)
Step I: Understand the data flow between platforms
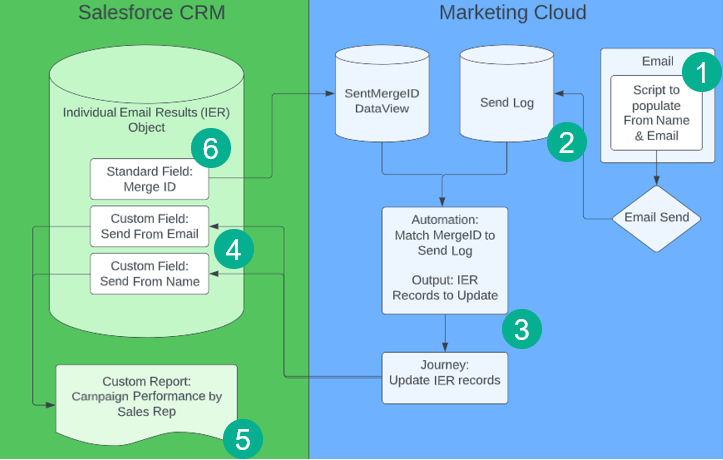
(1) If you enable the email to write the send from name/email in the Send Log via ampscript at time of send,
(2) The data will be written in the Send Log.
(3) An Automation will run on a daily/hourly basis pulling in those sent records with the send from name/email into a data extension, fed into a journey which will…
(4) Update the IER records in Salesforce.
(5) Which can be used in a report to determine which salesperson is sending emails.
(6) The important link between these records is the MergeID field on the IER object making this all possible.
Step II: Understand the Individual Email Results object
Let’s take a look at where to find the Individual Email Results object, the standard data points available and how to customize the records for our use case.
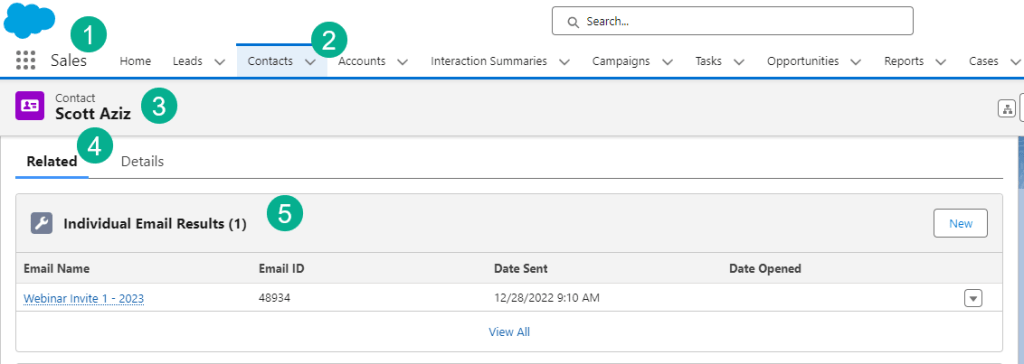
(1) In Sales Cloud.
(2) Under the Contact tab.
(3) Selecting our contact here: Scott Aziz.
(4) The location of the Individual Email Results records can vary, in our example it’s under the Related tab.
(5) You’ll see basic summary information for each email send in Marketing Cloud if they qualify (it has to be either a Journey Builder send of Salesforce send).
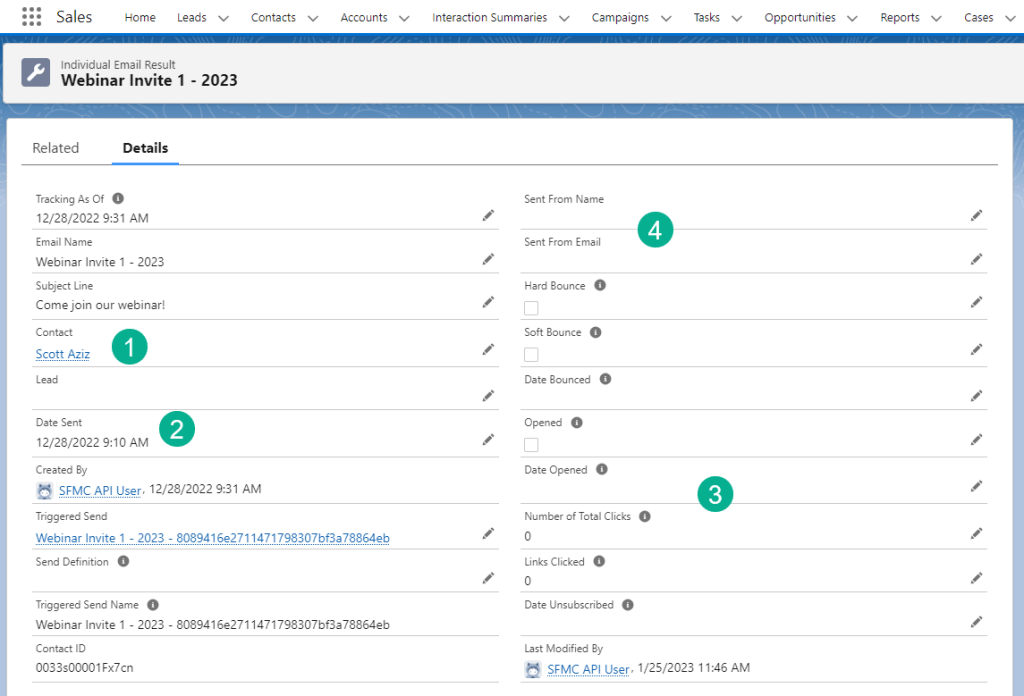
(1) Clicking into each link will pull up the IER record related to that contact.
(2) You can see basic send data like date sent, name of email, subject line and more.
(3) Engagement data like opens and clicks.
(4) For our use case we updated the object by adding two new custom fields: Send From Name and Send From Email.
Step III: Create a Contact with IER report to validate the data
Follow the steps covered in our how to build a IER report in Salesforce: https://handsonsfmc.com/how-to-view-marketing-cloud-email-sends-in-salesforce-reports/
Your basic report should look like the following:
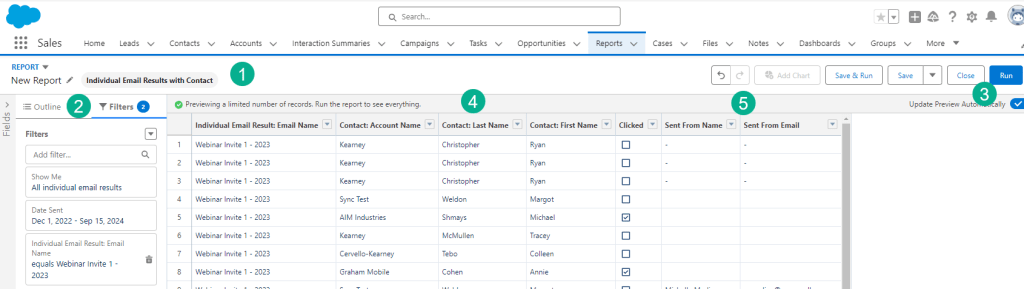
(1) Use either Individual Email Results with Contact or Lead.
(2) Select the appropriate Columns under Outline and the name of the email campaign and timeframe under Filters.
(3) Click the Run button.
(4) Verify all of the columns that you want displayed in the report.
(5) The new Sent From Name and Sent From Email fields should be blank but ready to receive data.
Step IV: In the email add functionality to write fields in the Send Log
For a breakdown of how to use the Send Log take a look at this post: https://handsonsfmc.com/how-to-use-the-send-log-in-marketing-cloud/
First you’ll want to add the custom fields to the Send Log. In this example SendFromName and SendFromEmail.
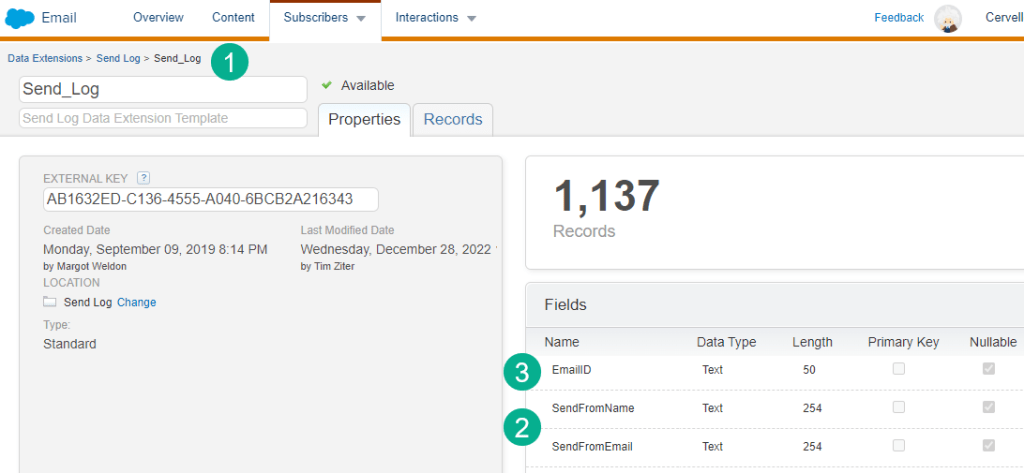
(1) In the Send Log.
(2) Add the fields that will capture the name and email of who sent the email.
(3) And valuable fields like EmailID.
Next in an ampscript code block populate the fields in the Send Log.
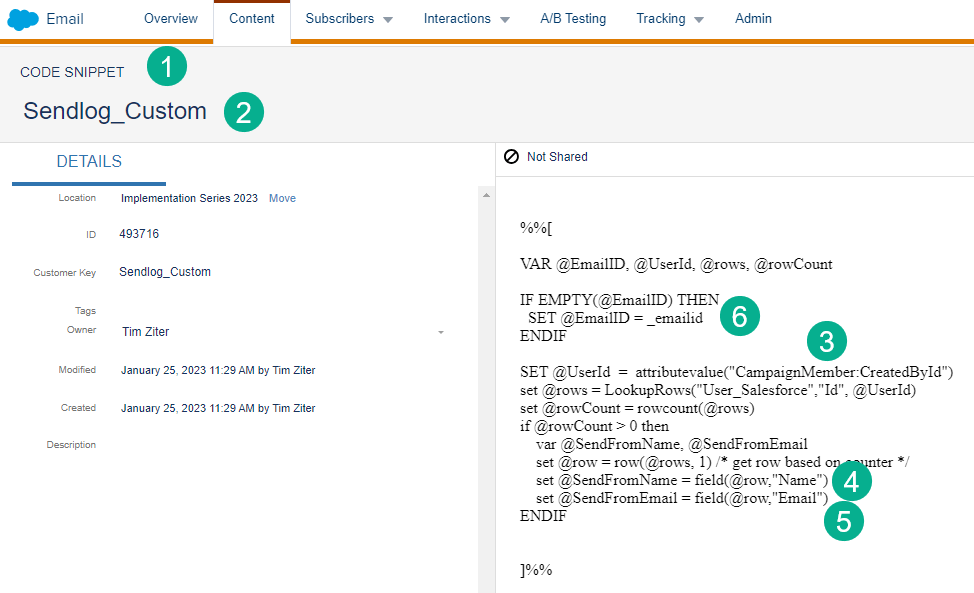
(1) Using a code snippet block is recommended when coding in Ampscript.
(2) You could create a generic script to be used in all emails to consistently populate values for each send.
(3) In this example a User ID is provided as a Data Extension value. Then the ampscript does a LookupRows to find the matching user in the Salesforce synchronized Data Extension.
(4) To populate a Send Log variable simply create a variable with the same name of the field and set it in Ampscript.
(5) Same approach for the SendFromEmail.
(6) Another example of populating the EmailId field with the _emailid personalization string.
Step V: Create Automation to populate IER records to update via the Journey
First up you’ll want to create a Data Extension that will include the key data points needed to update the IER records via the Journey.
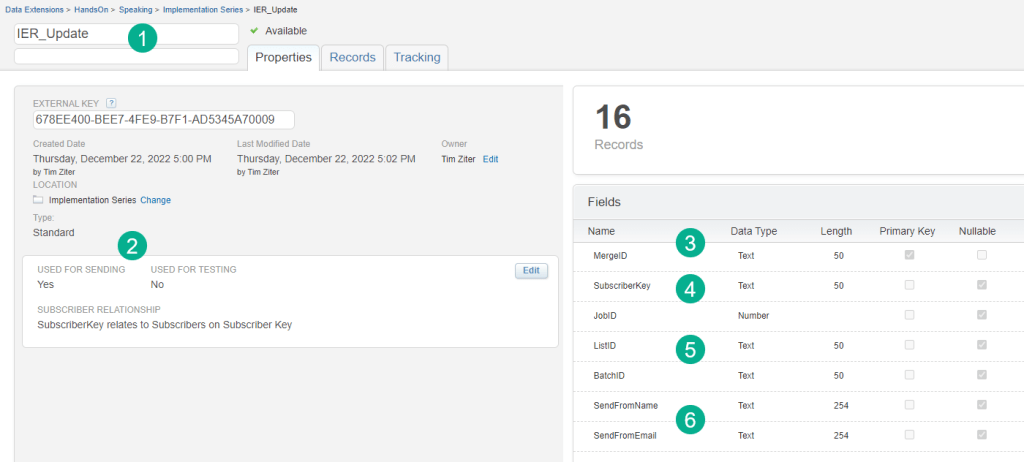
(1) Create a new data extension.
(2) Select used for Sending so that Journey builder will be able to find it.
(3) Include the MergeID as this is the unique field on the IER record in Salesforce. You can make this record the primary key.
(4) SubscriberKey can be handy from a logging/historical perspective.
(5) The JobID, ListID, BatchID will help link to the Send_Log and can be helpful for logging purposes.
(6) The SendFrom fields will be used to populate the new custom fields in the IER.
Next up create the query that will populate the data extension:
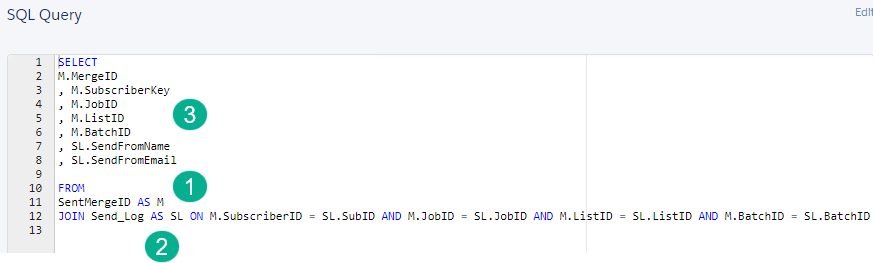
(1) The SentMerge data view is a custom data view that you can add on to your environment if you reach out to your Marketing Cloud account executive. It will have that all important MergeID to link to the IER record in Salesforce CRM.
(2) Join the SendLog to populate the SendFrom fields.
(3) And simply output all the values from both data sources.
And last create an automation that can be attached to the CRM field update journey.
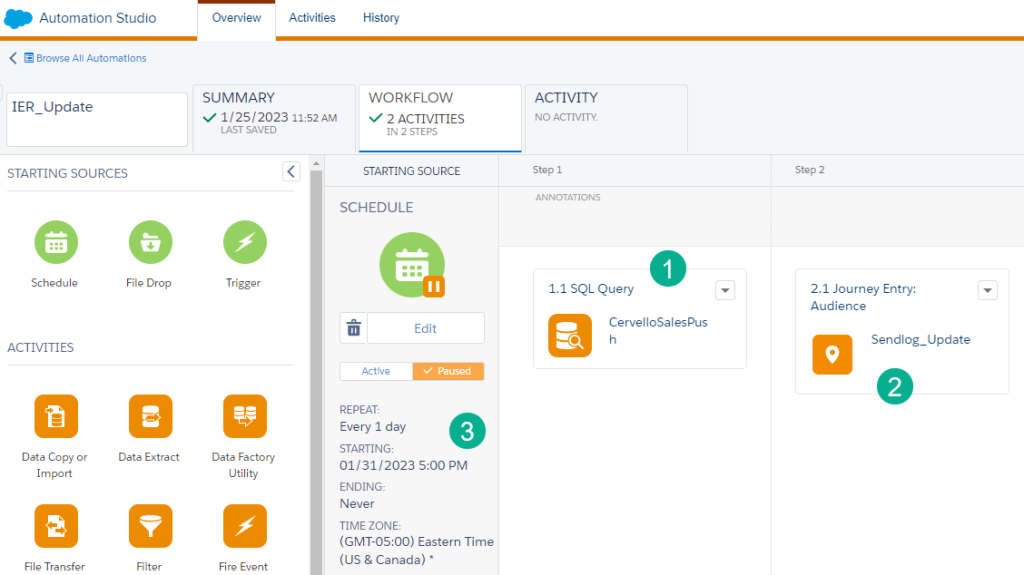
(1) Add in the query created above.
(2) When activated and attached to the Journey the Journey Entry Audience activity will appear.
(3) Schedule this automation to run maybe on a daily basis or more frequent depending on your use case.
Step VI: Create a journey to update the IER records in Salesforce
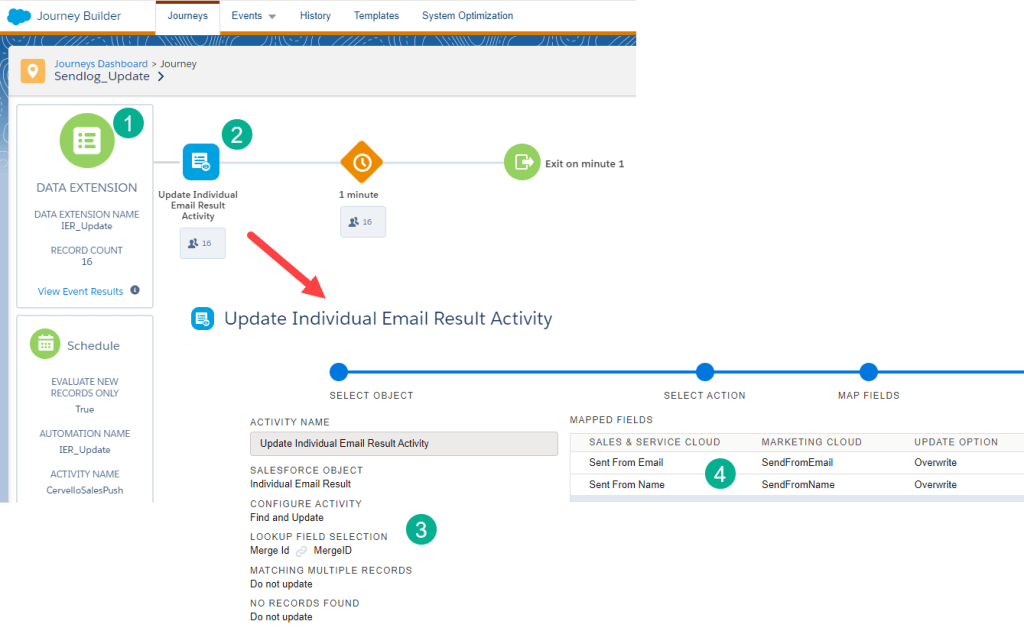
(1) You’ll want to use a Data Extension Entry Source. For a walkthrough on how to set up a Data Extension Entry Source click here: https://handsonsfmc.com/how-to-create-an-automated-journey-in-marketing-cloud/
(2) All that’s required in this journey is an Object Activity that will update the IER record.
(3) Select the Individual Email Results object using the MergeID field to make the link to the record.
(4) And update the two SendFrom fields.
Step VII: Test and validate end to end
The last step is to test the automation and Journey process on a single record before running the entire batch of records. In the video we walk through how to add a single subscriberkey as a filter on the WHERE clause to test one record E2E.
Once you validate it works on a single record you can run the rest of the records in batches or all at once depending on your use case.
And the end result after running the report in Salesforce you should see those custom fields now populated.
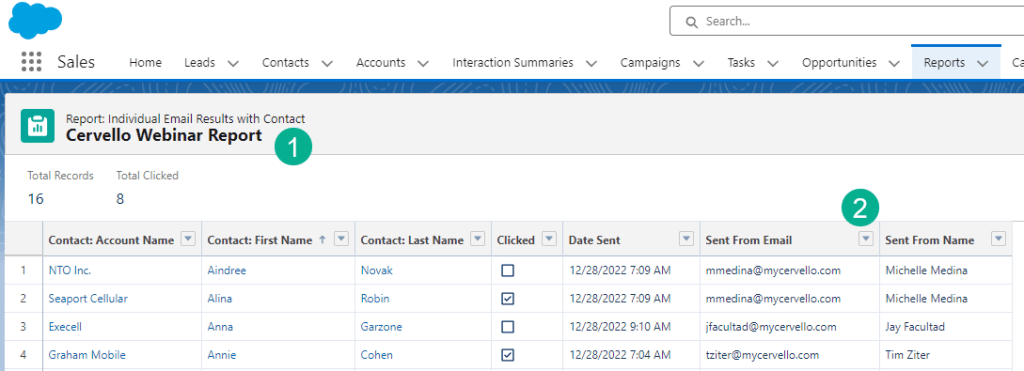
(1) In your report in Salesforce.
(2) You should see those custom fields on the Individual Email Results records populated.
Using this approach you have unlimited options to pull in any data point relevant to your use case as well as populating key data for each send in the Marketing Cloud environment in the Send Log.
Let us know how you are populating unique values in the Salesforce IER records.

Leave a comment