If your Marketing Cloud instance is connected with a Salesforce Sales Cloud or Service Cloud instance you have the ability to update Salesforce fields right in Journey Builder via the Sales and Service Cloud activities. In a prior post we walked through how to utilize these activities in a journey: https://handsonsfmc.com/how-to-update-a-campaign-member-status-using-salesforce-marketing-cloud/
But what if you have a need to update Salesforce records in bulk by itself, not as part of a multi-activity journey. With a very simple Journey you can use Journey Builder to make bulk field updates in Salesforce and that’s what we’ll walk through today.
Use Case: You’ve created a campaign in Sales Cloud and entered in thousands of campaign members who are ready to be pulled into a Journey in Marketing Cloud. Each campaign member has a status of “Add to Campaign” but in order for the records to be pulled into the Journey the status needs to change to “Send Journey”. How can you update in bulk thousands of campaign plan member records?
Solution: Build a Journey that’s single purpose is to update records in Sales Cloud. We’ll accomplish this build in three steps:
(1) Validate the campaign in Salesforce
(2) Create a query to determine all the campaign members to update
(3) Create a data extension to store the campaign members and be the entry source for the Journey
(4) Create a query, run it once with a test record to populate the data extension
(5) Create a journey with a Object Activity and activate it to test the update functionality
(6) Verify the update, modify the query to run the entire data set through the journey
(7) Validate all records are updated and check All Subscribers to verify no new subscribers have been created
Step I: Validate the campaign in Salesforce
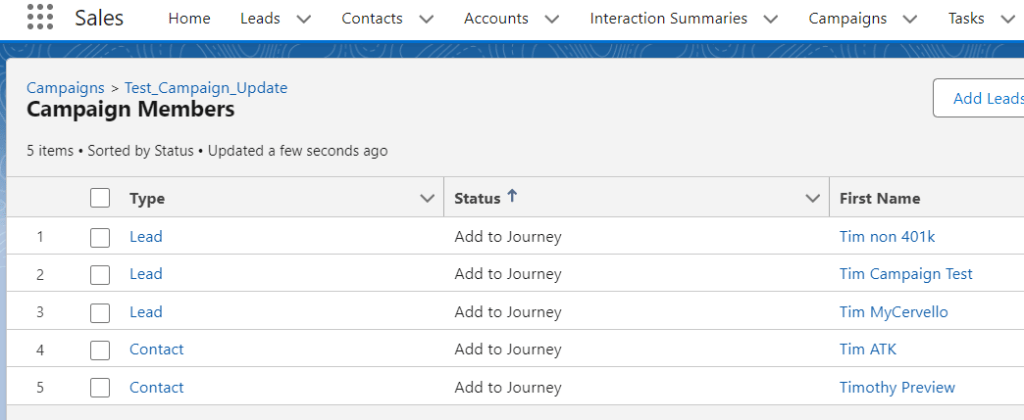
Our first stop is Sales Cloud to view the campaign and campaign members created sitting with a status that needs to be changed:

(1) The campaign we’re using is called Test_Campaign_Update and in the url we can capture the campaign id: 701Kg000000gSU6IAM which will be useful in our query in Marketing Cloud.
(2) Here we can see all of the campaign members with their status of “Add to Campaign”.
(3) In order to pull them into a Journey we need to update the statuses to “Send Journey”.
Step II: Create a query to determine all the campaign members to update
Let’s shift back into Marketing Cloud and create a query in Query Studio to visualize those campaign members. To get a free copy of Query Studio, an incredibly important Marketing Cloud tool please click here: https://appexchange.salesforce.com/appxListingDetail?listingId=a0N3A00000FP3yFUAT
All of the data we’ll use in our query comes from the campaign member synchronized data extension:
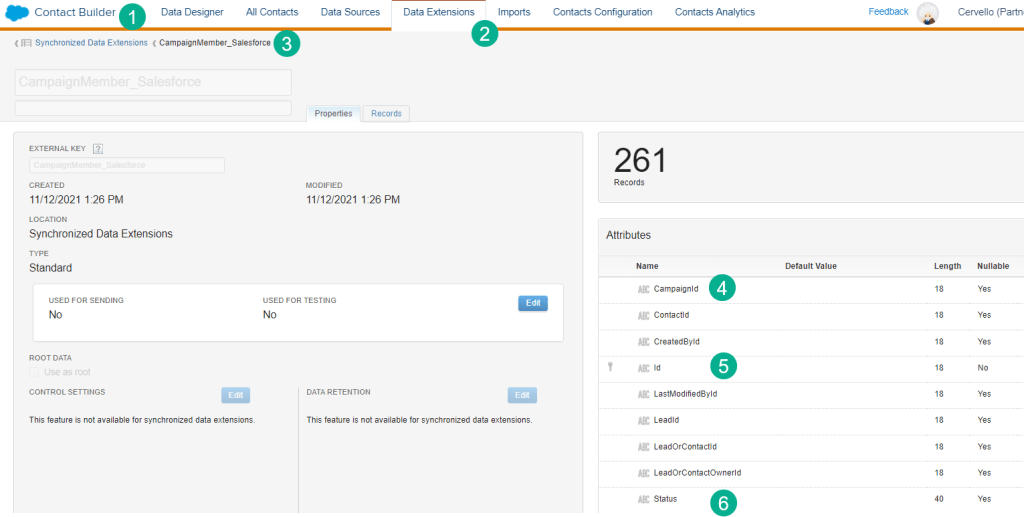
(1) In Contact Builder.
(2) Under the Data Extension tab.
(3) Select the campaignmember_salesforce synchronized data extension. For a walkthrough on how to create synchronized data extensions click here: https://handsonsfmc.com/how-to-create-a-synchronized-data-extension-in-marketing-cloud/
(4) We’ll need three fields to create our query: The campaign ID.
(5) The campaign member ID.
(6) and the Status.
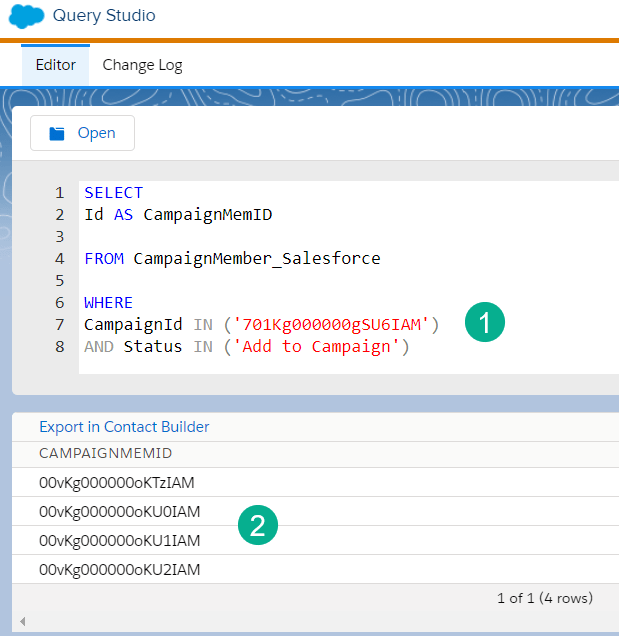
First let’s validate the entire data set in the query:
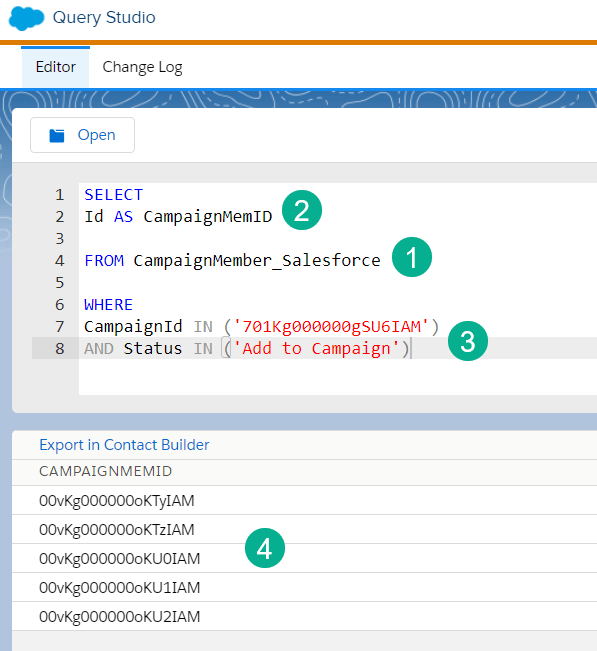
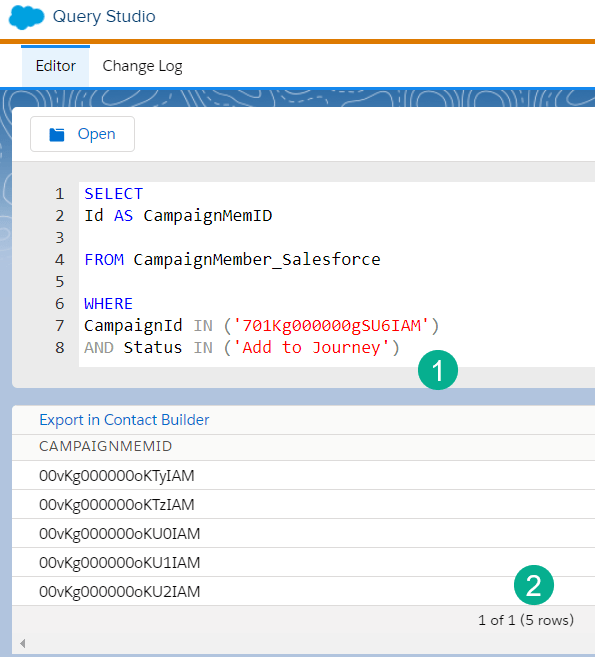
(1) Our FROM statement is pulling data from the campaignmember_salesforce synchronized data extension.
(2) The only output or field we’ll need in our SELECT statement will be the campaign member ID, which identifies the records we need to update in Salesforce.
(3) Our WHERE statement contains two filters (1) the campaign ID that we capture above so that we only pull in campaign members from our campaign and (2) we only need to pull in those members that have a status of “Add to Campaign”. You can see we’re using the IN function which gives us flexibility in case we want to include multiple values. You can also use the ‘=’ function.
Query Tip #1: Use Single Quotes
When creating a query in Marketing Cloud it’s best practice to use single quotes vs double quotes to identify your data value.
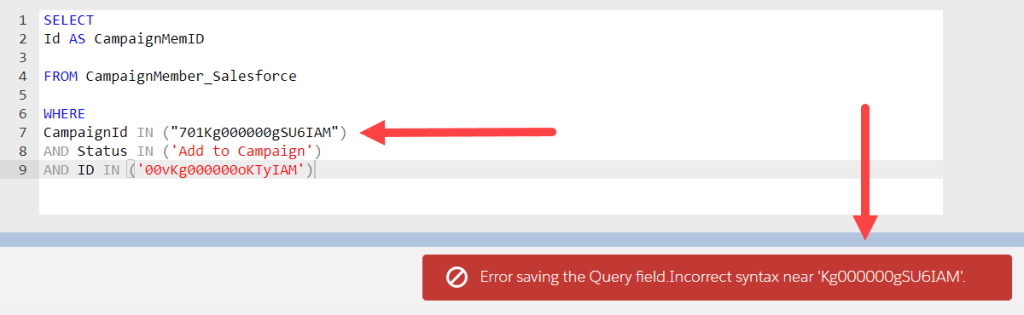
As you can see above double quotes in Query Studio will not work.
(4) We can see our output as expected when running the query, five records to update.
Let’s tweak the query to pull in only once campaign member to test before we run the entire set through the journey.
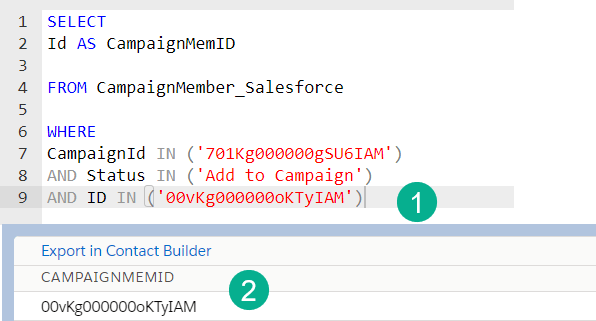
(1) In our WHERE add a line selecting the campaign member ID of the test record.
(2) We can see in the output only one record populated.
Step III: Create a data extension to store the campaign members and be the entry source for the Journey
In either Email Studio or Contact Builder create a simple data extension to capture your campaign member IDs.
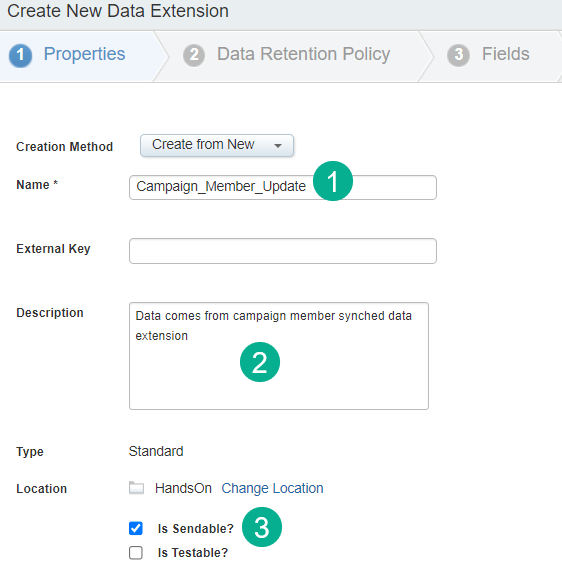
(1) Enter the name.
Data Extension Tip #1: Avoid space in the DE name
When creating a data extension it’s best practice to avoid including spaces in the name. It’s easier when using the data extension in queries or API calls if there are no spaces. For instance in a query you’ll need to include square brackets to reference the data extension. i.e FROM [Data extension name] vs FROM Data_extension_name
(2) Enter in a description.
Data Extension Tip #2: Use the description to record where your data comes from and you could also indicate the query where it’s used. We learned this tip from Matt Brulet in a Data Cloud Bootcamp session so thank you Matt!
(3) Don’t forget to check Is Sendable here as it won’t be recognized as a Journey Entry source without this checked.
For this use case we’ll not include retention settings but that might depend on your environment.
And last we’ll add the campaign member id, the only field you’ll need in this data extension.
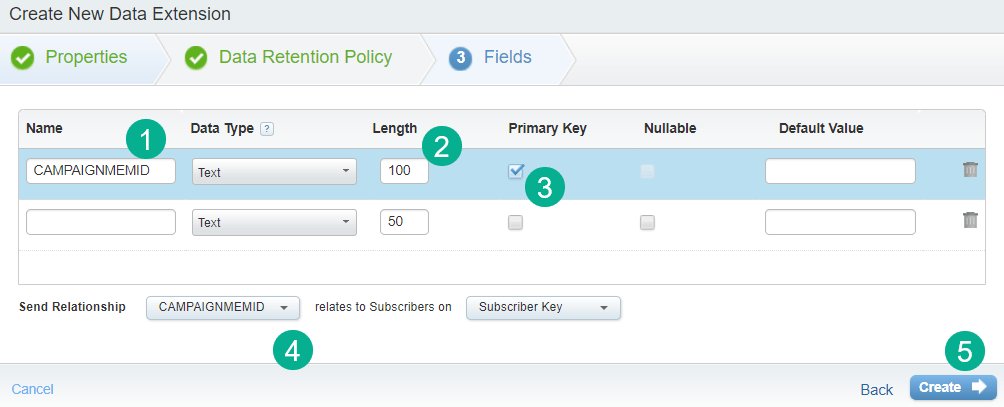
(1) Paste in the name of the field from our query.
(2) Pad the length in case the ID you are using is longer than 50.
(3) Just to be sure we prevent any duplicates we’ll select primary key for the value.
(4) Because it’s a sendable DE we’ll need to select the field in the Send Relationship.
(5) Click create and you are done.
Step IV: Create a query, run it once with a test record to populate the data extension
In automation studio we’ll create a new query:
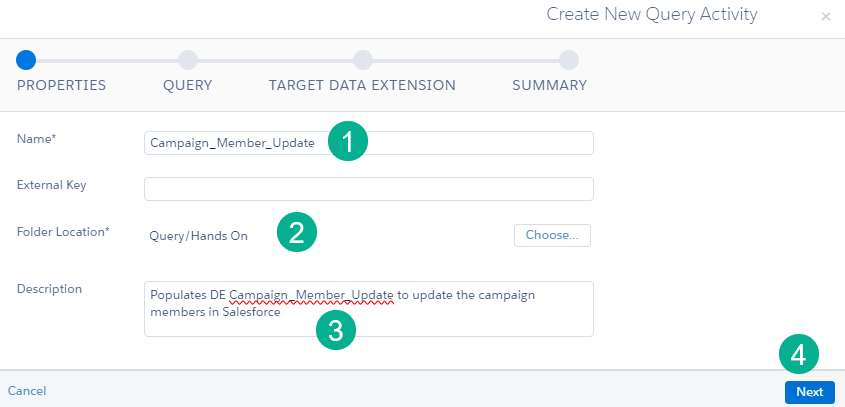
(1) It can be convenient to keep the same naming convention for your DE to your query.
(2) Don’t forget to select your folder when creating the query otherwise it’ll be placed in the default query folder.
(3) Entering a description always helps.
(4) Click Next.
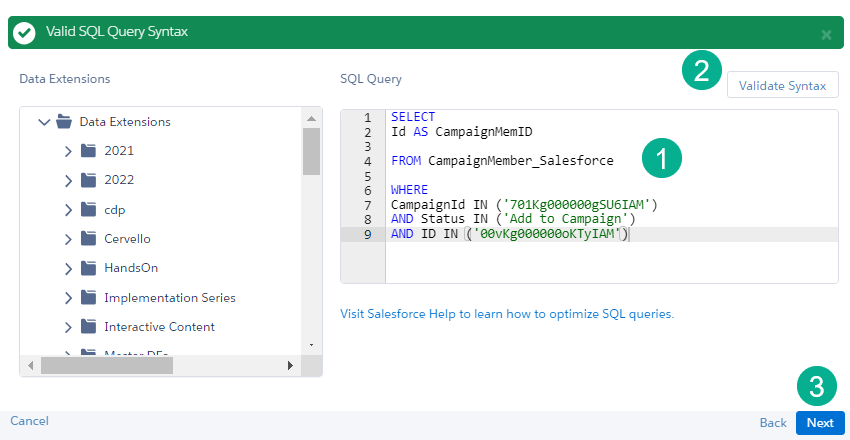
(1) Paste in your query from Query Studio.
(2) Click Validate Syntax just to be sure. If the green bar appears you are good to go.
(3) Click Next.
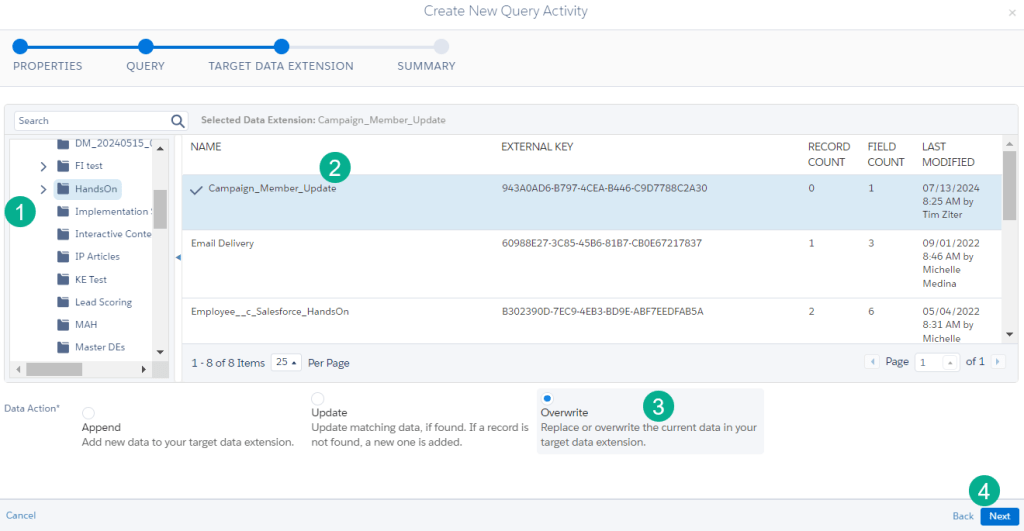
(1) Navigate to your data extension folder.
(2) Select the data extension.
(3) For our use case Overwrite will work, but always be mindful whether to use Update or Append depending on your use case.
(4) Click Next.
Last step let’s run the query on it’s own. If you aren’t setting up a query to run regularly in an automation save yourself the steps by just running the query on it’s own.
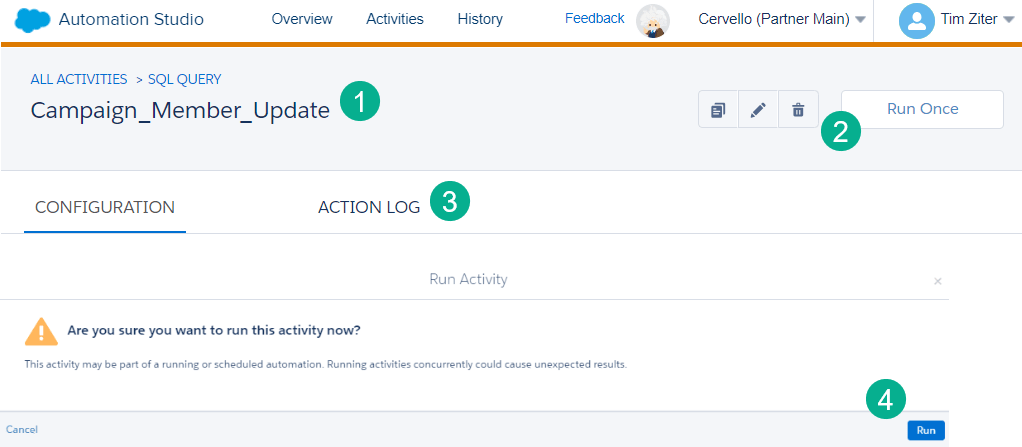
(1) Navigate to the query you built above.
(2) Select Run Once.
(3) Unlike the automation you’ll not be able to see the running of the query in progress. Checking the Action Log shortly after you click Run Once will help solve any errors that might arise.
(4) A pop-up window will appear asking if you are sure, click Run.
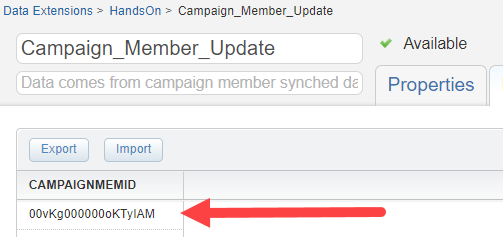
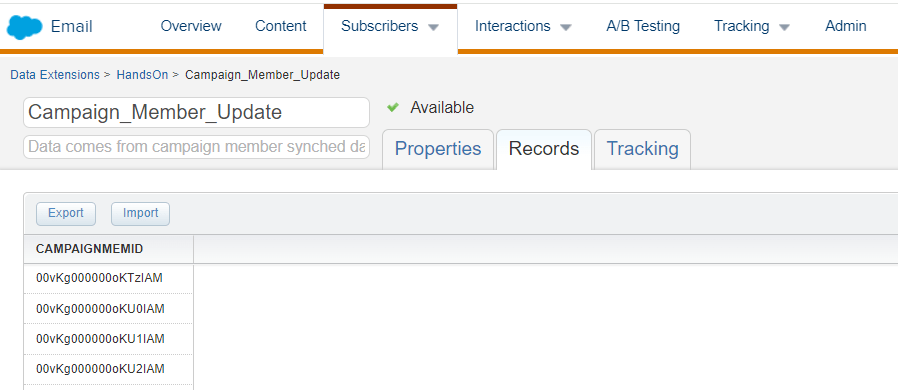
Checking the data extension a minute or so later you should see your record appear.
Step V: Create a journey with a Object Activity and activate it to test the update functionality.
Now for the fun part sending through the campaign member record to be updated in Salesforce Sales Cloud via a Marketing Cloud Journey.

(1) In Journey Builder.
(2) Click on the Create New Journey button.
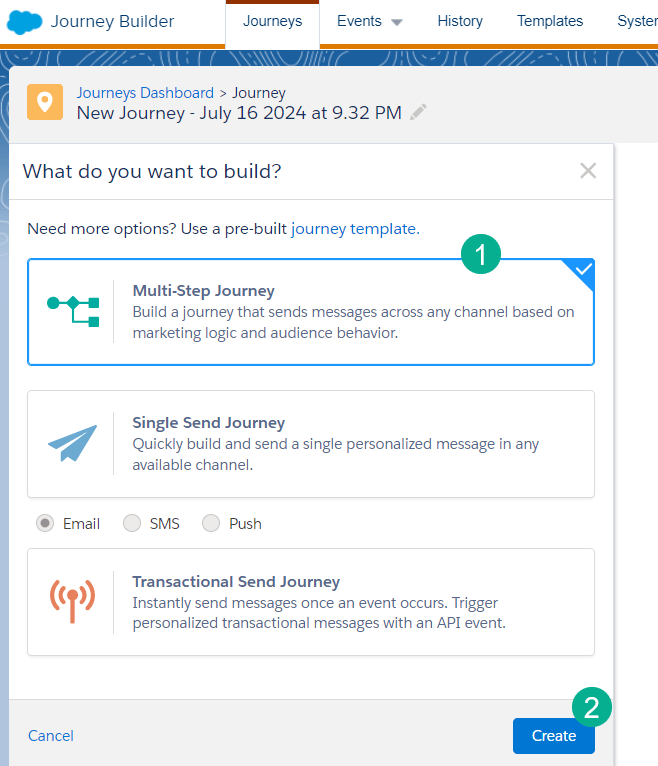
(1) Select a Multi-Step Journey.
(2) and click on the Create blue button.
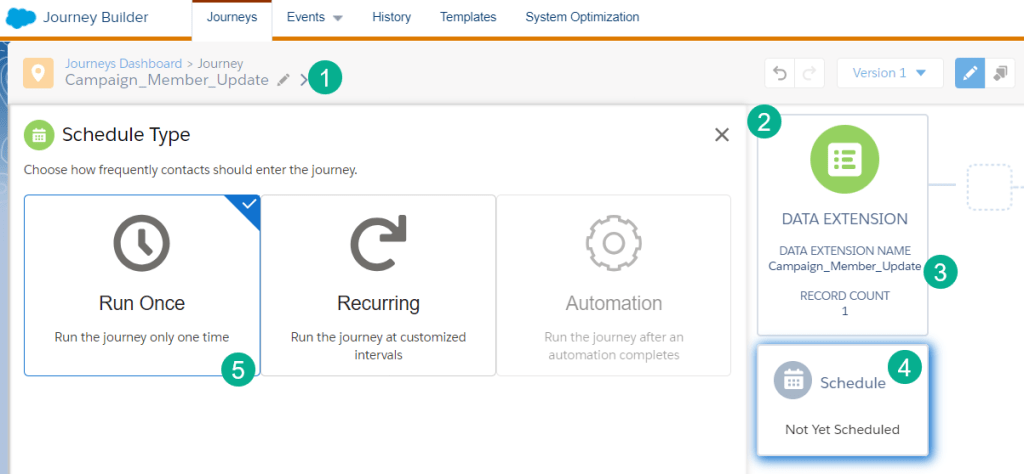
(1) Enter a name for your journey.
Journey Builder Tip #1: Always name your journey and save first.
If you don’t Journey Builder will automatically name your journey something like “New Journey…” which is not easy to change. To change a name of a journey you’ll need to create a new version, but for version #1 the auto populated name will always be there.
(2) Add a Data Extension entry event.
(3) Select the data extension created above.
(4) Click on the Schedule box.
(5) Select Run Once if your data extension isn’t tied to an automation.

Don’t change the default “Journey runs on activation” setting.
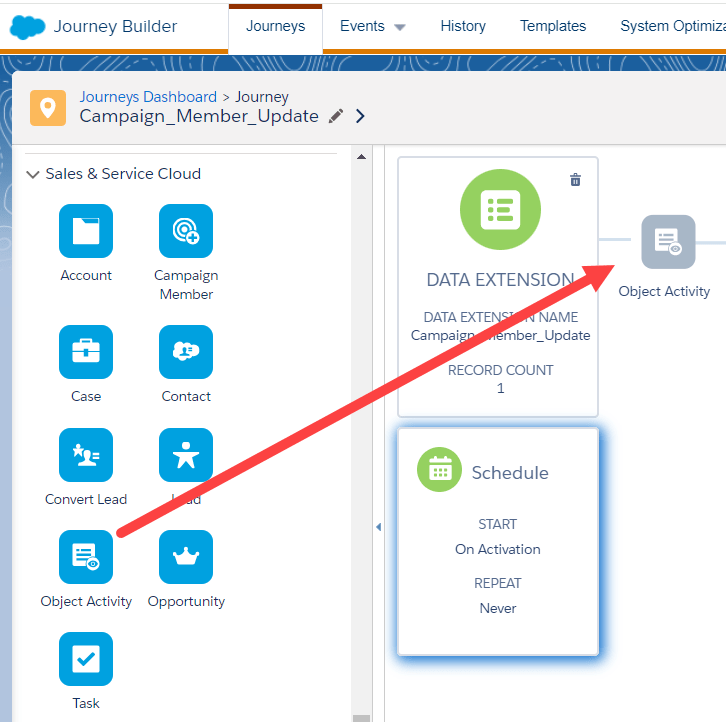
Add an “Object Activity” activity from the Sales and Service Cloud activities to your canvas and click into the activity to begin configuration.
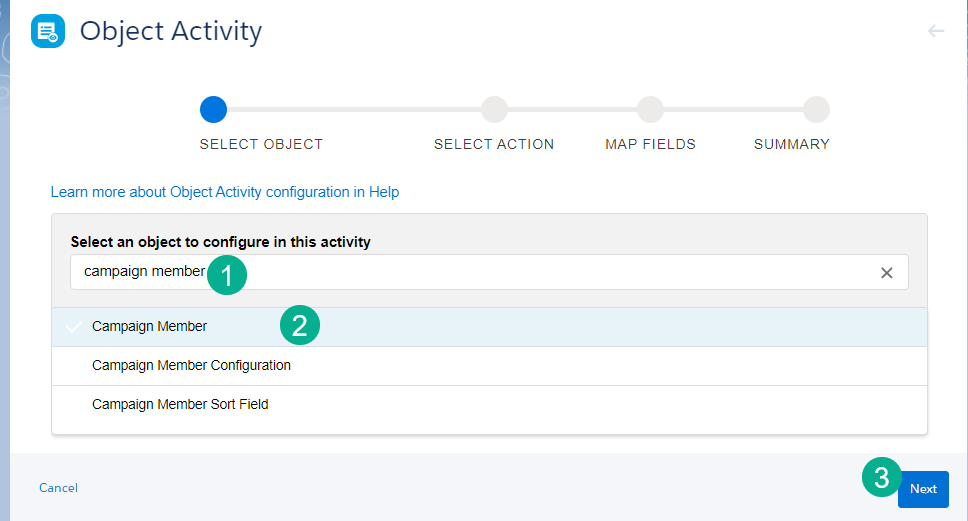
(1) Search for Campaign member.
(2) Select Campaign Member.
(3) Click Next.

(1) Select Find and Update.
(2) Select “Campaign Member ID”.
(3) Select “Campaign Member ID”.
(4) Select Journey Data.
(5) Select the field that has the campaign member id or CAMPAIGNMEMID.
(6) Select “Do not update” for both of the Records drop down options.
(7) Click on the blue Next button.
Now let’s select the field that we need to update in Sales Cloud.
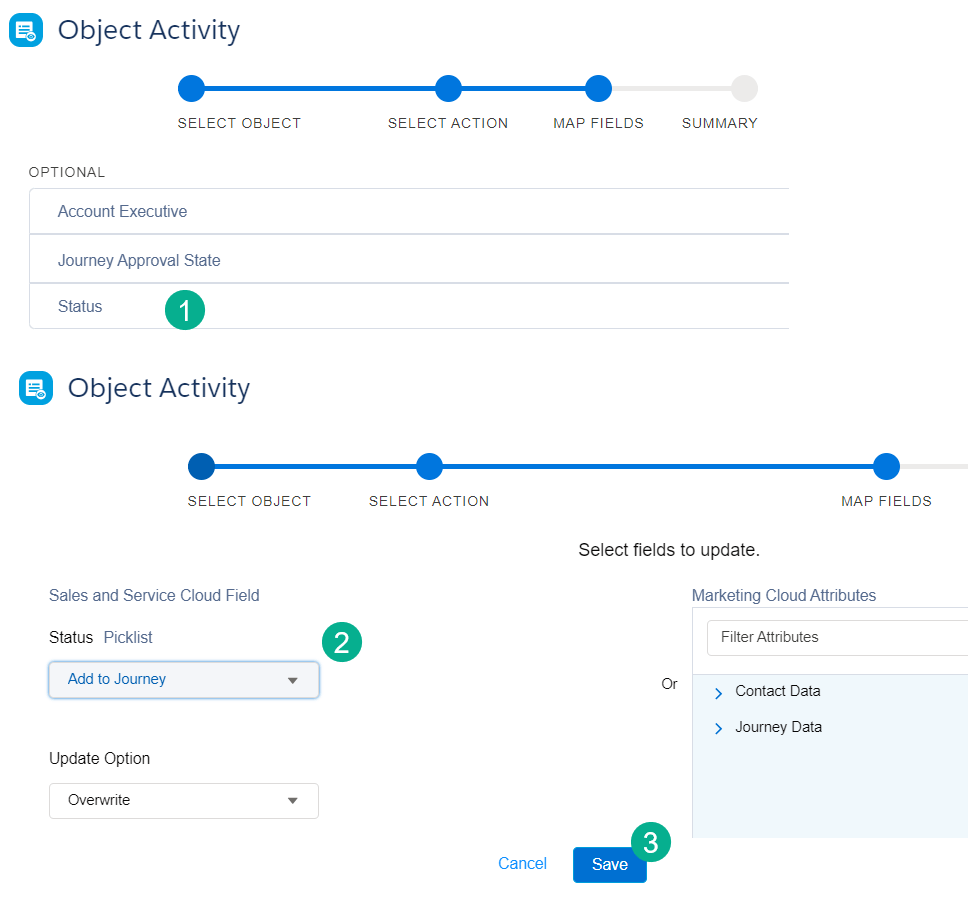
(1) In our case we want to update the Status field in Sales Cloud.
(2) Select the name to update either from a picklist or a text field.
(3) Click Save.
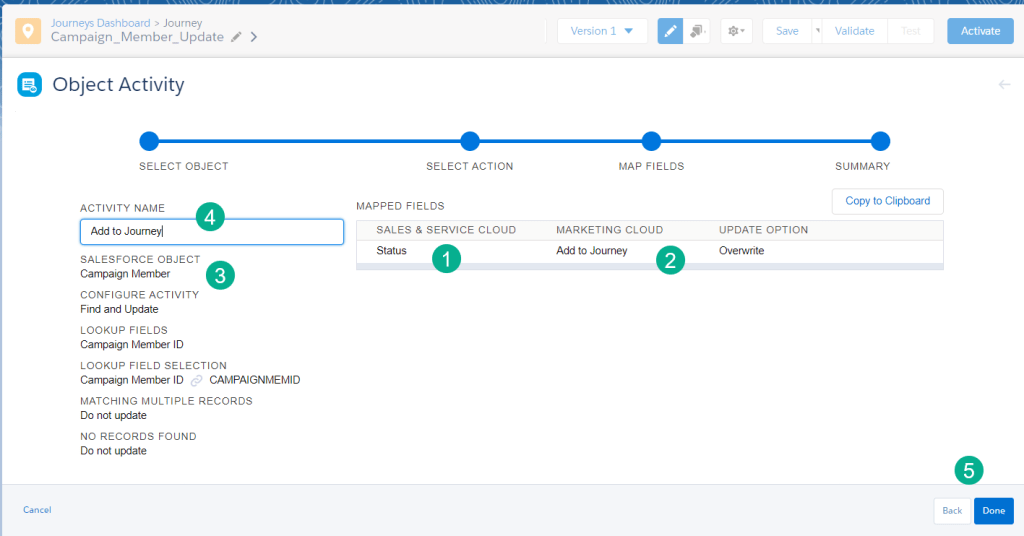
(1) In the summary screen review the field(s) updated.
(2) Confirm the name to be updated.
(3) Confirm the object selected in the activity.
(4) It can be helpful to name the activity to the updated status so you can verify visually on the Journey canvas.
(5) Click Done.
Just a few more housekeeping steps in Journey Builder and you are all set.
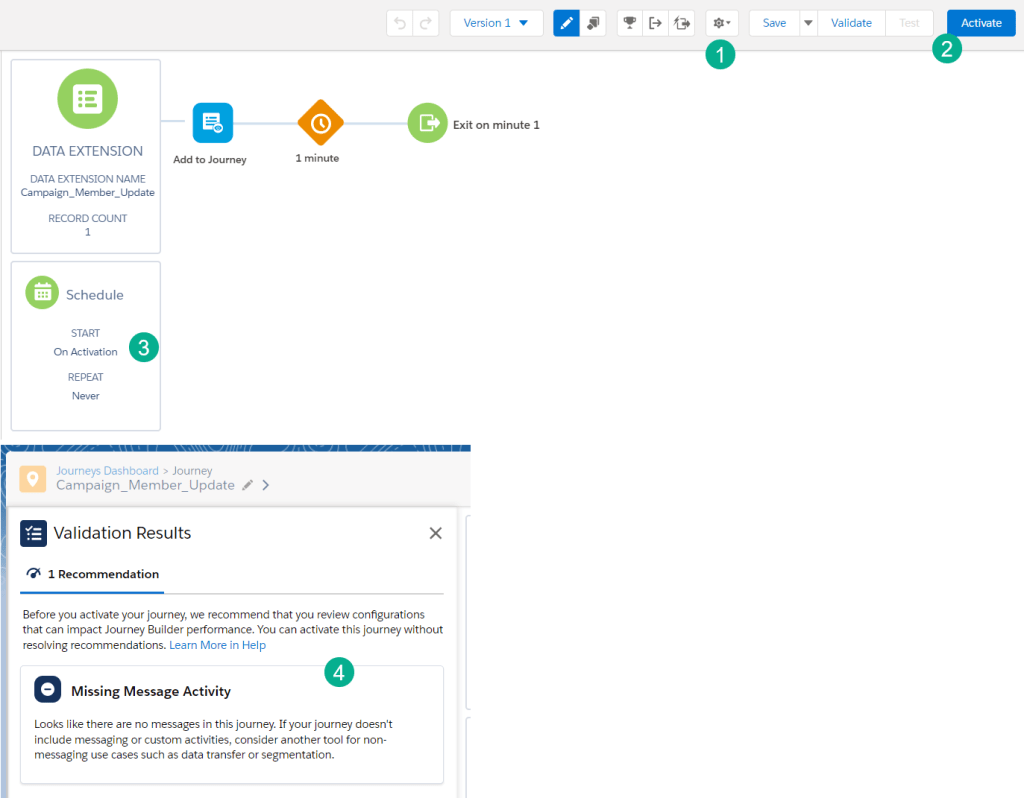
(1) Enter your Journey Settings.
(2) Click Activate.
(3) The one time activation will enter in those subscribers in the data extension whenever you activate a new journey version.
(4) You can ignore the Missing Message Activity warning and complete activation.
Step VI: Verify the update, modify the query to run the entire data set
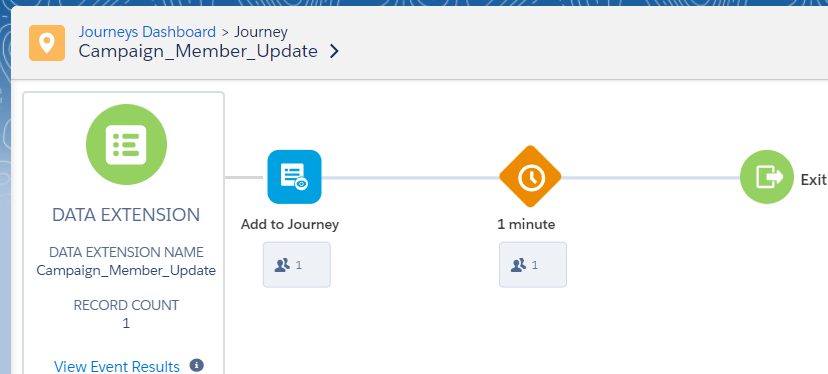
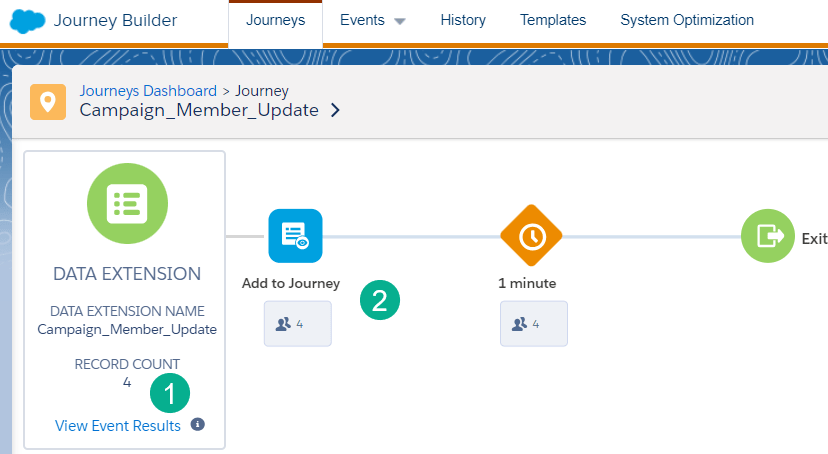
We can see in the Journey, once refreshed, that the subscriber passed through as expected.
Let’s navigate back into Salesforce to see if our test campaign plan member status was updated.

(1) Under the campaign tag.
(2) We can see our test campaign member has the status updated to “Add to Journey”.
(3) Clicking into the campaign member.
(4) Validated on the campaign member the status has been updated.
Now let’s modify the query removing the single record filter to update the rest of our records in bulk.
(1) Take out the filter for the individual record.
(2) running the query in Query Studio first we can see all four remaining records which we will update in bulk.
Running the query we validate the four records appearing in the data extension.
Create a new version of the journey and activate it to send the additional bulk records through the journey.
(1) Before you activate validate the count in the data extension.
(2) Running the journey all four records were sent through the journey.
Journey Tip: If you are updating large quantities of records add a Random Split activity with multiple paths including hourly wait steps to spread out the API calls to Salesforce Sales Cloud.
Step VII: Validate all records are updated and check All Subscribers to verify no new subscribers have been created
First let’s navigate to Sales Cloud to validate all records have been updated.
If your count is too large to spot check modify your query to filter only on those with “Add to Journey” for status.
(1) Update the Where clause.
(2) See the count at the bottom of the query in Query Studio.
Last just to be sure you didn’t add any new subscribers, check All Subscribers with a few of the campaign member IDs.
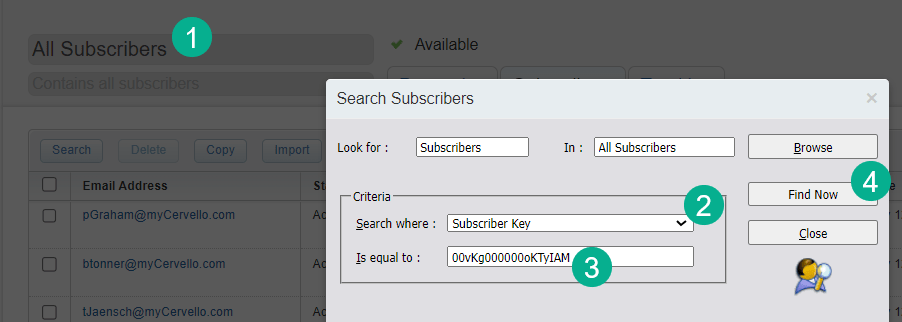
(1) In Email Studio navigate to All Subcribers. For a helpful blog on checking subscriber status in All Subscribers please click here: https://handsonsfmc.com/how-to-check-subscriber-status-in-all-subscribers/
(2) Select Subscriber Key.
(3) Paste in one of the campaign member ids.
(4) Select Find Now.
You should not see any of the field ids in All Subscribers but always good to check given they were added to a send-able data extension.
Have fun using this journey to update all types of Salesforce Sales Cloud records and let us know if you have any builds on these tools.

Leave a comment