Have you recently launched an email campaign and want to determine email addresses that have bounced. In this post we’ll show you a variety of bounce reports you can create and customize using the bounce dataview in Marketing Cloud.
Bounce Report #1: The Basic
All reports will be created using a query and populating the data in a data extension. To experiment with your Bounce report it will be helpful to install the free Query Studio app: https://appexchange.salesforce.com/appxListingDetail?listingId=a0N3A00000FP3yFUAT
We’ll be utilizing the bounce dataview for this query. We recommend two different resources that breakdown Marketing Cloud data views:
(1) Mateusz Dabrowski’s Data View overview gives you an excellent overview of the resource: https://mateuszdabrowski.pl/docs/config/sfmc-system-data-views/
(2) Salesforce Data View overview provides the basics of all dataviews with an easy to toggle menu to switch between views: https://help.salesforce.com/s/articleView?id=sf.mc_as_data_view_bounce.htm&type=5
Let’s take a look at this first query:

(1) In our FROM statement we are pulling from the _Bounce data view from the link above.
(2) We’re looking for specific data points. The subscriberkey so we can identify the subscriber in this case Lead Id to determine who to reach out to regarding the bounce. The EventDate is helpful to understand timestamp. And the BounceCategory and Bounce reason to help determine priority and details of the bounce.
(3) In our WHERE clause we want to specify a certain time period:
– The DATEADD function is being used to determine a date range. For more information on the syntax for this helpful SQL function please click here: https://www.w3schools.com/sql/func_sqlserver_dateadd.asp
– Don’t forget if you are looking back to use a negative number in position two.
– The GETDATE function pulls in the current date/time. For more on this SQL function please click here: https://www.w3schools.com/sql/func_sqlserver_getdate.asp
(4) In our output we have the subscriberkey which gives us each lead id to track down to address the bounced send.
(5) The category gives us the bounce type. We’ll want to address those Hard Bounces first compared to Soft Bounces. For more details on bounces please click here: https://help.salesforce.com/s/articleView?id=sf.mc_es_bounce_mail_management.htm&type=5
(6) The bounce reason can be very helpful to determine the cause of the bounce.
These four fields are one of many different fields in the bounce data view. Simply navigate to the link above and select the fields from the list as shown here:
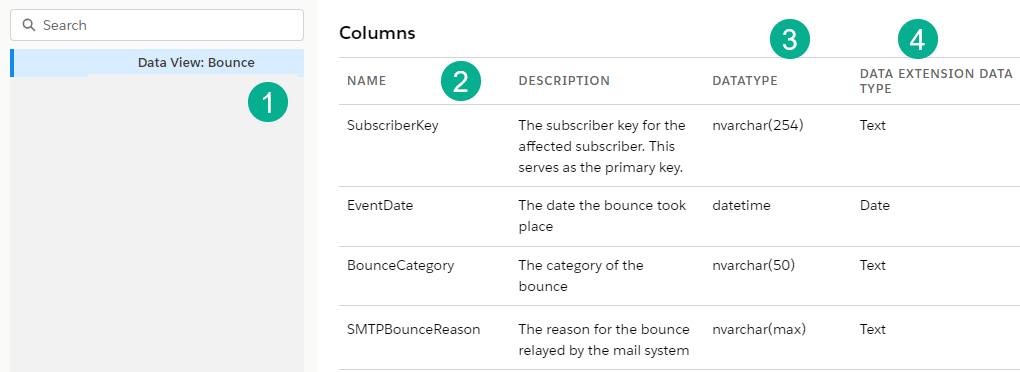
(1) Navigate to the Bounce data view.
(2) Scroll down to find the fields by name needed in your query.
(3) Be mindful of the data type when bringing in the data.
(4) As well as the DE data type.
All that is left to do is build a data extension and a query to populate your basic bounce query into a DE which could be exported to an excel document and shared with the appropriate parties. For more on creating a data extension please click here: https://handsonsfmc.com/how-to-create-a-data-extension-in-marketing-cloud/
Here is the query featured above:
SELECT
SubscriberKey
, EventDate
, BounceCategory
, SMTPBounceReason
FROM _Bounce
WHERE EventDate >= DATEADD(Day, -90, GETDATE())
Bounce Report #2: Basic single campaign
Most organizations will need to be a bit more specific with their bounce reporting and target the query to a specific email campaign. To do this we’ll want to JOIN the _Job data view: https://help.salesforce.com/s/articleView?id=sf.mc_as_data_view_job.htm&type=5 to allow us to specify a certain campaign or in our case an email send.
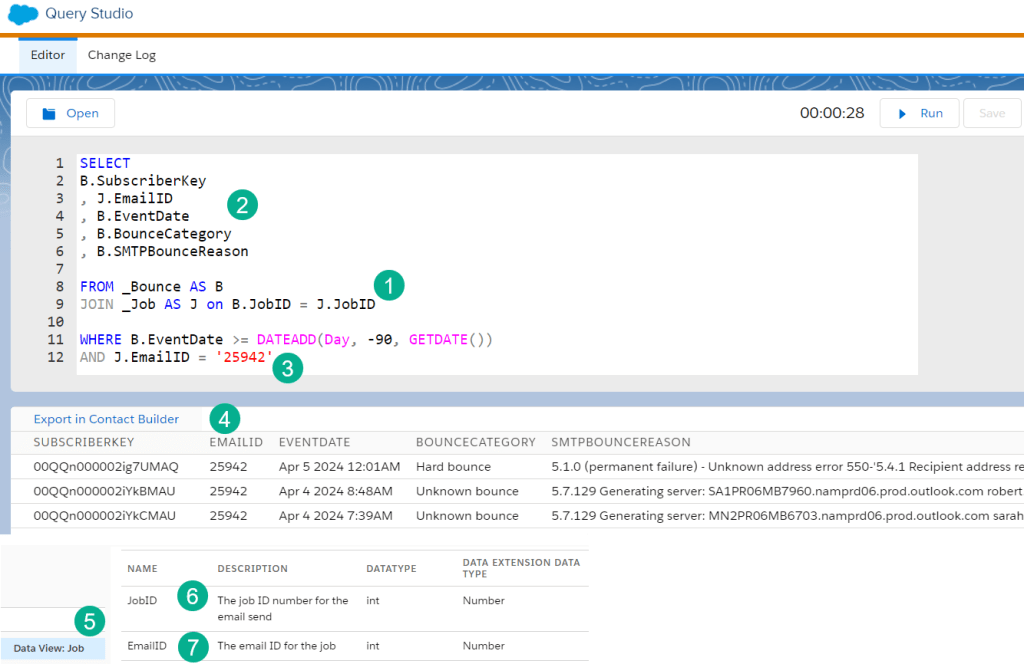
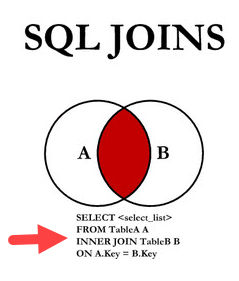
(1) We’re going to JOIN the _Job dataview. Leveraging our query cheat sheet: https://handsonsfmc.com/query-cheat-sheet/ we’ll determine that an INNER JOIN or a simple JOIN is the preferred syntax as we want records that are in both data views:
We’ll also need to label both data views in our query now that there are multiple data sources (B and J) and for our ON statement, reviewing both queries we find that the JobID field is common between both data tables.
(2) We’re selecting the EmailID and adding that data point to our SELECT statement to be added to our output. We also have to add J. or B. before each data point as we now have two data tables in our FROM.
(3) In our WHERE we’re adding a filter to look for one specific EmailID. An EmailID can be found on the content properties screen:
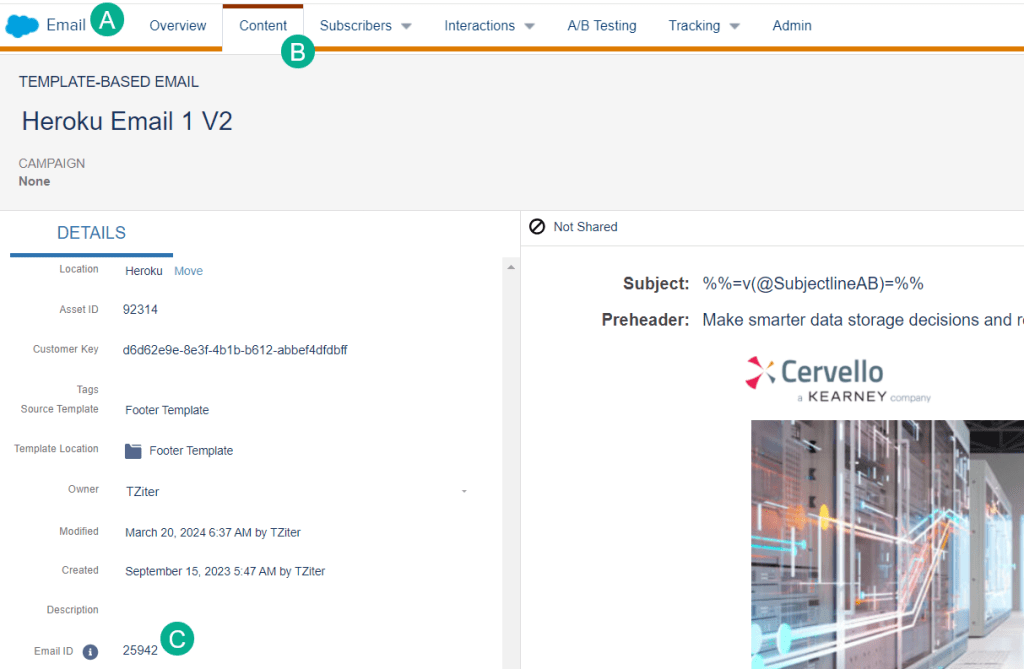
(A) In Email Studio.
(B) Navigate to the email content
(C) Before you click in and edit the email the properties tab will appear and on the left you’ll find the EmailID, a unique ID for each content piece.
(4) Verify the EmailID in the output.
(5) In the Job dataview.
(6) Note the JobID field which is also present in the bounce dataview and is a common connector from Job to other dataviews.
(7) The EmailID is one of the data points on the Job table.
Here is the query featured above:
SELECT
B.SubscriberKey
, J.EmailID
, B.EventDate
, B.BounceCategory
, B.SMTPBounceReason
FROM _Bounce AS B
JOIN _Job AS J on B.JobID = J.JobID
WHERE B.EventDate >= DATEADD(Day, -90, GETDATE())
AND J.EmailID = ‘25942’
Bounce Report #3: Enhanced Bounce Report
What if your stakeholder needs additional data points related to the bounced email send. Simply JOIN data from other data sources to enhance your bounce query.
Use Case – Identify Account Owner
In our use case our stakeholders want to identify who the Account owner is where the bounce occurred so they can forward the report.
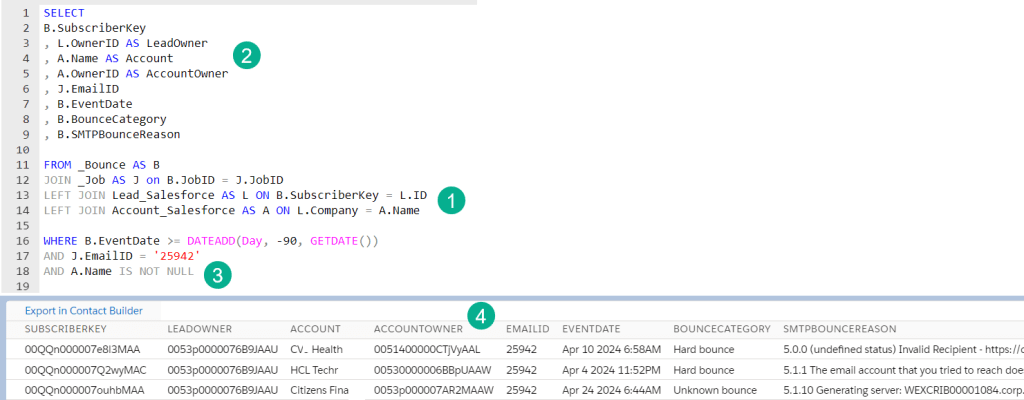
(1) We are joining the Lead and Account synchronized data extensions to pull in Lead and Account fields. Like the above query we are finding those data points that exist in both data sets that will allow us to JOIN them to the data Job/Bounce data sets. We are using LEFT JOINs in case the bounce records aren’t leads or don’t have an associated account. For more on how to set up synchronized data extensions please click here: https://handsonsfmc.com/how-to-create-a-synchronized-data-extension-in-marketing-cloud/
(2) We’re adding data points to the output to determine either to follow up with the lead owner or the account owner.
(3) In this use case we’re specifically looking for Account owners so we’ll add this filter at the bottom. For more information on the NOT NULL syntax please click here: https://www.w3schools.com/sql/sql_null_values.asp
(4) In our output we’re validating the lead and account user id.
Here is the query featured above:
SELECT
B.SubscriberKey
, L.OwnerID AS LeadOwner
, A.Name AS Account
, A.OwnerID AS AccountOwner
, U.Name
, J.EmailID
, B.EventDate
, B.BounceCategory
, B.SMTPBounceReason
FROM _Bounce AS B
JOIN _Job AS J on B.JobID = J.JobID
LEFT JOIN Lead_Salesforce AS L ON B.SubscriberKey = L.ID
LEFT JOIN Account_Salesforce AS A ON L.Company = A.Name
JOIN User_Salesforce AS U ON A.OwnerID = U.ID
WHERE B.EventDate >= DATEADD(Day, -90, GETDATE())
AND J.EmailID = ‘25942’
AND A.Name IS NOT NULL
We also added in an additional feature to the query above joining the User so the stakeholder doesn’t have to look up the user ID in Salesforce.

(1) Joined the User synchronized data extension.
(2) Outputting the user name in the SELECT.
(3) Validating the user name in the output.
Hopefully these three bounce report queries give you at the very least a starter query to use to customize based on your use case. Please share how you customize your bounce report in your environment.

Leave a comment