This blog is a part II to our first blog on “How to delete contacts in Marketing Cloud” which you can find here: https://handsonsfmc.com/2024/03/24/how-to-delete-contacts-in-marketing-cloud/
Why do we need another post, because deleting contacts in Marketing Cloud is complicated. Let’s say you followed the following usual steps:
(1) You reduce the number of contacts and leads synched from Sales Cloud to Marketing Cloud.
(2) You delete those All Contact contacts that aren’t engaging
Both of these approaches are covered in detail in our first blog. But what happens if you still see a mysterious number of contacts that don’t match your counts. Here’s an example. In a sample account we have the following contact numbers:

We have zero synched Leads and only 186 synched Contacts. These counts are found by navigating to the synchronized data extension folder in Contact Builder.
In addition our All Subscriber and or All Contact count is 4,055:
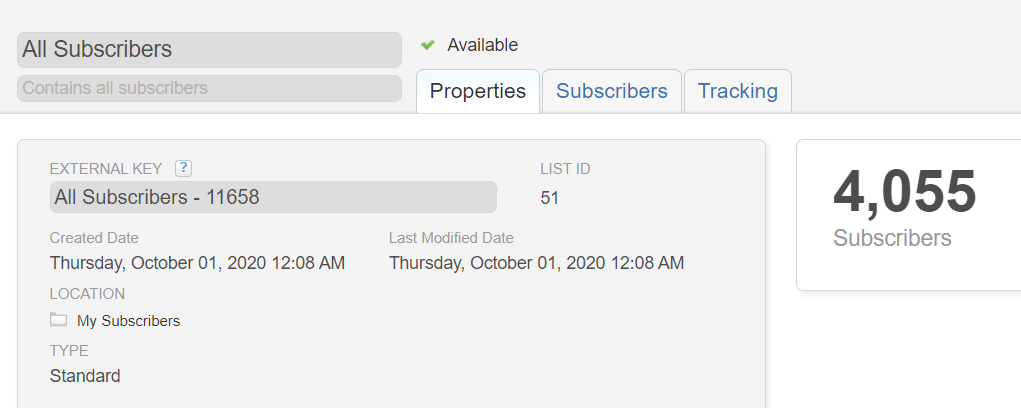
That brings our total contact count to 4,241. But when we run our Contact report we get the following count:

Wow! That’s a 14,000 contact difference. And look at those lead and contact counts, they are way off!
Solution: Delete Contacts Without Channel Address
Here’s a step by step plan to delete and narrow the gap with your contact records in the system vs what is reported.
Step I: Find all the contacts without a channel address
Salesforce has a helpful list of steps which we will walk through in detail. https://help.salesforce.com/s/articleView?id=sf.mc_cab_contacts_without_channel_address.htm&type=5
(A) Create a data extract to create the Contacts Without Channel Address data extension.
Under a general admin folder create a new Data Extract activity in Automation Studio.
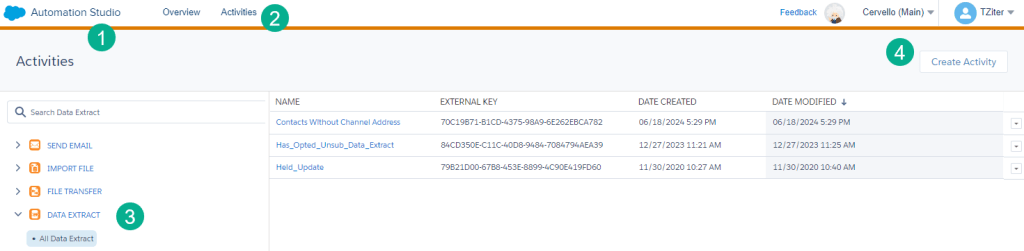
(1) Under Automation Studio
(2) Select the Activities tab
(3) Select the Data Extract folder
(4) Select “Create Activity”
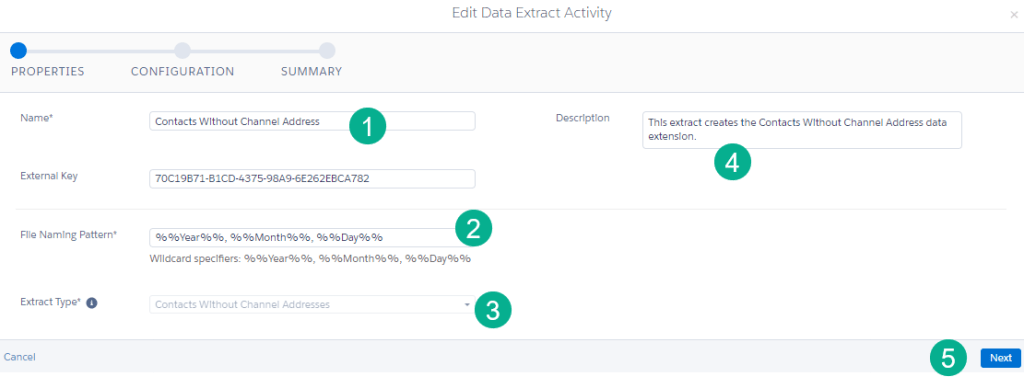
(1) Enter in a name, we recommend: “Contacts Without Channel Address”
(2) Select a file naming pattern. It doesn’t matter what you select here if the DE will only be used for deletion. The following will work:%%Year%%, %%Month%%, %%Day%%
(3) Select the “Contacts Without Channel Address” Extract Type
(4) Enter in a description and
(5) Click done
The next screen typically is blank so just select the Next button.
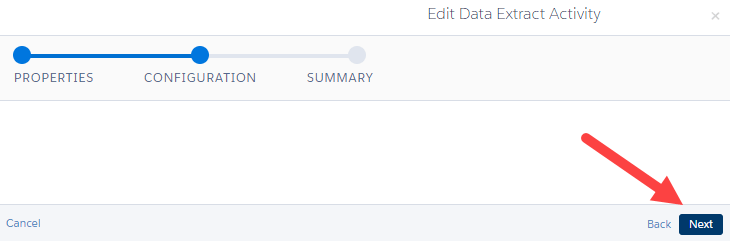
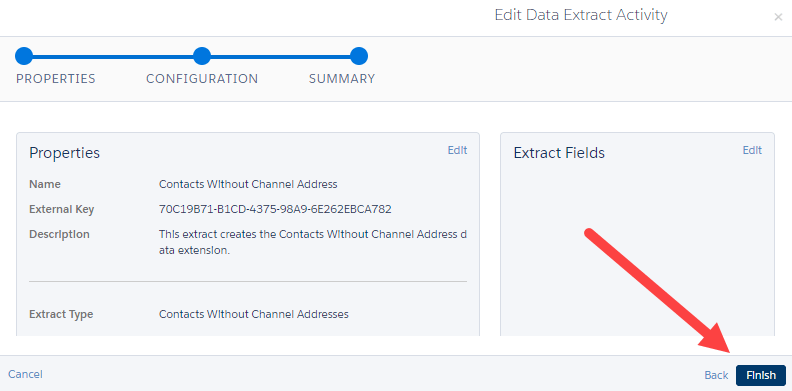
The next screen will give you a summary of the settings, click Finish.
(B) Run the Data Extract
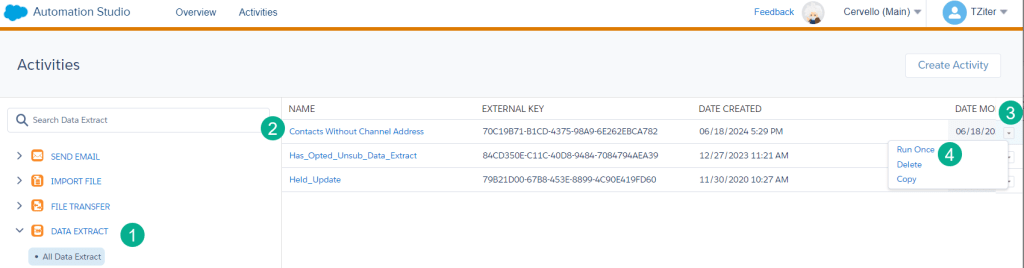
(1) In the Data Extract activity folder
(2) Find the Data Extract you created
(3) Select the arrow box on the right
(4) Select Run Once
(C) Validate the Contacts Without Channel Address data extension and data
Depending on the size of your data it make take a couple of hours for the data extension to be created.
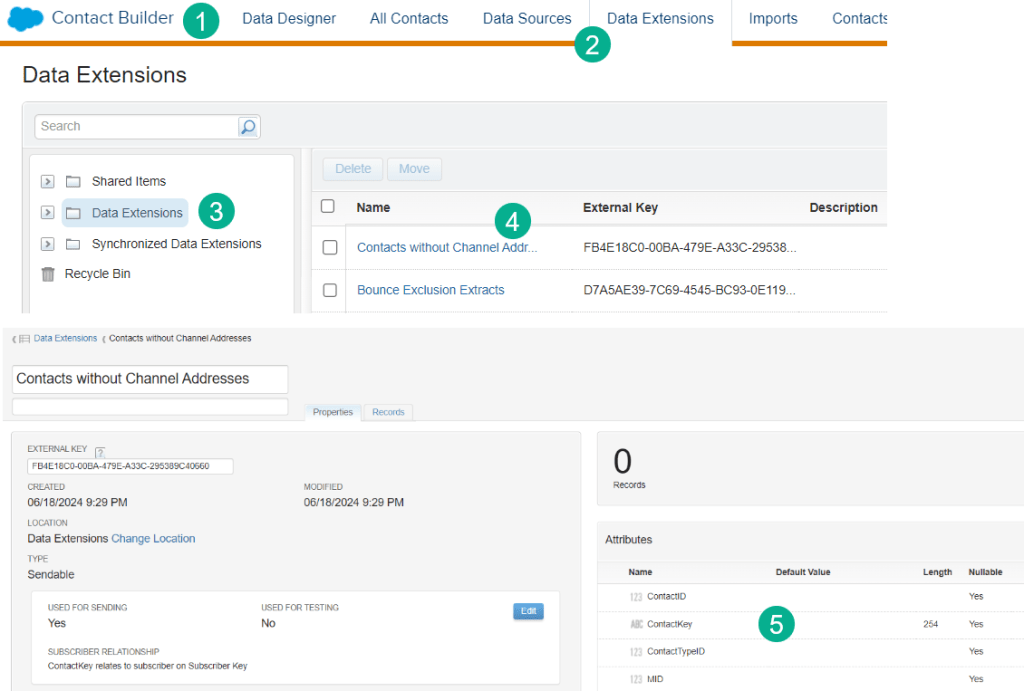
(1) In Contact Builder
(2) Under Data Extensions
(3) Select the root Data Extension Folder
(4) The Contacts without Channel Addresses data extension will appear
(5) Note the fields that are included in the data extension and click on the Records tab to view the contacts/leads.
Step II: Pause the Contact, Lead and User synchronized data extensions
In Contact Builder navigate to the synchronized data extension data sources:
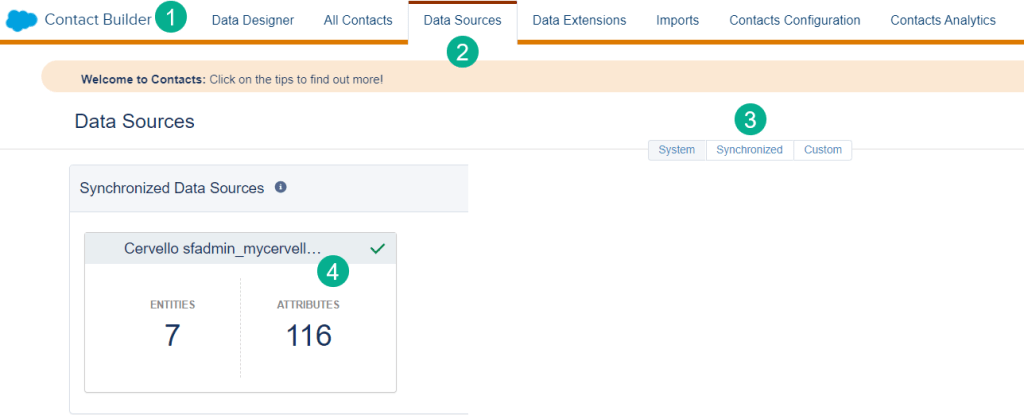
(1) Under Contact Builder
(2) Select Data Sources
(3) and the Synchronized tab
(4) Select box that details your Entities and Attributes in the following screen
Select either the Lead, Contact or User synchronized data extension.
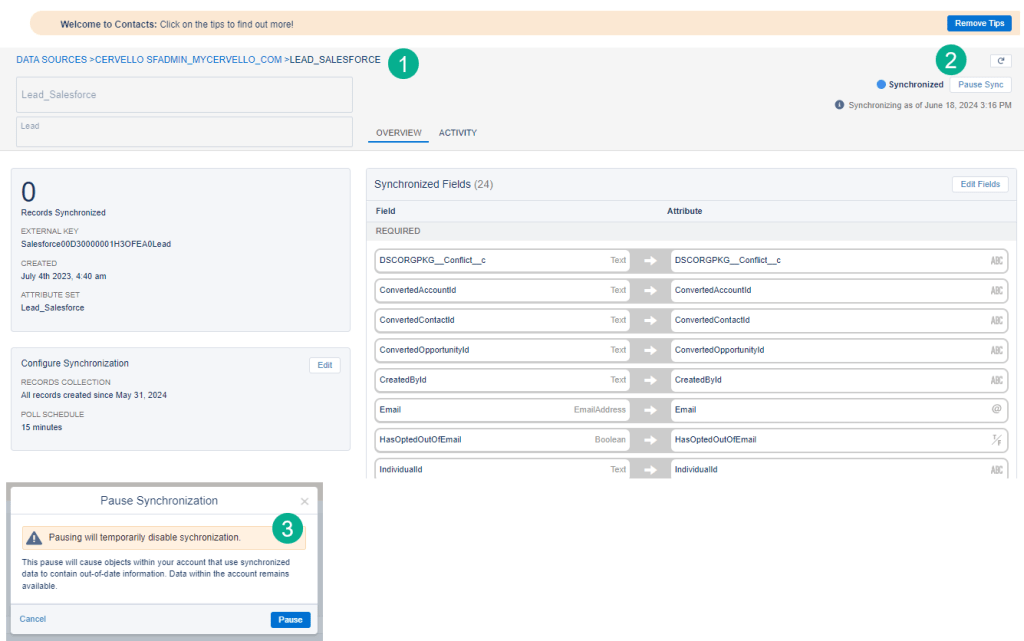
(1) Lead was selected here,
(2) Select the Pause Sync button
(3) A pop up window will appear, click Pause
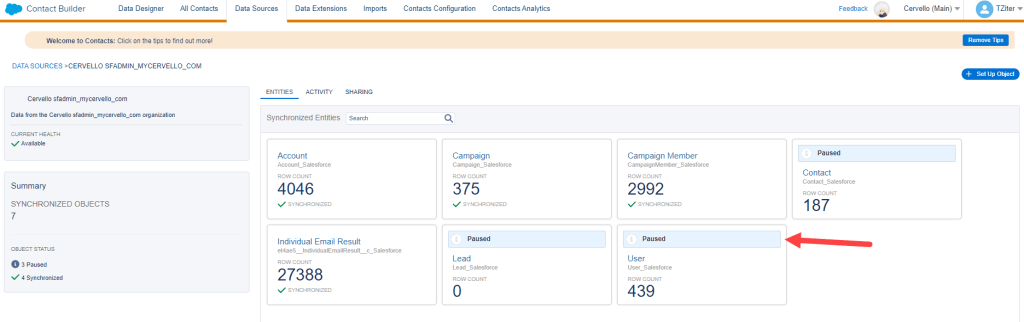
Follow the same steps for Contact and User. In the end your data source window should look like this:
Step III: Turn on Contact Delete functionality
Before you can delete contacts in bulk, first turn on the Contact Delete functionality:
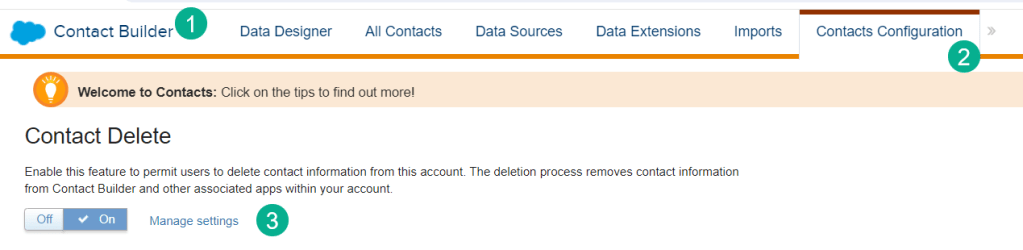
(1) Under Contact Builder
(2) Select Contacts Configuration
(3) Turn on Contact Delete
It’s recommended to turn on this feature only when deleting and then turn it back off to prevent accidental contact deletion.
Step IV: Delete contacts in a data extension
Once Contact Delete is turned on follow these steps to delete contacts in a data extension:

(1) While in Contact Builder
(2) Select the All Contacts tab
(3) Select the trash can button on the right
(4) Select “Delete contacts from data extension”

(1) Navigate to the folder where the data extension is stored
(2) Select the data extension
(3) Select delete the data extension if you want to delete the records and data extension as well. For our use case we’ll leave this unchecked and use the same data extension to bulk delete in the future.
(4) Click the Delete Contacts button
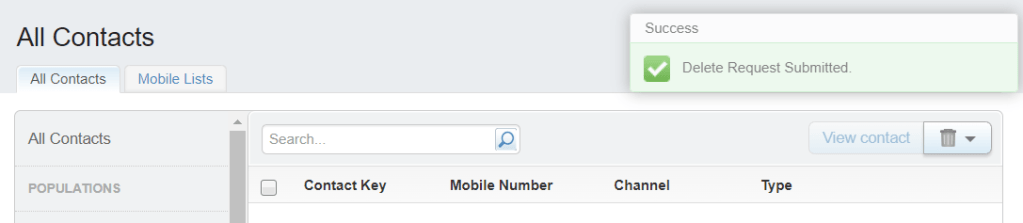
This screen will pop up alerting the user to the variations of the deletion in various parts of Marketing Cloud. Click the Delete Contacts button.

Once clicked the following confirmation window will appear in All Contacts.
Step V: How to confirm contacts have been deleted in Marketing Cloud
Once submitted you can validate the deletion has been submitted and depending on the size of the deletion see the changed records in a minute or two.
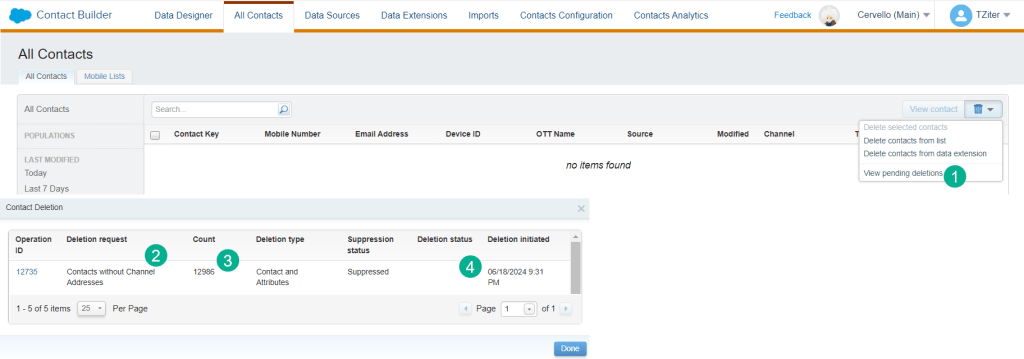
(1) Under the trash can button select “View Pending Deletions”
(2) In the popup window under the deletion request will be the name of the data extension
(3) and the count of the records to be deleted
(4) and the status and date submitted.
Step VI: How to confirm the contact count has been reduced
Run the Contact Counts report to validate the reduction.
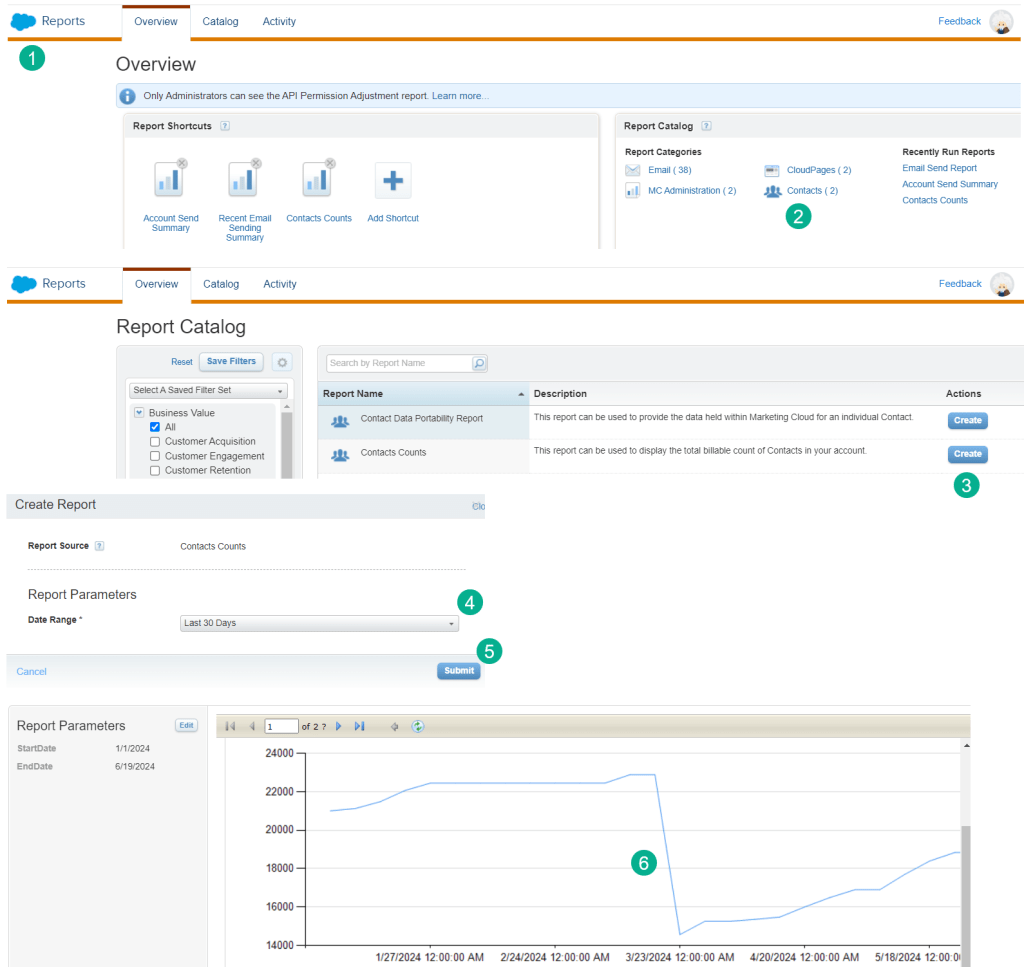
(1) In Reports under the Analytics Builder icon in the home screen
(2) Select Contacts in the reports catalog
(3 Select the Create button on the Contacts Counts section
(4) Select your timeframe in the next popup, 30 days should be fine if you just suppressed the contacts
(5) Click Submit
(6) And the report should show the drop in the count
Contact Deletion Tips
1.) Stay ahead of your contact counts. Schedule a routine process to delete unnecessary contacts and leads (even users).
2.) Synch only the contacts/leads you need. Utilize the filter options in the synchronized data extensions to reduce the number of records in your Marketing Cloud environment. No need to have all Contacts/Leads in both places.
3.) Be mindful of the SubscriberKey. Standardize your subscriber relationship settings on your data extensions so that you are creating a consistent SubscriberKey and prevent duplications of records for each subscriber.
Please share with us your methods and strategies to maintain a minimum set of contacts in your environment.

Leave a comment