Data Cloud Ingestion API allows external applications to programmatically push data into Data Cloud. To enable this functionality, a Data Cloud admin first sets up the Connecter and the Data Stream according to an agreed upon ingestion schema. However, before an external app can start using Data Cloud APIs, a Salesforce admin must authorize the external app by setting up a Connected App on the platform with the application details, and must configure all the required permissions.
In this article, we’ll go over all the necessary steps in creating this Connected App, and at the end, you will be equipped with everything that the application team would need to know to start pushing data into Data Cloud.
Create a Digital Certificate
As Data Cloud APIs are protected, we’ll be enabling OAuth settings in our Connected App in the next step. There are lot of ways external applications can access protected Salesforce APIs through a connected app, but we’ll be focusing on the JWT Bearer Flow today, and if you wish to explore other potential methods for your use-case, check out the official documentation.
JWT Bearer Flow makes sense for the Ingestion API use-case as we want our external application to connect to Data Cloud through a server-to-server integration without any user interaction. To enable this flow, we will need to upload a Digital Certificate so that Salesforce can verify that the incoming requests are coming from the authorized external application.
We do not want to dive too much into the details of the digital certificate in this article, so we’ll simply use the command below to generate a Salesforce compatible certificate that expires in 300 days. A pre-requisite to running this command in your terminal/command prompt, is the OpenSSL client, so please install that before proceeding.
When prompted to enter basic information, we’ll fill in the Country, State, Organization, and Email, and leave the others blank/default. Please feel free to update these as you see fit for your app.
openssl req -x509 -sha256 -noenc -days 300 -newkey rsa:2048 -keyout salesforce.key -out salesforce.crt
Here’s what the above options mean, in brief:
- x509 → Output a X.509 certificate
- sha256 → sign the certificate using SHA256
- noenc → do not encrypt private keys
- days → days until the certificate expires
- newkey → generate a new key with given algorithm (rsa) and number of bits (2048)
- keyout → file to contain the private key
- out → file to contain the certificate
Create a Connected App
Keeping the certificate handy, navigate to the App Manager and click on New Connected App to start configuring our app.
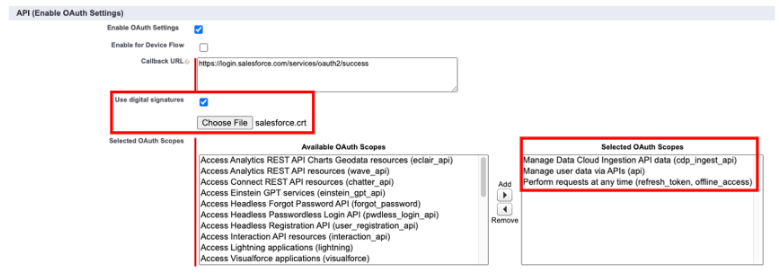
After entering the basic details for the app, we get to the important part — enabling and configuring the OAuth settings. To use the JWT Flow, as discussed above, we need to check the use digital signatures checkbox, and upload the certificate we created in the last step.

After entering the basic details for the app, we get to the important part — enabling and configuring the OAuth settings. To use the JWT Flow, as discussed above, we need to check the use digital signatures checkbox, and upload the certificate we created in the last step.
Finally, we add all the scopes required to push data via the Ingestion API and then save the connected app (you may leave all other options as default).
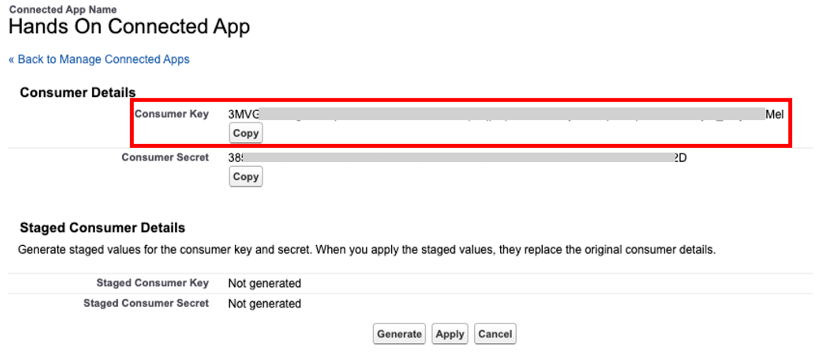
Now if we visit the details page for our connected app, we should see that everything has been properly setup, and the meta-data we attached to our certificate (country, org name, email, etc) has been correctly parsed.

While we’re on this screen we’ll click on Manage Consumer Details and then copy our Consumer Key because we’ll need to use this later to make API calls.
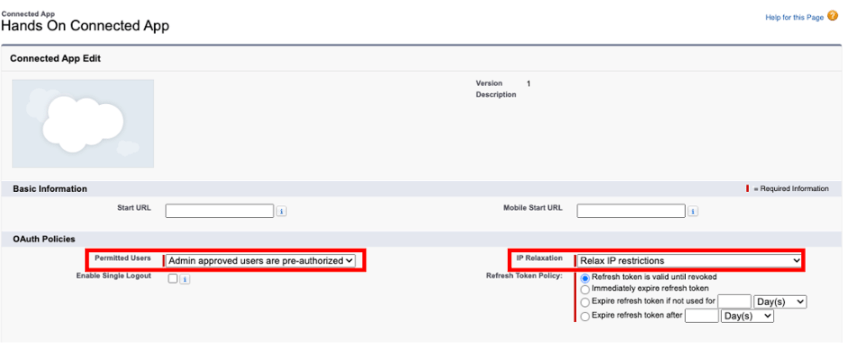
The final step in setting up the connected app is to change the Permitted Users setting to allow pre-authorized users to access the app without them having to interactively log in. The second option to access is the IP Relaxation option. For our particular use-case, we don’t want to deal with IP restrictions, so we’ll relax those, but this might vary according to your own policies.
Create an Integration User
Now that the Connected App is all set up, lets create an integration user. Our external app is going to access the Salesforce APIs on behalf of this integration user. We could use any of our existing users (with the right permissions) for this purpose, but it is best practice to create a separate integration user for connecting external apps. This makes it easier to manage access levels, and audit usage when we need to.
To create a new integration user, navigate to Users in your Setup and click on New User. Then, fill out the basic information for your new user, and choose the Salesforce Integration license. The profile can be Minimum Access - API Only Integration as it suffices for our use-case.

We’ve successfully created our user, but this user doesn’t have the right access yet. Lets first create a new permission set that’ll give the user access to the Connected App.
Fill in the basic details of the permission set, and set the License field to Salesforce Integration as we intend to apply this permission set only to integration users.

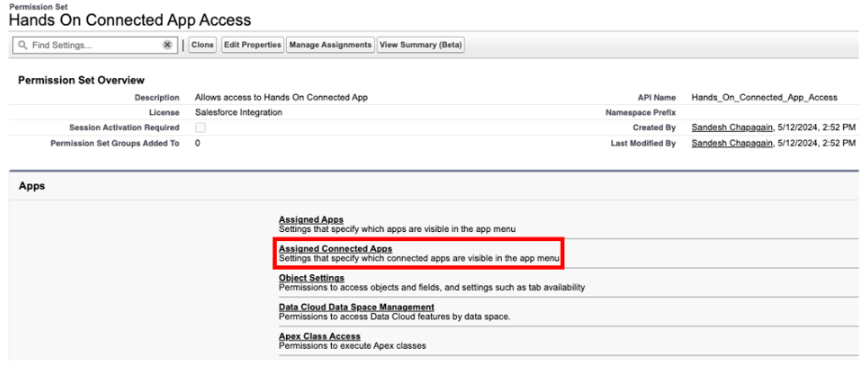
To add permissions to access the Connected App, click on Assigned Connected Apps and Hands On Connected App to the user’s enabled apps list.

Now we assign this permission set to the integration user. Click on Manage Assignments and follow the screen prompts to assign this permission set to the Hands On Integration User.

Clone Data Cloud Standard Permission Set
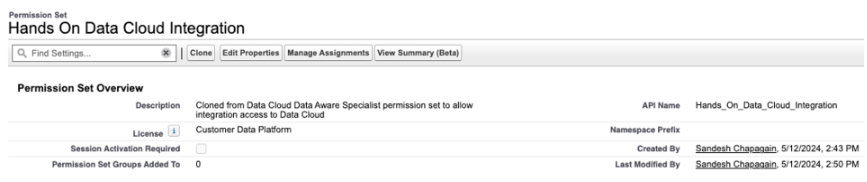
At this point, the integration user is ready to connect to the Salesforce core platform through the Connected App, but isn’t ready yet to connect to Data Cloud APIs, as that would also require access to Data Cloud features. To enable these, we’ll create a separate permission set by cloning the readily available Data Cloud Data Aware Specialist set, and then assigning that to the integration user.
If you want to create a custom permission set, the documentation recommends that you clone a standard Data Cloud permission set instead of creating one from scratch, as some Data Cloud features cannot be added to a custom permission set.

Add Data Space Access Permission
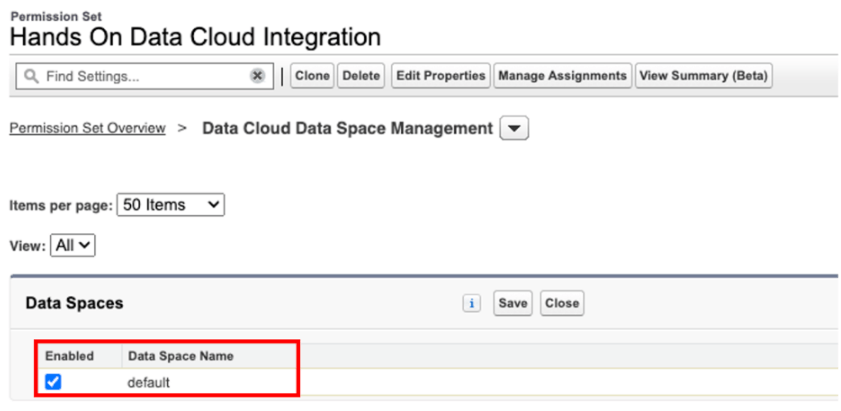
There’s one customization we need to add to the Hands On Data Cloud Integration permission set. We will navigate to the Data Cloud Data Space Management and add the default Data Space access to this permission set.

We’re finally ready to use an external app to make requests to Ingestion APIs on behalf of the integration user. Here are the items our external application will need to make API requests:
ClientId— Connected App Consumer Key we copied from the Connected App consumer details earlierPrivate Key— salesforce.key file that was created by the openssl command used earlier to create the Digital CertificateUsername— Integration user’s username
We can use the official Postman collection to test if our setup was successful. Simply add the above details to the collection variables and try out any of the APIs in the collection!


Leave a comment