Updating a campaign member status using Marketing Cloud is a snap thanks to the “Clicks Not Code” nature of Journey Builder. Follow these easy steps to configure a journey to make the campaign member update:
1.) Check to make sure your Journey data extension includes the Campaign Member ID
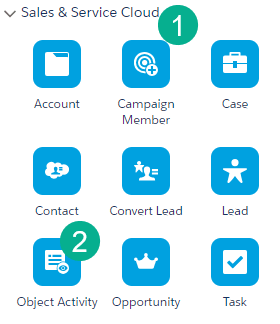
2.) Add either (1) the Campaign Member or (2) the Object Activity to your Journey path
3.) Select Find & Update if updating vs adding a new Campaign Member
4.) Make sure you choose the campaign member ID in the configuration
5.) Select the status field and enter the status to be updated
6.) Test End to End
Why Update a Campaign Member Status:
In a previous post we walked through how to automate a Marketing Cloud Journey: https://handsonsfmc.com/2024/04/14/how-to-create-an-automated-journey-in-marketing-cloud/
In this use case we wanted to add leads to a lead nurture campaign where they would be fed a series of communications tailored to their needs. After each communication we wanted to update their campaign member status so the sales team in Sales Cloud could see their progress right in the Sales Cloud platform.
Step I: Check to make sure your Journey data extension includes the Campaign Member ID
There are multiple ways to send campaign member driven journeys, the two most populate ways are via a Salesforce Data Entry Event and via an automation.
Salesforce Data Entry Event
Let’s walk through the steps to create a Campaign Member Salesforce Data Entry event where the Campaign Member ID will automatically be populated in the Journey Data Extension.

(1) Add the Salesforce Entry Event to the journey and select the Salesforce Data tile – note: don’t select the Salesforce Campaign tile as it will offer limited functionality.
(2) Search for CampaignMember (all one word)
(3) Depending on your use case select who the communication will be sent to. In our case we’re sending it to both Contacts or Leads entered into the Journey.
(4) Select Created and Updated (5) (unless your use case only requires one or the other)
(6) Enter in the filter criteria like which campaign you are pulling from and a status to trigger entry into the journey.
(7) When you migrate over to the Entry Data section of the Entry Source definition the Campaign Member ID will automatically be populated.
Step II: Configuring the Campaign Member Activity
Let’s walk through setting up the Campaign member activity later on in the steps now that you’ll have the campaign member id sitting in your data extension to select:
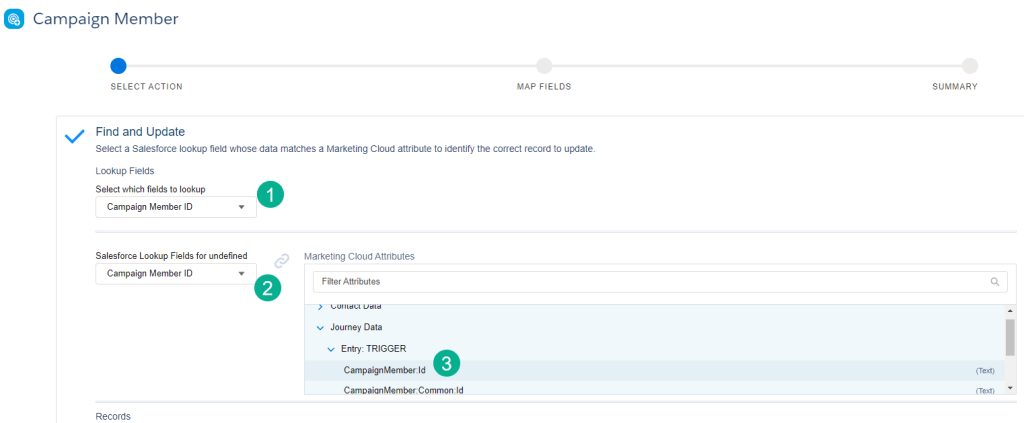
(1) In the opening screen first you’ll want to select Campaign Member ID as it is a default value.
(2) Same here, a default value
(3) You’ll want to select the CampaignMemberID here which has automatically been added to your data extension.
In the next set of screens you’ll select which field to update, the value to set it and review a summary of changes to be made.
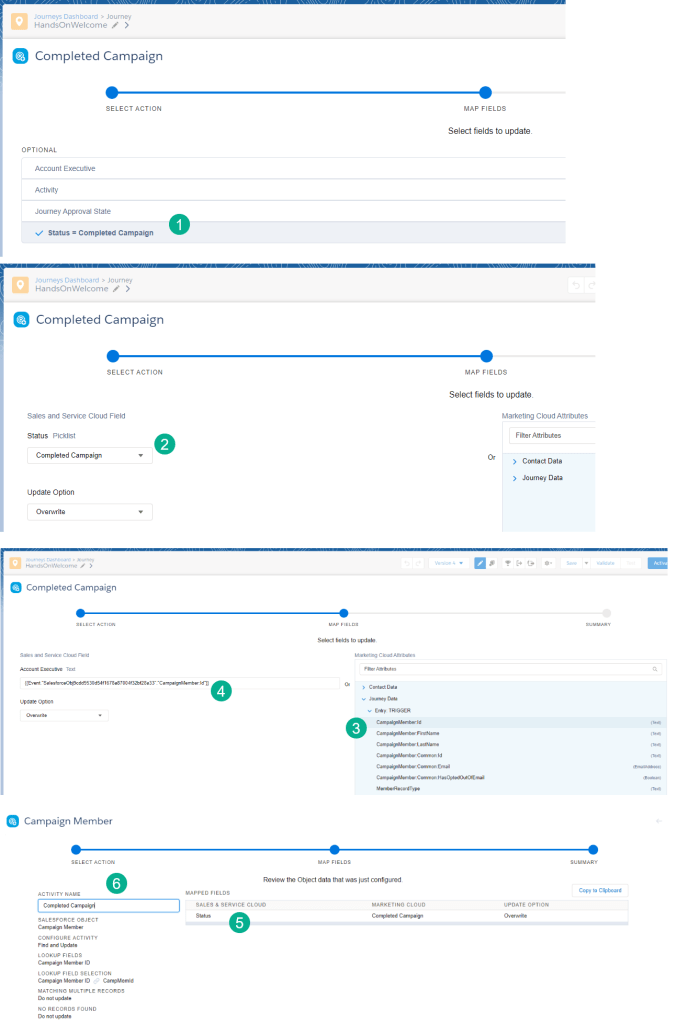
(1) Select which fields you’d like to update. In our case we want to update the Campaign Member status as the subscriber moves along in the journey.
(2) The Status field is a picklist which allows you to select the status available for the status field. Make sure you select the status that is available in the campaign that was created.
Journey Builder Tip #1: Select the right status
Be mindful to select the exact status that was added to your Campaign settings in Salesforce Sales Cloud. Initial caps and spaces can make a difference as to whether the campaign status gets updated or not.
(3) If you are using a field that isn’t a picklist you have the ability to personalize the updated field by selecting any field that was provided in the Journey Entry data extension.
(4) Note the handlebar code. This coding is unique to each journey and can be helpful in setting up activities like the Update Contact activity.
(5) Once you update all the fields the final screen will give you a summary of the fields updated.
(6) On the left the popup shows you all the settings and allows you to name the activity. It can be helpful to name the activity based on the updated syntax. So in our case we’re updating the status to “Completed Campaign” so that’s the name we’ll give this Activity.
Step III: E2E Testing of Campaign Member Status Update
Congratulations, you’ve set up the activity and now it’s time to test the functionality. We’ll be adding a lead to the campaign with a status of ADD TO CAMPAIGN. Once in the journey the subscriber will be sent an email and then their status will be updated to “Completed Campaign”.
First let’s verify in our campaign that we’ve got the correct statuses:
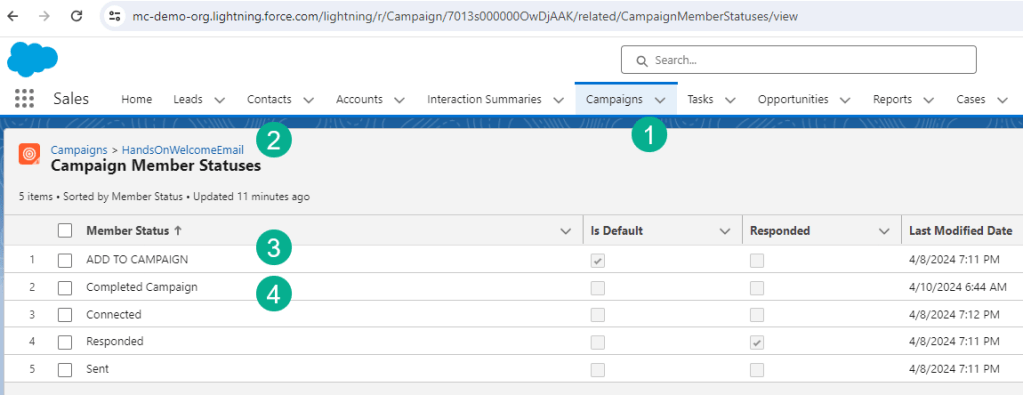
(1) Under the Campaign tab,
(2) Select the campaign for our testing “HandsOnWelcomeEmail”.
(3) Verify the campaign status that will trigger entry to the journey, which is also the default status.
(4) Verify the campaign status that we want to update the subscriber while in the Journey.
Now let’s add a lead to the campaign:
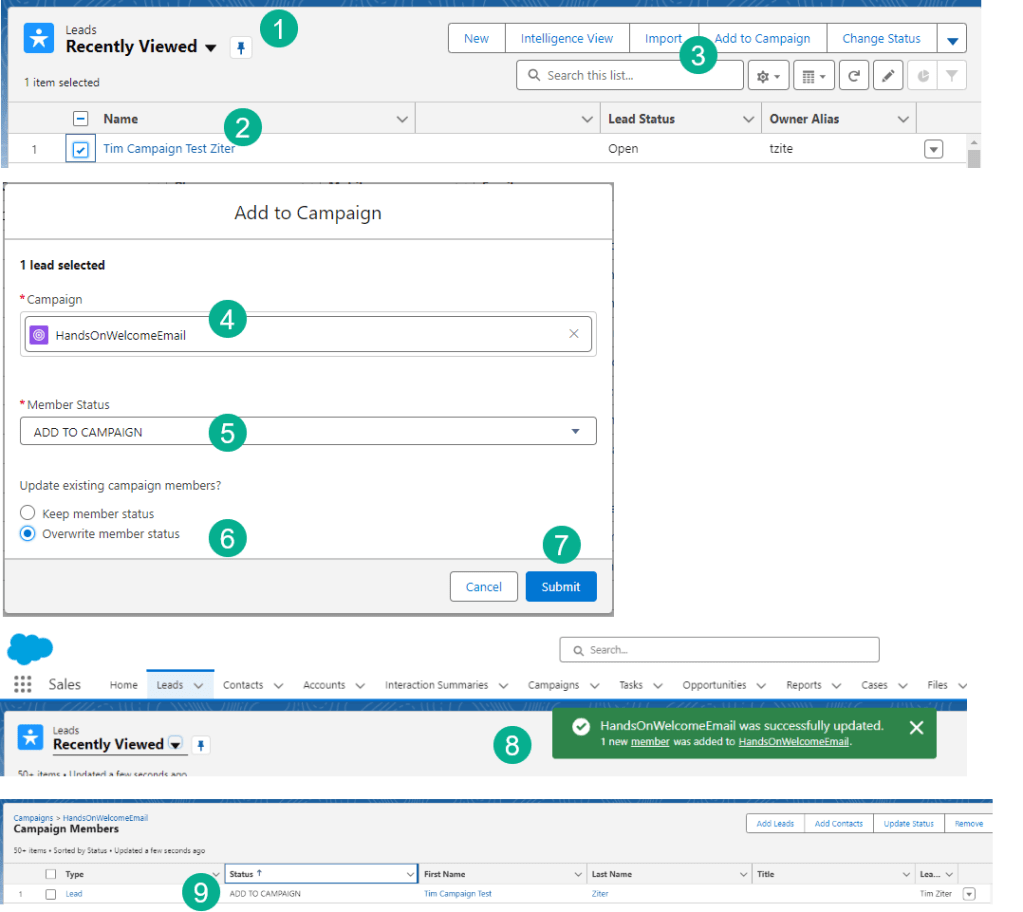
(1) Selecting our lead recently viewed list,
(2) Select the lead to add to the campaign.
(3) Select the Add to Campaign button.
(4) In the next screen/pop up select the campaign.
(5) Select the status – Important to make sure this aligns with your journey settings
(6) Select Overwrite member status as when triggering a Journey this is best practice.
(7) Click submit.
(8) A success pop up will appear.
(9) Verify that your new campaign member has been added with the status of “ADD TO CAMPAIGN
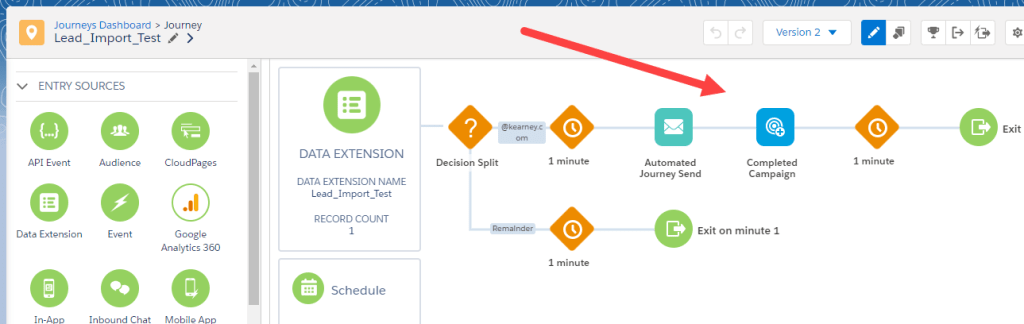
Now let’s track as the subscriber should enter the journey and follow all of the journey steps ending with the Campaign Member status update.

(1) Checking the journey we see our new subscriber has entered the journey as was accepted.
(2) We can see our subscriber passing through all activities in the Journey.
(3) Coming back to Sales Cloud checking the campaign we can see our campaign member status has now been updated to “Completed Campaign”.
Updating campaign member statuses can be helpful to label those who don’t go down the “Happy Path”. Use statuses like “Excluded – Bounce” to label those subscribers who bounced and never received the email for example.
Have fun updating campaign member statuses!

Leave a comment