Automation or query based Journeys give you a lot of flexibility and creativity in journey builder architecture. In this blog we’ll cover how to create a basic query, data extension, automation then connect it to a journey and send actual subscribers through to receive a test email.
How to steps:
1.) Draft a query in Query Studio
2.) Create the automation, data extension and query
3.) Perform a “Run Once” activity to populate the data extension
4.) Activate the automation for a future date
5.) Create a test email with personalization data points from the query data extension
6.) Create the journey and activate it
7.) Test the automation and journey end to end
The Setup
Before we start we need to set the stage for this build. Let’s review the use case and the details of the lead in the Salesforce Sales Cloud environment.
Use Case: We are a small commercial bank and want to reach out to potential leads who have recently attended one of our banking seminars. The leads have opted into email communications and are stored in Salesforce Sales Cloud along with various data points.
We want to send an email thanking them for attending the seminar and serve up products based on topics covered in the seminar.
Salesforce Sales Cloud Environment: Here’s a snippet of the lead layout for a sample lead in the Salesforce Sales Cloud environment and the fields we’ll be using to
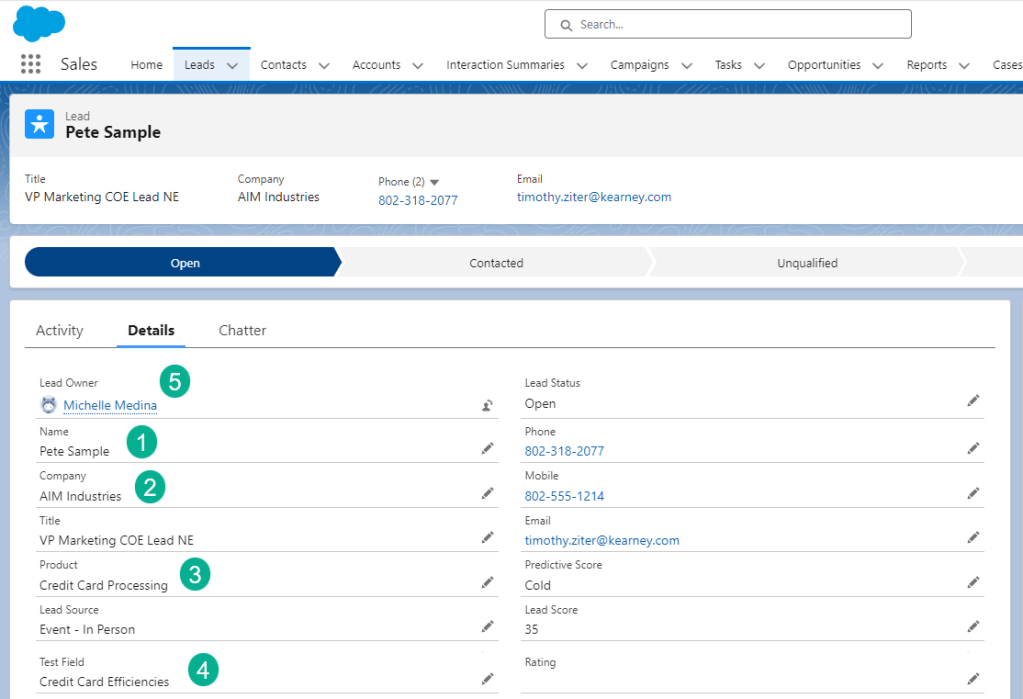
(1) First and last name for the greeting
(2) The company name to include in the email
(3) Products to tailor the content of the email
(4) We are using this test field to add the name of the conference attended
(5) And the owner of the lead so we can add a custom signature
We can pull the subscriber directly from the lead object in Sales Cloud, but let’s follow a typical course and add this lead to a campaign and pull from that object.
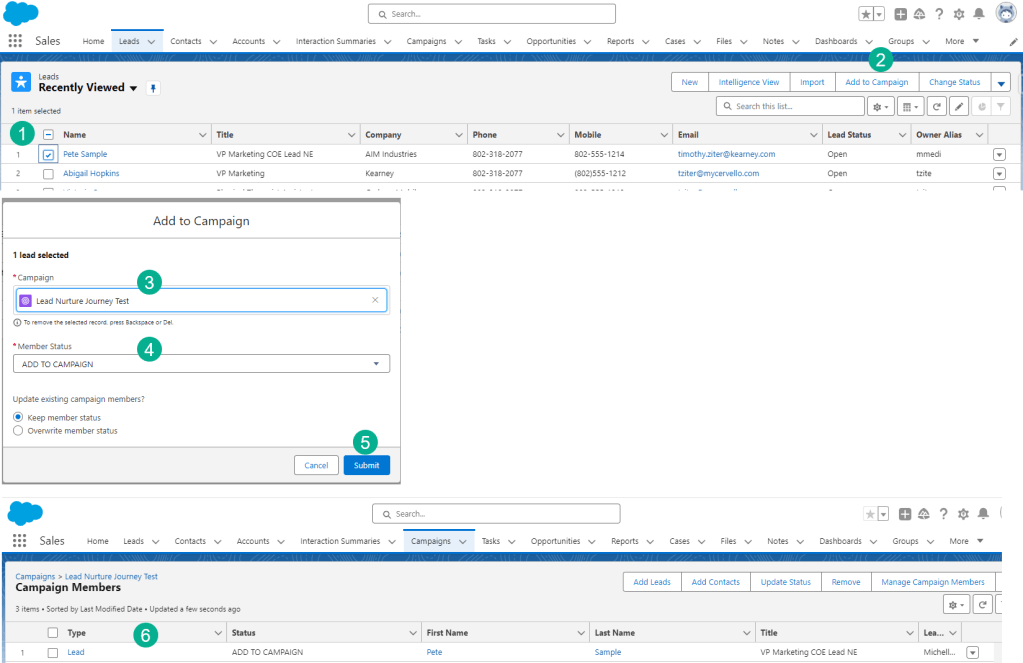
(1) In Sales Cloud we’ll select our lead,
(2) Click on the Add to Campaign button in the upper right
(3) Select the campaign we want to drop them into
(4) Select the status
(5) Submit the lead
(6) and see the lead appear in the campaign.
Step I: Draft a query in Query Studio
If you don’t have it already, download the free Query Studio application: https://appexchange.salesforce.com/appxListingDetail?listingId=a0N3A00000FP3yFUAT
Here’s a starter query based on the requirements of our use case:
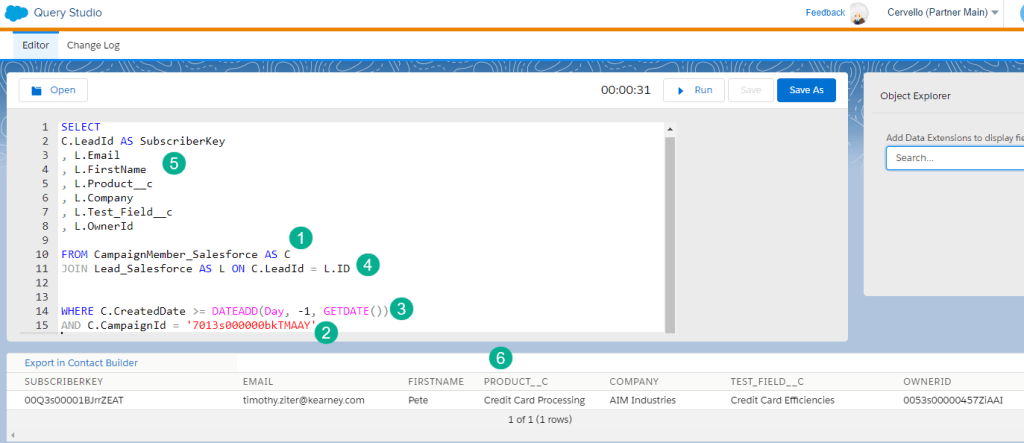
(1) In our FROM statement our primary data source is the Campaign or the campaign member synchronized data extension in Marketing Cloud
(2) In the WHERE clause we only want to pull in those campaign members from a specific campaign, the one we added our lead to in Sales Cloud.
(3) Using the DATEADD function we want to filter in only those campaign members who were added in the last 24 hours.
(4) We want to pull in data from our lead as well so we JOIN the lead to the campaign member using the LeadID on the Campaign Member object to link it to the Lead ID.
(5) With our database set up in the FROM and WHERE we can use the SELECT to output fields (based on the names of the Sales Cloud fields) which will be populated in our data extenion.
(6) Running the query we see the values populating in the fields.
Now that we’ve validated our query in Query Studio we can create the query, data extension and automation to populate the data to feed into the journey.
Step II: Create the automation, data extension and query
The first step is to create a data extension to contain the data. Follow the steps detailed in our How to Create a Marketing Cloud Data Extension page here: https://handsonsfmc.com/how-to-create-a-data-extension-in-marketing-cloud/
Let’s review the data extension field setup from the article:
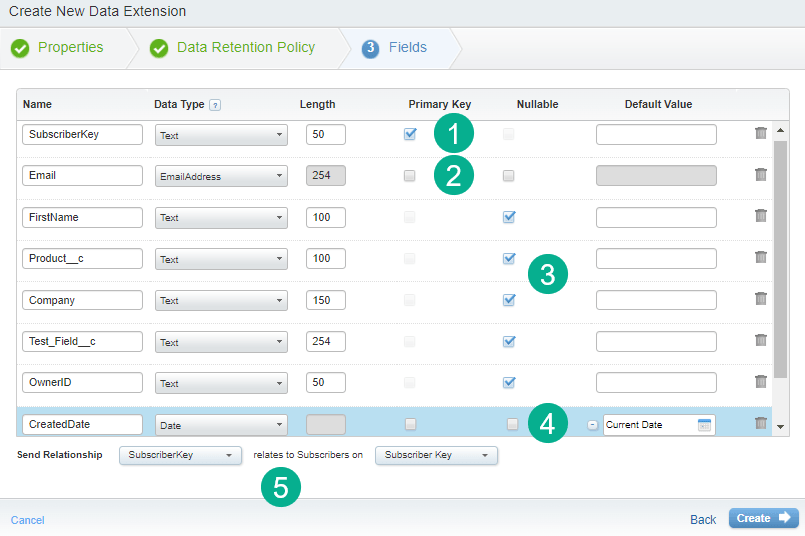
(1) SubscriberKey is going to be our golden key for this data extension. We will be using the Lead ID from Salesforce and selecting this field as the Primary Key. Note we could have selected this field as 18 character length as that should be the max given Salesforce Lead Id length.
(2) For the Email field we’ll select the EmailAddress type because this is the email/field that we want to use for the send. Note that it auto populates the number max of 254. We decided to keep this field as not nullable or required because we are sending an email and don’t want to send if there’s no email address. This could cause an error but we’ll add a line in our query to only pull in leads that have an email address populated, I.E. WHERE L.Email IS NOT NULL.
(3) FirstName through OwnerID are not required so we’ll select nullable for each. Note that we are mindful of the length for each field to give plenty of room.
(4) We want to add a bonus date field using the Date type to populate a date each time a record is added. If you click on the plus sign to the left of the default field the current date will be added.
(5) Because our SubscriberKey will determine the unique ID in Marketing Cloud, not the email address we’ll select that key for the Send Relationship.
Now that we have a data extension let’s create the automation and query.

(1) Select automation studio
(2) Click on the overview tab
(3) Select the folder you want the automation saved in
(4) and click the New Automation button.
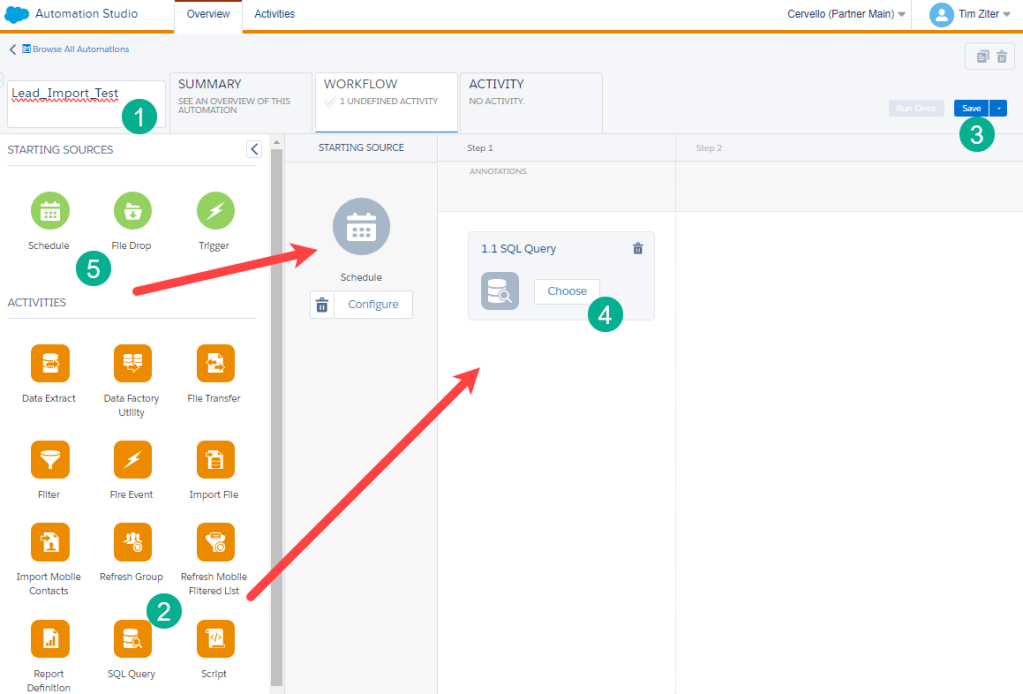
(1) Name the automation
(2) Find the SQL Query activity on the left and move it to the canvas
(3) Don’t forget to click save to not loose your work
(4) When ready to add your query click on the Choose button
(5) Before you click the button bring over the schedule icon
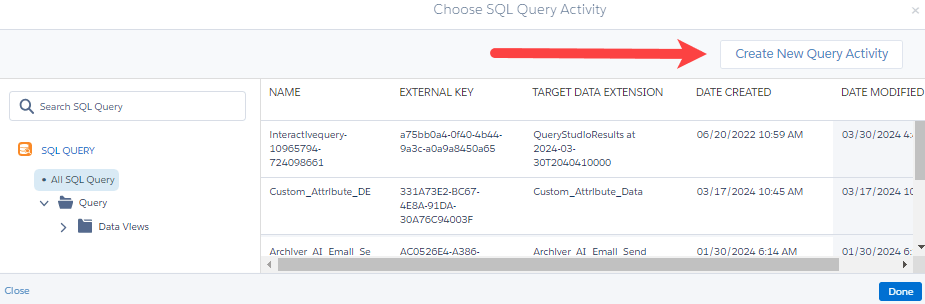
Click on Create New Query Activity.

(1) Create a name for the query
(2) Select the folder where the query will be stored. If you don’t select a folder it will be dropped in the general query folder.
(3) Enter a brief description. Taking a few min to write a description will save you from remembering in the future.
(4) Select Next.
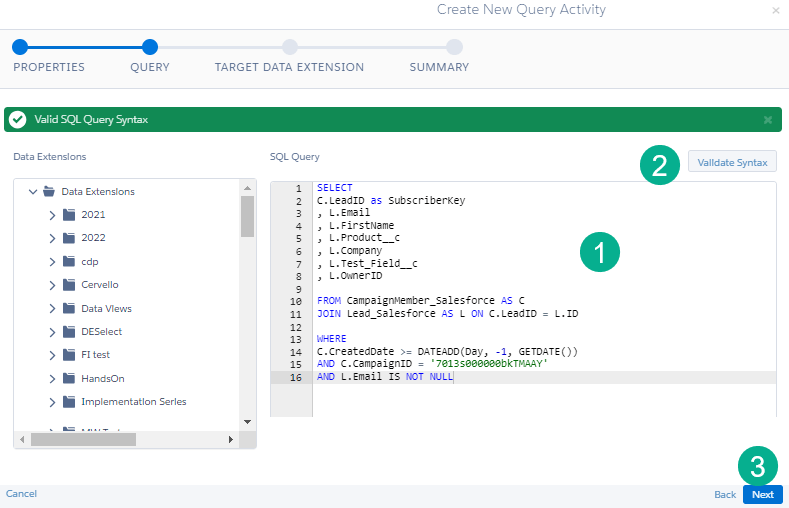
(1) Paste in the query that you built in Query Studio.
(2) Click on validate syntax to make sure the query has no errors. Green means good to go.
(3) Click Next.
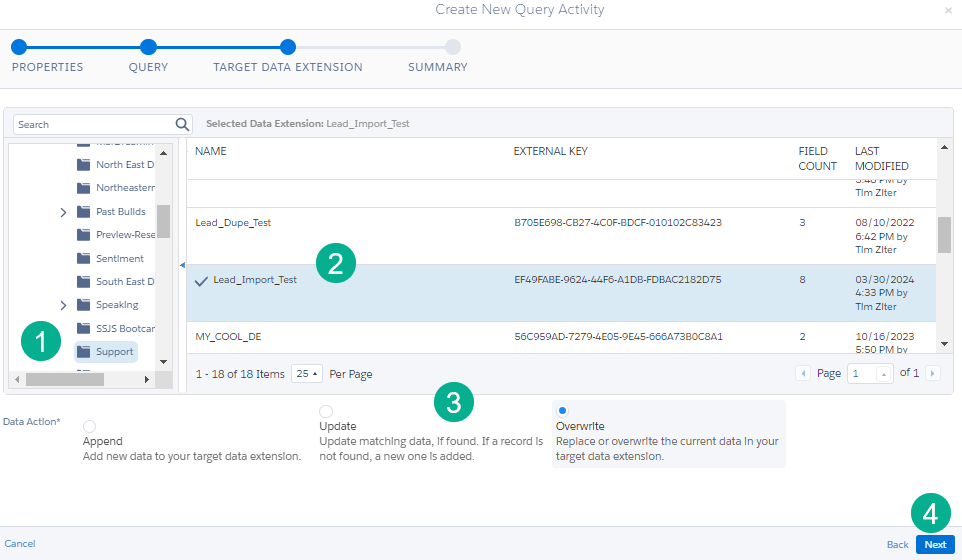
(1) Select the folder where the data extension is stored.
(2) Select the data extension.
(3) Click one of the three options carefully. We’ll go into these three in more detail in another post. For now well click on Overwrite which is the easiest option as it overwrites the data extension every time.
(4) Click Next
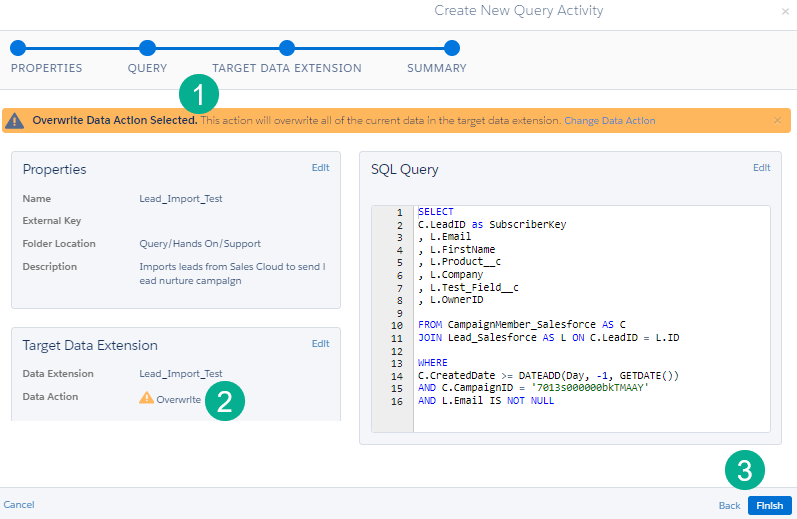
(1) In the summary screen note the warning sign for the overwrite data action option which is a nice feature just in case you selected incorrectly.
(2) Review the settings in the Target Data Extension section.
(3) If all is well click on Finish and you are done.
Step III: Run the query to populate data in the Data Extension
Now that you have the automation set up lets do a “Run Once” before we activate the automation to populate data in our data extension.
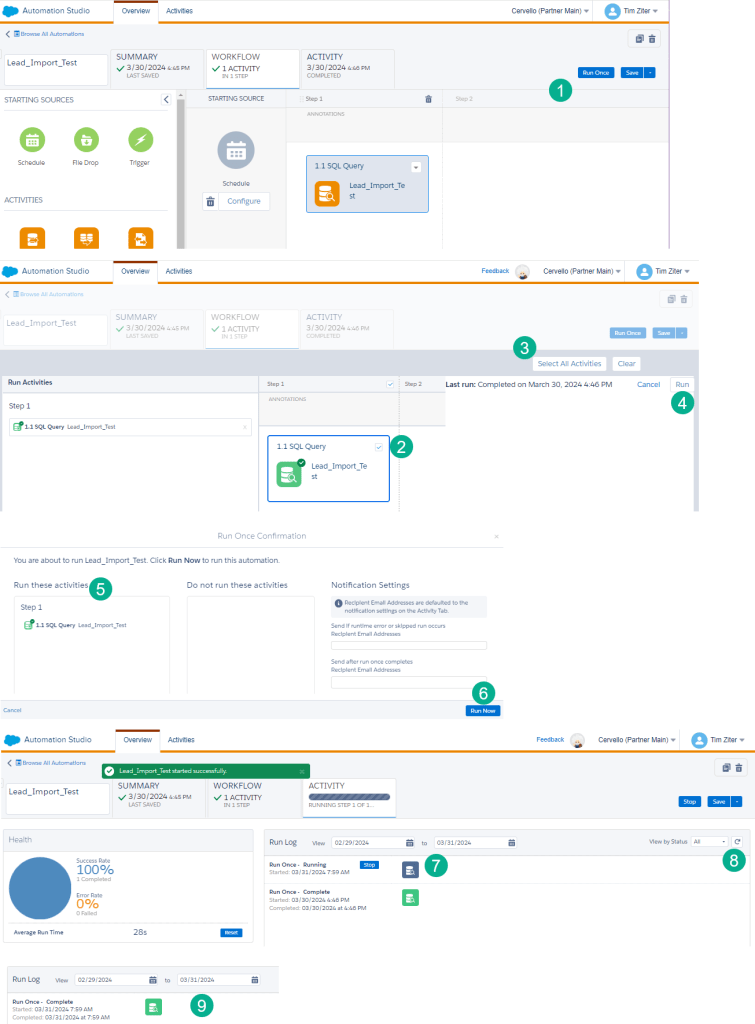
(1) Click the “Run Once” button
(2) Select the query activity to run
(3) Or you can select run all activities as there is only one activity
(4) Click the Run button
(5) A pop up screen will appear confirming the selection
(6) Click the Run Now button
(7) Watch as the activities run, blue means that it’s running
(8) Click this refresh icon to refresh the automation
(9) When the query is green it is done
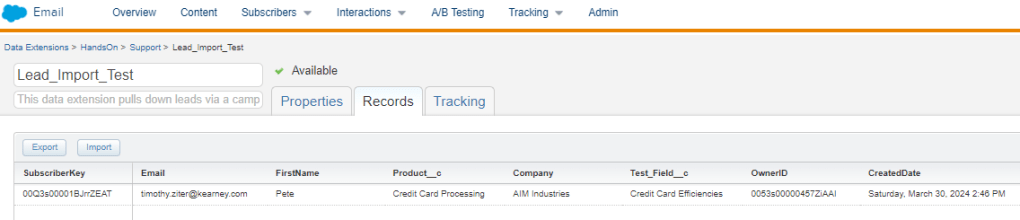
When we return to the data extension we can see all the data populated. Now we are ready to create our email and personalize it based on this data using ampscript.
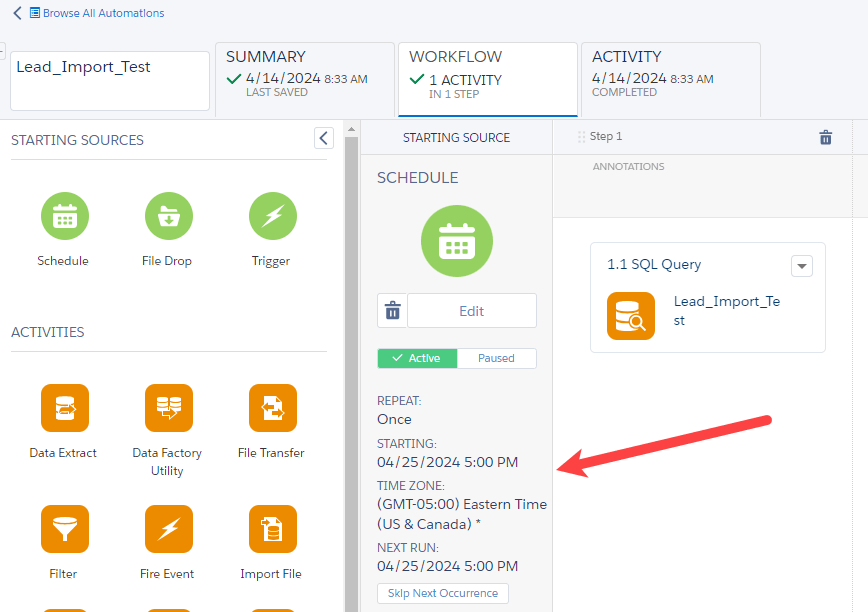
Before you move onto the next section, activate your automation to a date in the future. This will allow the Journey to see an activated automation and connect.
Step IV: Personalize the email based on the data in the Data Extension
Let’s go over three ways to add custom personalization in Email Studio.
(1) Greeting – displaying a variable based on a field in the Data Extension
(2) Dynamic Content Block – How to customize content using this cool out of the box content block
(3) Lookup Rep – Using the LookupRows function to personalize rep information based on the record owner ID

(1) We recommend creating a amspcript code block to capture all of your ampscript coding and place it at the top of the email.
(2) Use the Code Snippet block when coding with ampscript.
(3) Declare all of the variables used in the code.
(4) For basic personalization set a variable using the attributevalue function. For more on this function check out content from the Ampscript Bootcamp: https://handsonsfmc.com/part-i-attribute-value-v-and-empty-functions/
(5) We want determine a set of variables for the sales rep and use the LookupRows function to find the User record associated with the User ID to
(6) Pull down all the relevant rep contact variables. For a walkthrough of LookupRows please check out our session from the Ampscript Bootcamp: https://handsonsfmc.com/part-3-lookup-function/
(7) With the variables set simply use the “v” function to output each variable in the email.
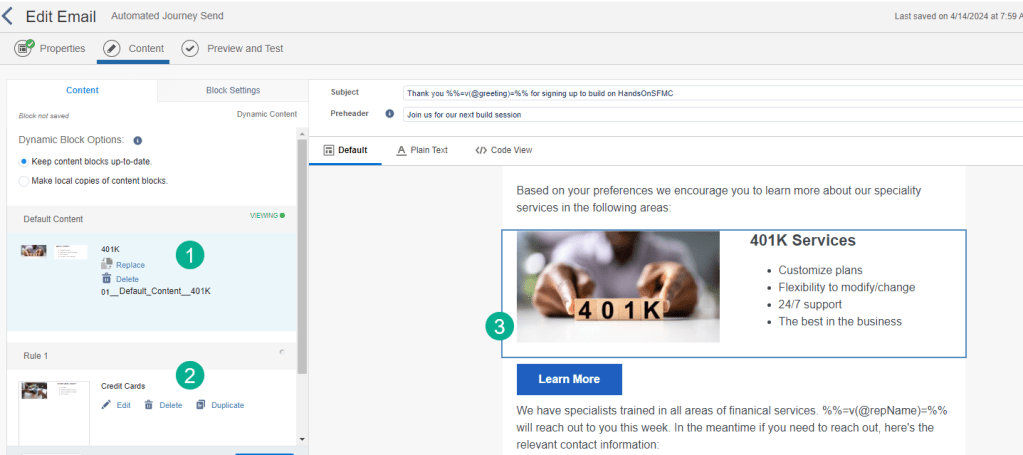
Setting up the Dynamic Content block is very straight forward. Make sure you create the different content blocks in advance. Then simply:
(1) Select the default block
(2) Select alternate blocks based on the field in the send data extension
Previewing the email with the outputted variables and dynamic content block in place:
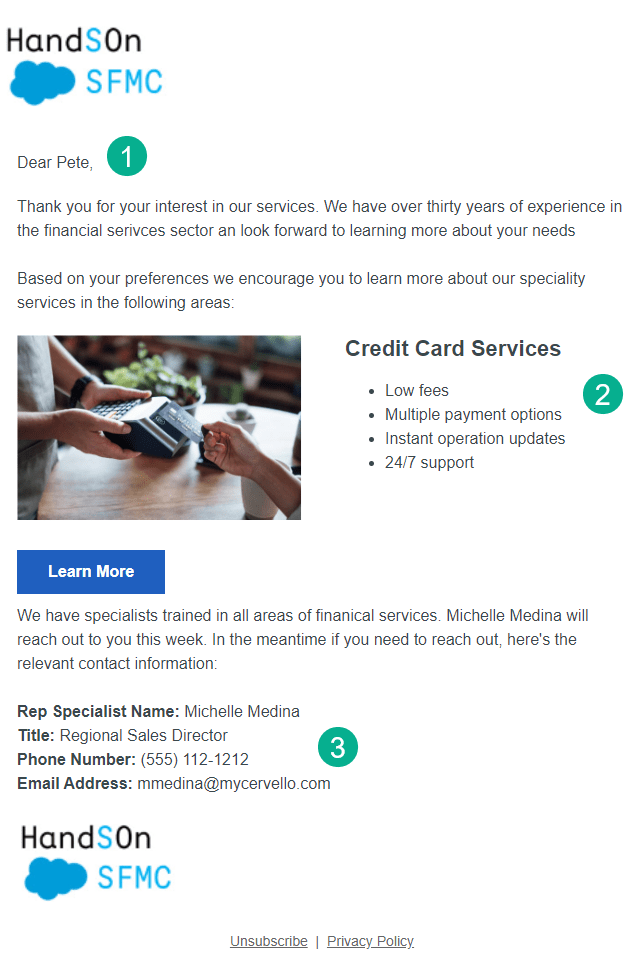
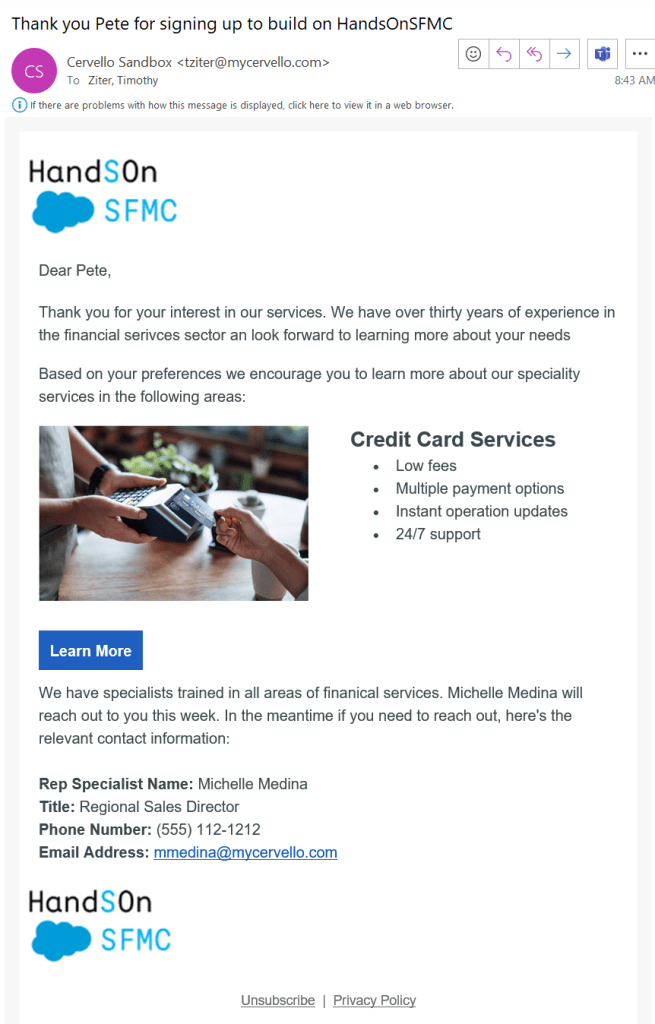
(1) The first name appears – Bonus points: add a default greeting just in case a value isn’t populated in your Name field.
(2) The dynamic content block appears based on Credit Card Services in the Product field.
(3) The rep information for Michelle appears as expect as she’s the owner of this record/lead.
Step V: Hook up the Journey
Stay with us, our apologies as this blog post is never ending as there is a lot to cover! Now onto building and hooking up the Journey.
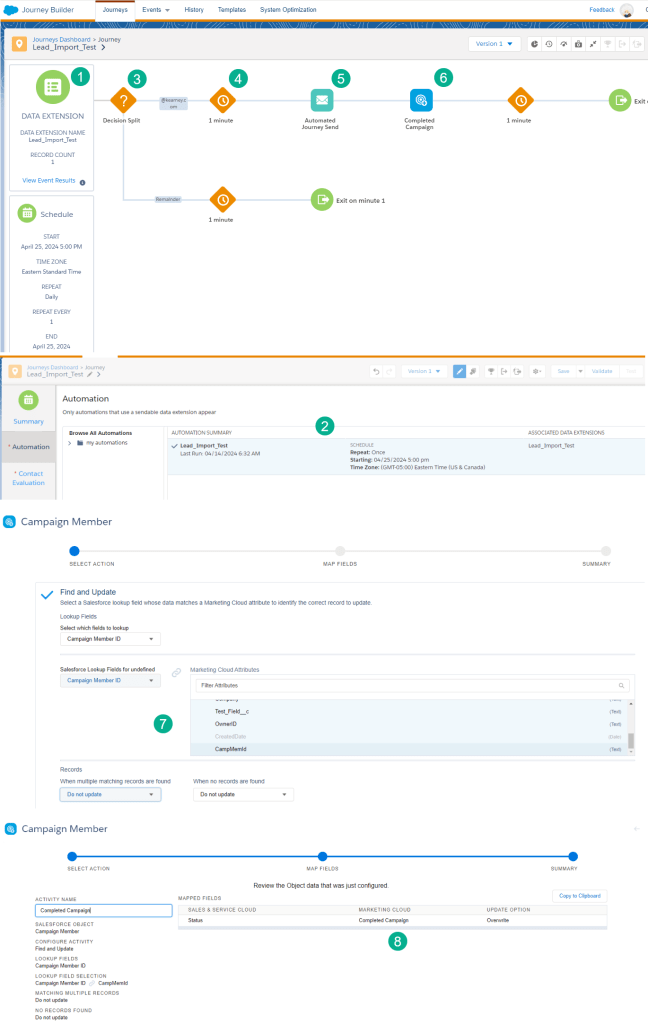
(1) Select a Data Extension entry event and navigate to the Lead_Import_Test data extension.
(2) Select the active automation linked to this data extension.
(3) Add a decision split to only bring over email addresses for your domain when testing. This will prevent live records going into the journey until it’s ready.
(4) Add a wait step which has multiple uses. When you go live you can confirm counts and if counts are way off you can take action. Or sometimes data needs to be synched from other platforms into Marketing Cloud.
(5) Add and configure the email that was created in the previous step.
(6) Add the Campaign Member update activity.
(7) When configuring select the Find and Update and make sure in your query you are populating the campaign member ID.
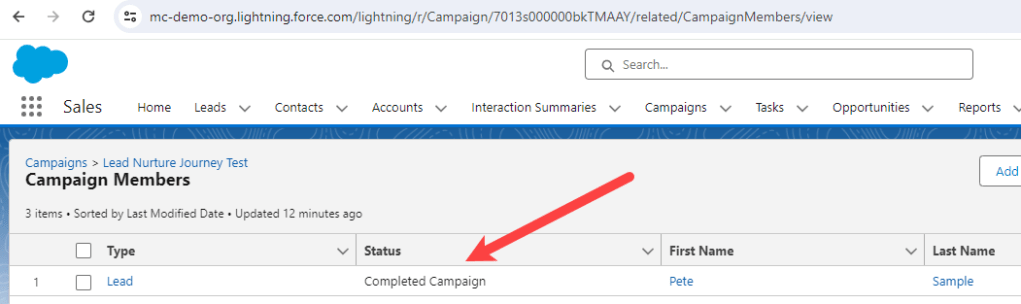
(8) Select the field to update, in our case we want to move the status to “Completed Campaign” once sent.
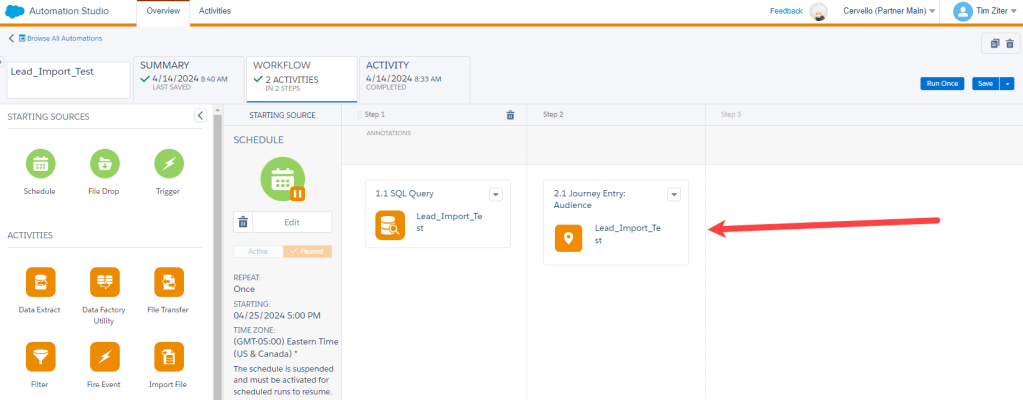
Activate the Journey once everything looks right. Don’t worry, the entrants in the data extension won’t be sent into the journey. When you do activate it a Journey Activity Audience tile will automatically appear on the automation.
Step VI: E2E Test of the automation and journey
You made it, now all there is left to do is test E2E. You can pause the automation and select run once and select all activities to fire through your test record through the journey.
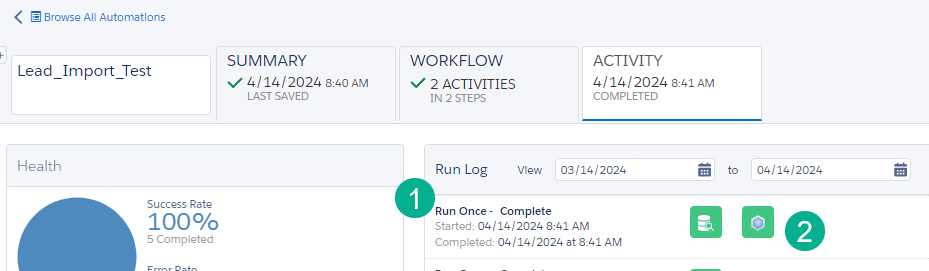
(1) In the Activity tab you can watch as the automation runs – here verifying that a run once was completed.
(2) Both activities including the new Journey Activity are green validating a successful send.
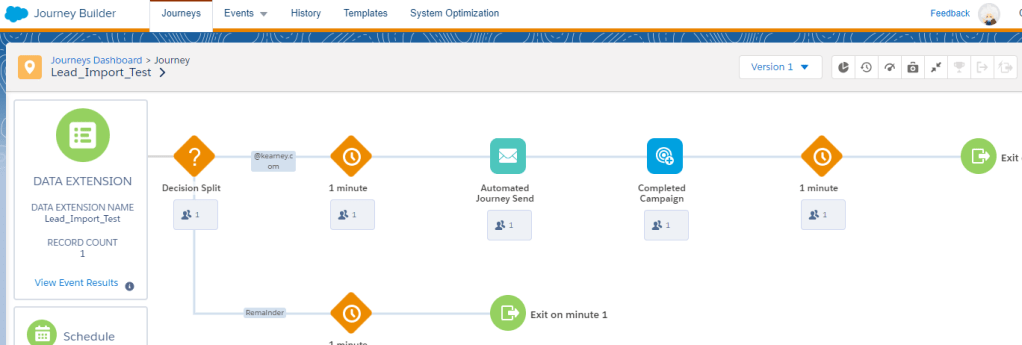
Refresh the Journey and you should see the subscriber move through each activity.
Hopefully you’ll receive a test email in you inbox with all the relevant personalization.
And the campaign member status in Sales Cloud is updated:
Whew! That’s a wrap on how to create an automated journey in Marketing Cloud. Don’t forget to sign up for our Hands On training sessions. We hold them most Thursdays around 8am EST. You can sign up here:https://handsonsfmc.com/contact/

Leave a comment