Campaign fed journeys are a fantastic way to feed leads and contacts from Salesforce into a marketing automation journey in Marketing Cloud. The setup of a campaign takes minutes on the Salesforce side and integrating with Marketing Cloud is native via the Salesforce Data Entry Event. In this blog today we’ll create out campaign and add campaign members in Salesforce. Then we’ll create a journey in Marketing Cloud to pull in those campaign members feeding them a string of emails and updating campaign member statuses in Sales Cloud along the way.
Part I: Create a Campaign in Sales Cloud
1.) First validate that you have the right settings in Sales Cloud to create/edit campaigns. Typically you’ll want to have the Marketing User checkbox checked.

2.) Click on the Campaign tab in Sales Cloud and select the “New” button.

3.) Fill in all of the relevant/required information for the campaign

(1) Status – select in progress.
(2) Name your campaign.
(3) Typically you’ll want to select Active. For testing you not select this box as can prevent functionality if needed before go live.
(4) Select the type of campaign. In our case we are going with the Seminar/Conference type.
(5) Enter in a description for future reference.
(6) Add a start date for the campaign.
3.) Add Campaign Statuses: Depending on your record layout navigate to the Campaign Member Statuses tab.

(1) Select a new status.
(2) Note the Default status which will automatically be added to any new campaign member when added.
Salesforce TIP #1: Watch those statuses
Be mindful when adding campaign members statuses as punctuation matters. For instance if you created a “Add to Journey” status but a “Add To Journey already exists you can quickly create an unmanageable list of statuses. This can be cumbersome if you are selecting a status from a drop down menu and have to scroll through dozens of statuses.
Here’s how to navigate in Setup to find all the current Campaign Member statuses:
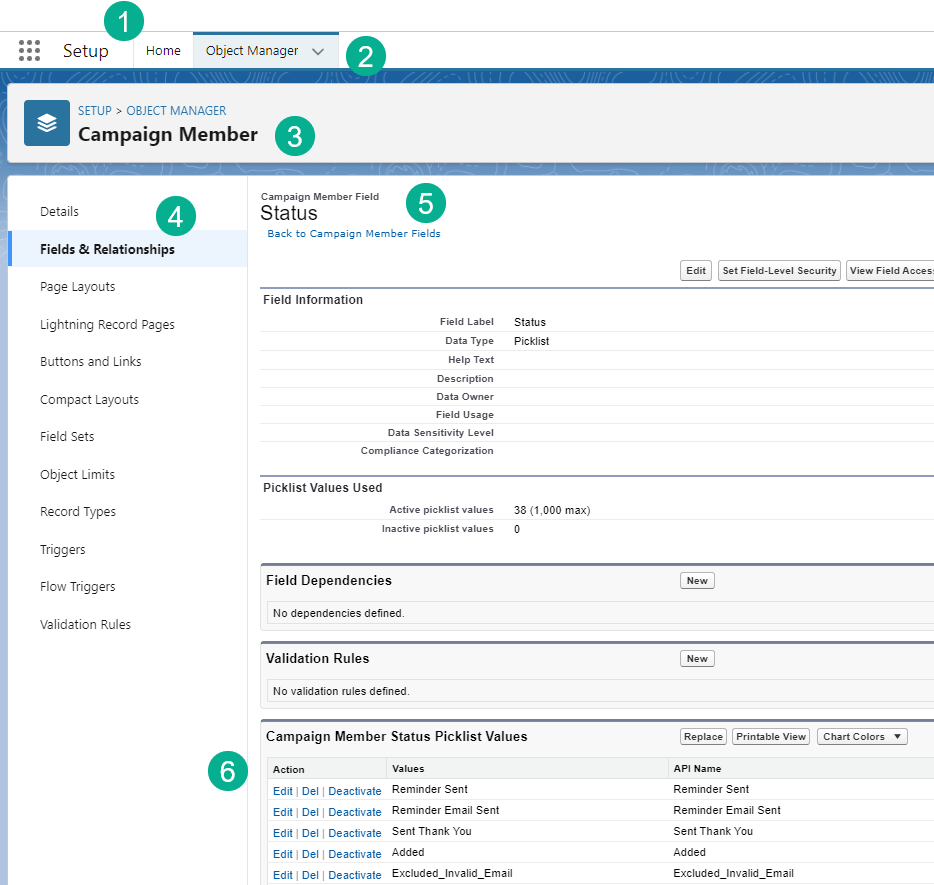
(1) Under Setup in Sales Cloud (click on the cog wheel in the upper right hand corner).
(2) Select Object Manager.
(3) Search for the Campaign Member object – not to be confused with the Campaign object.
(4) Select Fields & Relationships.
(5) Search for the Status Field
(6) View all of the Campaign Member statuses here
4.) Clean up/configure campaign statuses. Once you’ve added all of the campaign statuses it’s time to set the default status and clean up any statuses that are unwanted.
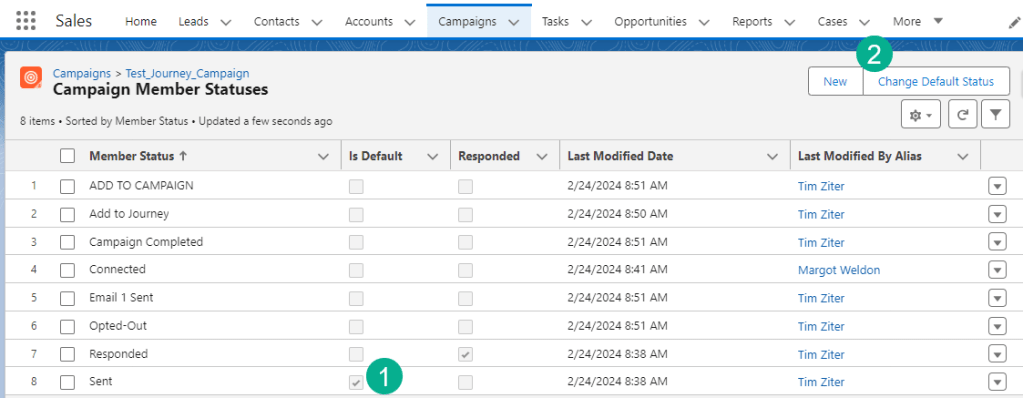
(1) Note which status is set to “Is Default”.
(2) To change this setting click on the “Change Default Status” button.

(1) Select the status you want for the default.
(2) Select Save.
(3) And the status list view will now display the change.
To delete any unwanted campaign member statuses click on the arrow button and select delete.

Part II: Add Campaign Members
There are several ways to do this in Sales Cloud, you can add campaign members right in the campaign:

(1) Add Contact or Leads here
We prefer adding them from the Lead/Contact list view:
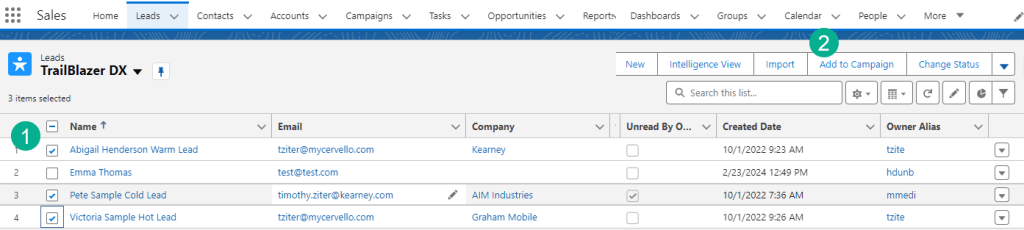
(1) Check the boxes for each lead to enter.
(2) Select “add to Campaign”.

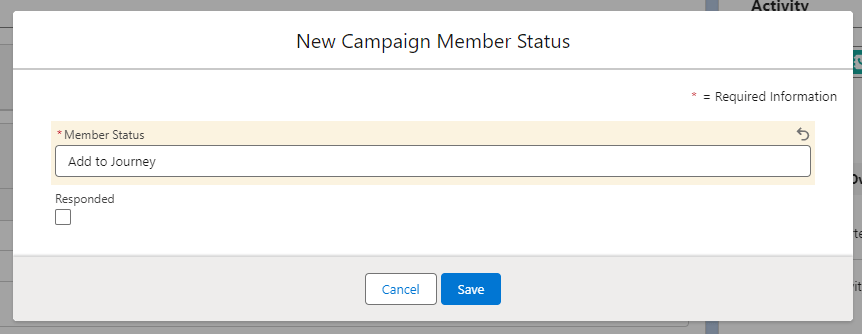
(1) Select the right journey, it should popup for you to select if created recently.
(2) Select the Member Status – the Default status will appear here automatically.
(3) Select overwrite member status as this will help with edge cases of triggering based on the entry status.
(4) Select submit and you are done.
Navigating back to the campaign we can now see the new campaign members added:
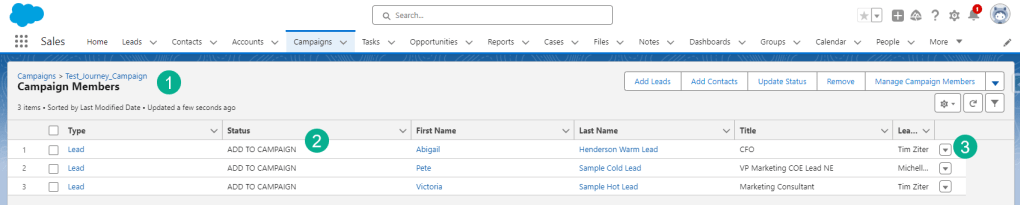
(1) Selecting the campaign and the campaign member list view.
(2) Each campaign member has the “Add To Campaign” status.
(3) To edit each campaign member select the arrow box on the right.
When editing the campaign member there are a couple of things to note:

(1) The campaign member id is worth noting which can be found in the url when editing the campaign member. This ID will helpful to use when in Marketing Cloud as the campaign member is the subscriber, not the campaign.
(2) If you need to change statuses this can help with triggering the journey.
Part III: Visual the campaign and campaign members in Marketing Cloud
Allow for 20 minutes for the newly created campaign members to synch to Marketing Cloud. While waiting in Query Studio in Marketing Cloud (https://appexchange.salesforce.com/appxListingDetail?listingId=a0N3A00000FP3yFUAT) create a query to output the new campaign members and their key data points.

(1) In the FROM statemen we’ll start with the Campaign Member synchronized data extension which will have the three new campaign members once synched.
(2) In the WHERE clause we’ll want to select only those who are in the campaign we created. To find that campaign ID navigate to the campaign in Sales Cloud and pull the id from the URL.

(3) In the Select statement we’ll want to output the values that will be needed to send the email like Lead/Contact ID as subscriberkey and email address. We should also output other variables needed for validation of the data and personalization like the status and the name.
(4) All the data points are visualized when running the query which is a good check before proceeding in building the journey.
(5) For advanced personalization add the User synchronized DE to identify the user who dropped the lead/contact into the campaign. We can use this data point to personalize the email or from address.
(6) The name of the person who dropped the campaign member into the campaign.
Here’s the code for the query:
| Query | Code |
| Validate Campaign Members | SELECT CM.ID AS CampaignMemberID , CM.LeadOrContactId AS LeadID , CM.Status , CM.Name , CM.CompanyOrAccount , CM.Email , CM.CreatedById , U.Name AS SalesUserName FROM CampaignMember_Salesforce AS CM JOIN User_Salesforce AS U ON CM.CreatedById = U.ID WHERE CM.CampaignId = ‘7013s000000oI7PAAU’ |
Part IV: Build the Campaign Fed Journey
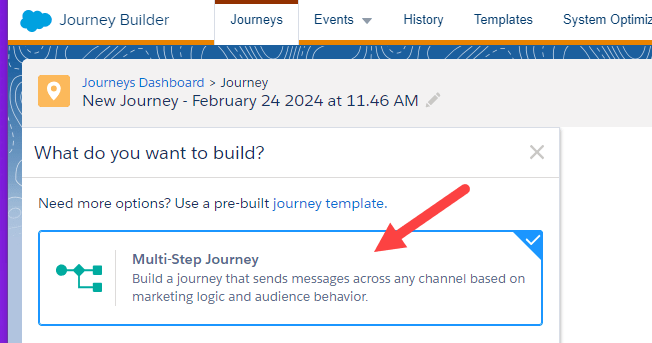
1.) Create a new Multi-Step Journey
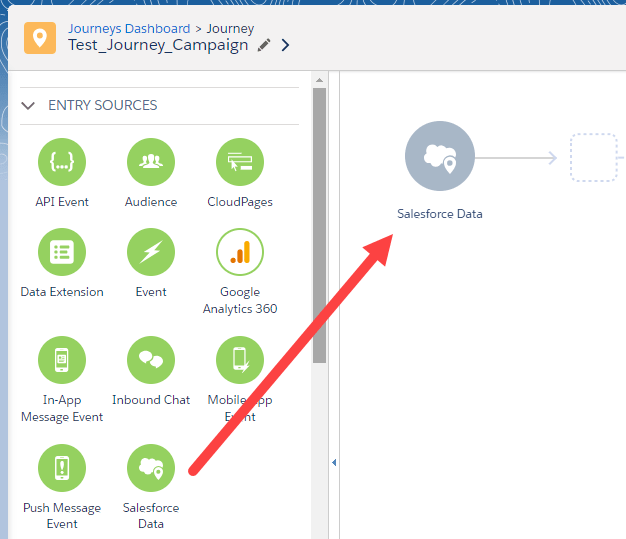
2.) Select the Salesforce Data Entry Event
3.) Configure the Salesforce Data Entry event to the campaign member use case.
Select the Salesforce Data option on the Define Entry Source section, do not select the Salesforce Campaign option as that will give you limited functionality:

4.) Next search for the Campaign member object in the Select Object section

(1) Search for Campaign.
(2) Select CampaignMember.
5.) Select the “WHO” will be sent into the Journey.

(1) You can select the user who dropped the campaign member into the campaign. But in our case we want to choose the section below which is the campaign member itself.
(2) We are going to select the Contact and Lead field to give us capability to send to both objects.
6.) Select the criteria to determine when to pull in the campaign member.

(1) Select “Is Created” and/or
(2) “Is Updated” depending on your use case you may only need one of these.
(3) From the different fields in CampaignMember search for the Campaign ID and drag it to the canvas on the right.
(4) Paste in the Campaign ID from Sales Cloud.
(5) Wait for the name to popup in the UI and select the campaign.
(6) Click Done.
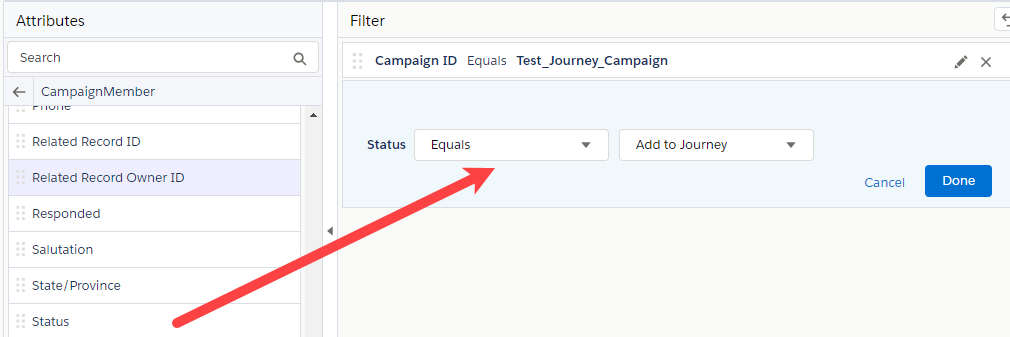
Add Status equals “Add to Journey” and you’ll be done with the Entry Criteria:
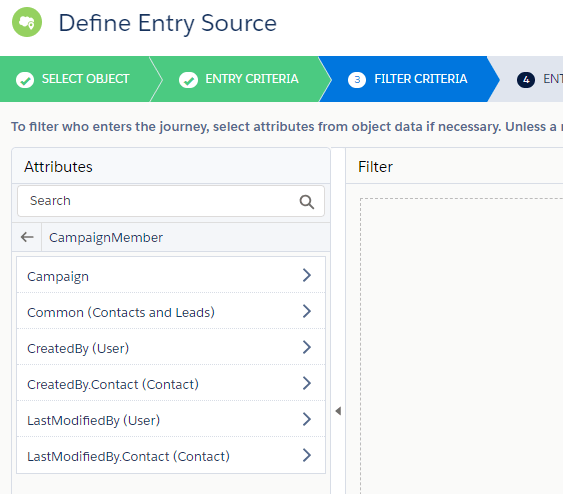
7.) Add Filter Criteria – if you have secondary objects to add, select those relationships here. For our use case today these won’t be needed.
8.) Add Entry Data for personalization and journey functionality. Based on your Entry Object certain data points will be provided automatically. And you can select additional data points simply by checking the boxes in each object.
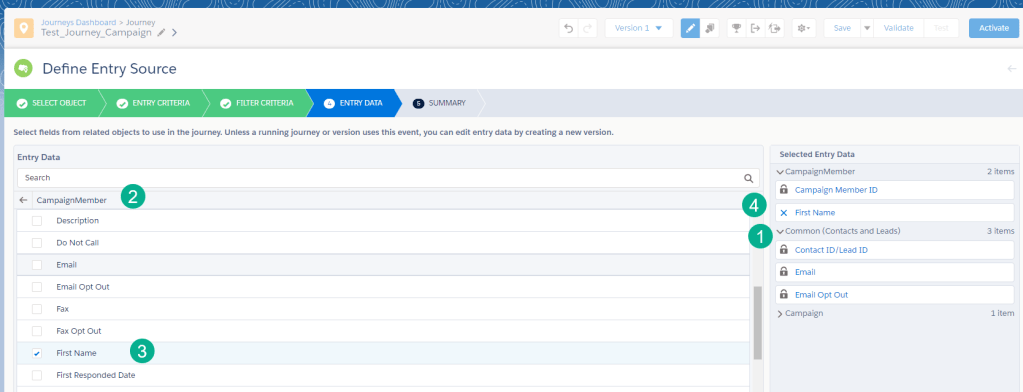
(1) Open up the drop down to see the default values that are provided for each object.
(2) Add additional data points by selecting the object.
(3) Click the box next to the field, in this case we want to personalize the email with the first name.
(4) You’ll see the data point appear on the right once clicked.
9.) Review the summary section to validate settings. At the end of the configuration the Entry Source provides a helpful summary of the selections made.
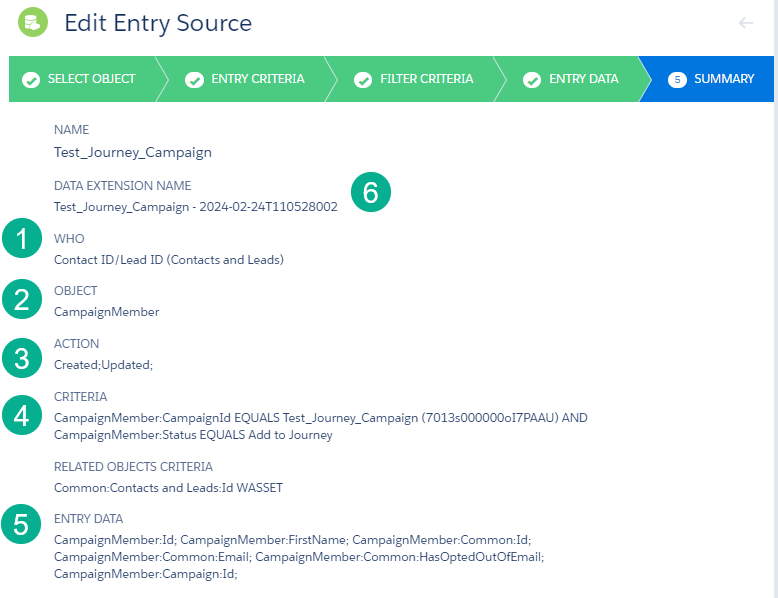
(1) WHO – who will be the subscriber in the Journey – in this case either a contact or lead.
(2) OBJECT – which object will the who come from, in our case the Campaign Member.
(3) ACTION – that subscriber will be pulled in when the object record is either created or updated.
(4) CRITERIA – what are the filters that need to be present, in our case a specific campaign and the campaign member status of “Add to Journey”
(5) ENTRY DATA – these are all the fields that will be added to the data extension and their field syntax.
(6) DATA EXTENSION NAME – journey builder will create a data extension for you and here’s the name. Typically it’s created in the default Data Extension folder.
Part V: Pulling in Campaign Members into the Journey.
What can help before creating the email or other content is to pull in data into your journey so you can (1) populate the data into the data extension (2) validate the syntax of the data and (3) proof the email/messaging content against real data points.
1.) Add a decision split activity. To pull in campaign members simply add a decision split activity and check to see if the email address ends with your company domain.
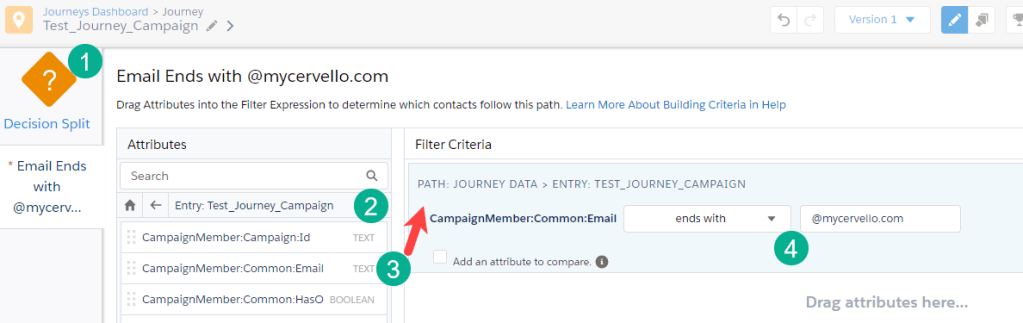
(1) Add a decision split to the canvas and click into one of the paths to configure.
(2) Select the Journey data, navigate to the journey DE.
(3) Select the email field and drag it to the canvas on the right.
(4) Select “ends with” you company domain.
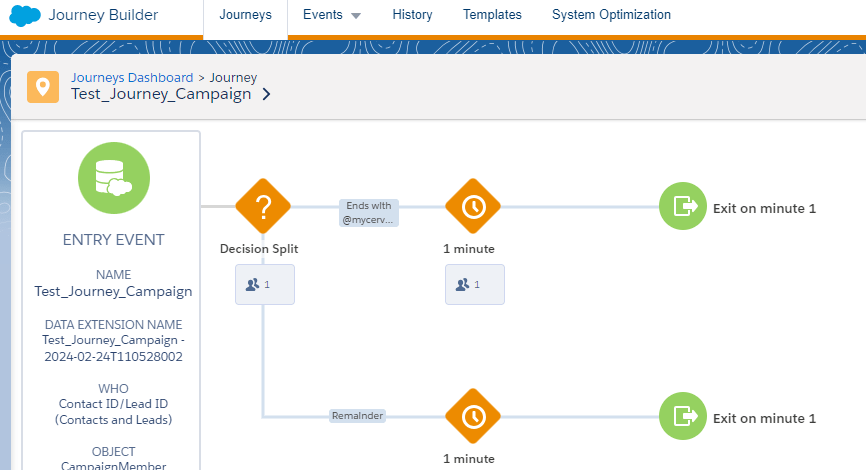
2.) Activate the journey. Under Journey setting select “ReEntry after Exiting” and you can lower the wait steps from 1 day to one minute and activate the journey. The journey could look like this:

3.) Update a campaign member status to enter them into the Journey. Navigate back to Sales Cloud. Select a campaign member and change their status to “Add to Journey”.
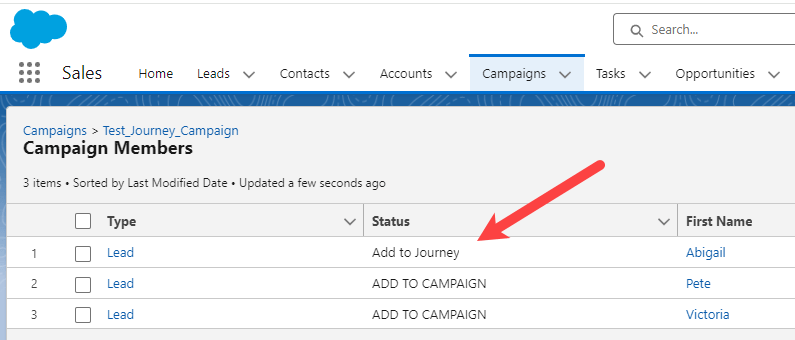
And just like that a new Journey subscriber will enter the journey:
4.) Validate the data in the Journey Data Extension. Navigate to the general data extension folder in Marketing Cloud and click into the Records tab to view the data:
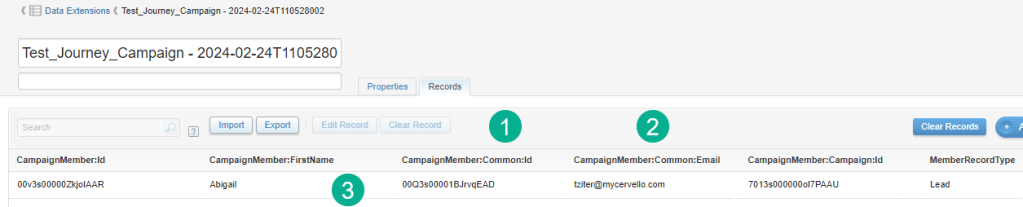
(1) The lead ID comes through and will be the subscriberkey.
(2) The email address to be sent.
(3) The first name data point to use in the email.
Part VI: Leverage Journey data points in an email.
Add an email to the Journey and select a test email that you can modify to populate the Journey first name data point.
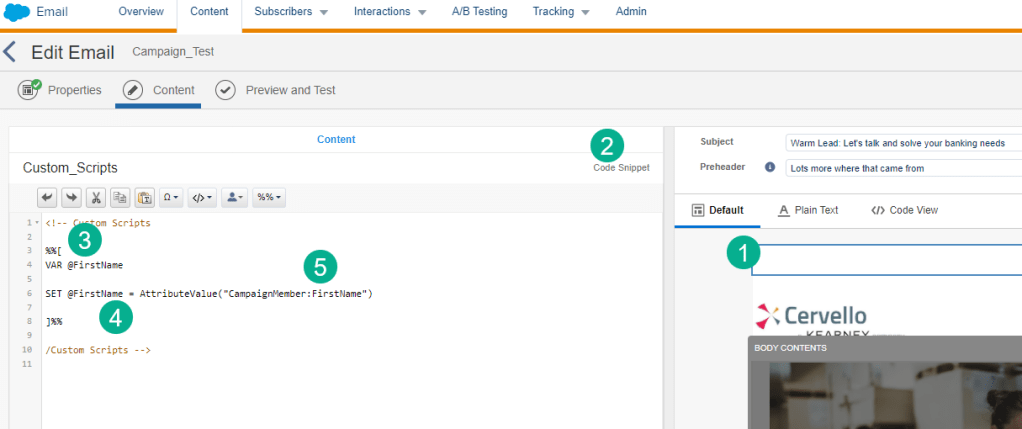
(1) Create a ampscript block and drop it at the top of your email if you have an email design system.
(2) Select a Code Snippet block when using ampsrcipt.
(3) Open your ampscript code block.
(4) Create a variable for first name.
(5) Set the first name variable based on the first name field in the data extension using the attributevalue function to provide consistency to the data point. https://ampscript.guide/attributevalue/
Then drop the variable into the body copy of the email using the “v” function. https://ampscript.guide/v/

Last when you proof the email against the data extension record that entered the journey:
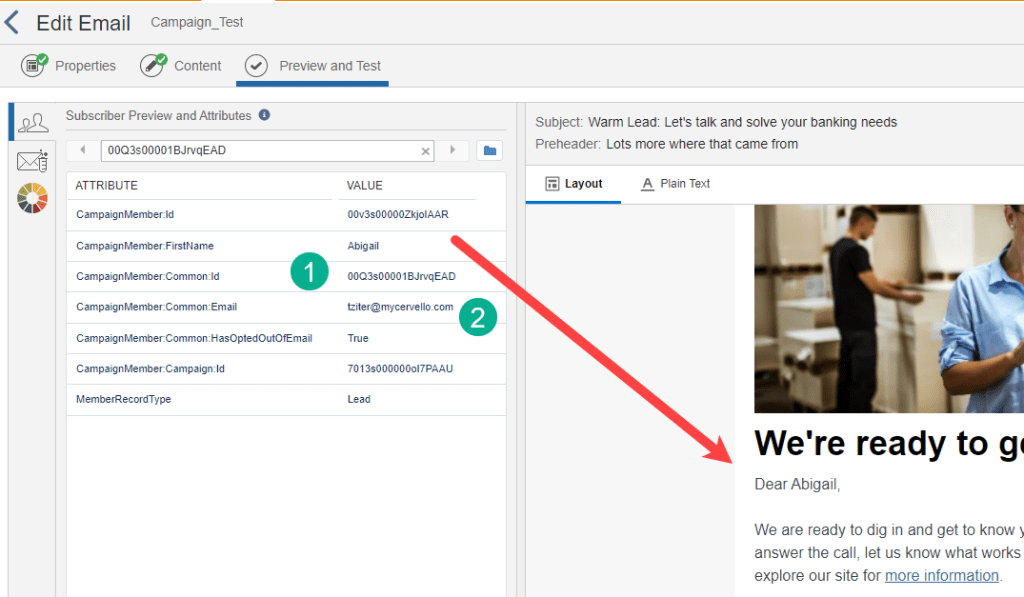
“Abigail” is displayed based on the data point.
(1) The data points in the data extension are validated, including the subscriber key which is the lead ID.
(2) And the email address.
In future posts we’ll add more complex functionality and personalization to the campaign journey functionality. Experiment in your sandbox and explore the wealth of options creating campaign fed journeys in Marketing Cloud.

Leave a comment