
This is part two of a two part blog covering how to create an automated unsubscribe process in Marketing Cloud integrated with Sales Cloud. In this post we’ll be covering how to query lead and contact objects in Sales Cloud to identify those records that need to be unsubscribed on the Marketing Cloud side.
Part I covers setting up the recommended Extract Transfer and Load (ETL) process in Marketing Cloud and running it manually with a test record. Please review the steps located here: https://handsonsfmc.com/2023/12/27/how-to-set-up-an-automated-unsubscribe-in-marketing-cloud/
Part II Solution: Create an automation that checks the compares the HasOptedOutOfEmail field with the subscriber status in Marketing Cloud. If HasOpted out is “True” and the subscriber status in Marketing cloud is “Active” then add them to the data extension.
Step I: Create a query in Query Studio for the Lead unsubscribe records
First off if you don’t have the amazing Query Studio, install it in your Marketing Cloud instance as it is free. https://appexchange.salesforce.com/appxListingDetail?listingId=a0N3A00000FP3yFUAT
We like to work in Query Studio first as it allows the user to visualize the data first before creating the query and data extension.
Let’s take a look a the following query created to generate subscribers to unsubscribe.
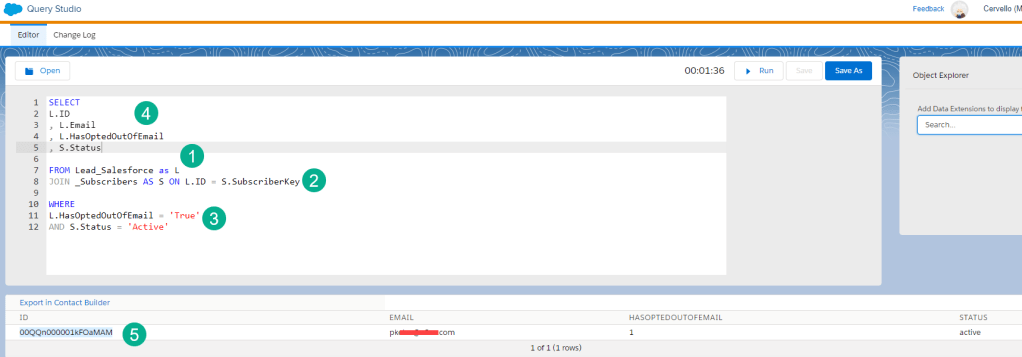
(1) Our primary source for this query will be the Lead synchronized data extension which contains all of the synched leads from Sales Cloud.
(2) We are JOIN-ing the Subscriber data view (https://help.salesforce.com/s/articleView?id=sf.mc_as_data_view_subscribers.htm&type=5) which is the official way to query All Subscribers in Marketing Cloud. We are linking the Subscribers data view with leads by joining the Lead ID to the Subscriber key as that data point on the lead is used, not email as the subscriber key.
(3) The two filters we are looking for are (a) any lead that has the Has Opted/Email Opt Out field checked or “True” and (b) their subscriber status is “Active”.
(4) For data validation purposes it will be helpful to output the lead ID, email, Email Opt Out and status (from the Subscriber data view).
(5) Before running the query we had validated that the lead identified above fit this criteria and the query validated the data.
We will post the query code at the bottom of this post.
Step II: Create a query in Query Studio for the Contact unsubscribe records
Duplicate the browser tab in Marketing Cloud, copy the lead query code and make modifications for the Contact Synchronized Data Extension.

(1) The Contact synchronized DE syntax is very similar to lead, we are naming it as C instead of L.
(2) Modifying the HasOpted field to a C.
(3) Modifying the output fields to begin with a C. as well.
We didn’t set up a Contact that met this criteria in Sales Cloud so zero records were returned which is expected.
Step III: Create a Log Query to capture all Unsubscribe Events
Having a log will be very helpful troubleshooting any subscribers who aren’t unsubscribed in the future. Best of all you can leverage the existing lead and contact queries.

(1) Utilize the lead query, we’ve made some updates to fit the data extension created in the first blog.
(2) Using the UNION function we can combine both of these queries into one.
(3) Utilize the contact query as well.
(4) We see both a contact ID or contact being populated
(5) and leads as well.
We’ll need a special logging DE as well:
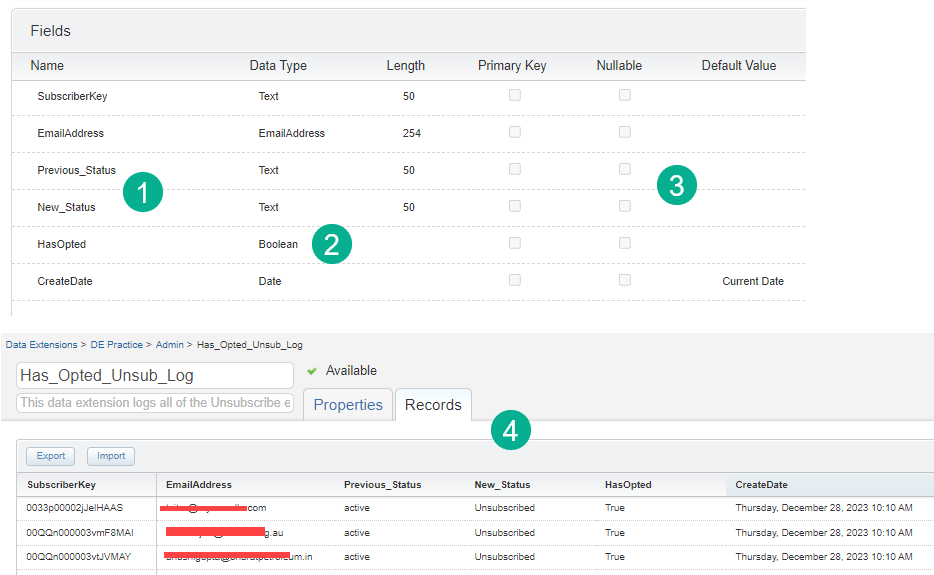
(1) We’re capturing the previous status for record keeping and the new status which will be “Unsubscribed”, but good to see anyways.
(2) We’re capturing the Has Opted field and setting it as a boolean data type.
(3) We’re keeping all values as not nullable as they should all be populated and are necessary.
(4) After running we see the data populated as expected in the data extension, both leads and contacts are present.
Step IV: Build the Queries and add them to the automation
We’ll be added to the query we built in the first blog and setting the schedule to run once a day.

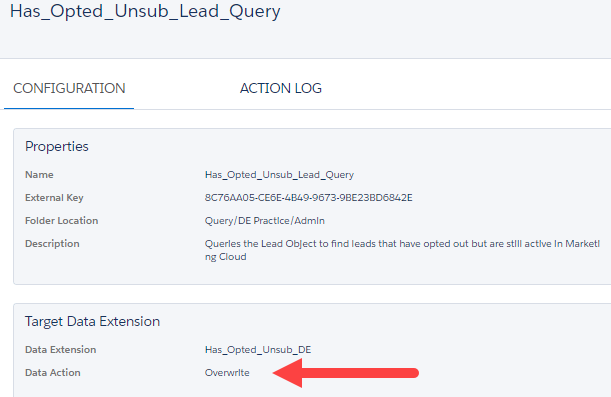
(1) Set the lead query to overwrite the data extension that is being imported.
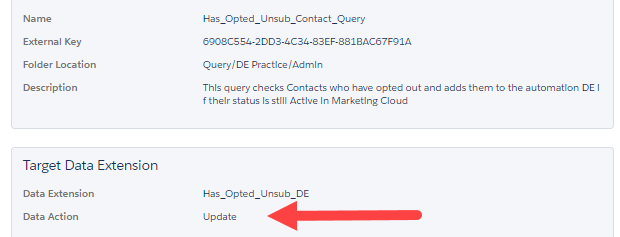
(2) Set the contact query to update.
(3) Add the log query to step 1. It can’t be added at the end as the records will be unsubscribed and not be logged.
(4) Activate the automation to run in our case daily at 6:13am.
Tip: When setting scheduled automations never set them on the hour as most automations will be running at that time and could delay or cause problems for your automation. If you set it for a unique time instead there will be less risk of a competing automation running or starting at that time.
And there it is you now have an automated ETL process to keep the lead/contact records in Sales Cloud in sync with the subscribers in Marketing cloud.

Leave a comment