Welcome back to our top 50 Marketing Cloud tips part two, our second set of twenty five tips.
26.) TrailBlazer Marketing Cloud Community groups
Take advantage of the amazing TrailBlazer community groups. They are a fantastic place to post your questions and most if not all answers will not only receive multiple answers from SFMC experts, but also you’ll receive an answer within an hour. Another big shout out to Mateusz Dabrowski (https://mateuszdabrowski.pl/) for all of his efforts in these groups. He will most likely answer your question and provide a thorough explanation as well.
And don’t forget to try your hand at answering questions as well. Take a question posted and solve it on your end in your own SFMC or Sales Cloud org and submit an answer. If you answer is helpful you might receive a best answer award and receive a shout out by community organizers for best answers by month.
Here’s a link to the Marketing Cloud focused community group: https://trailhead.salesforce.com/trailblazer-community/groups/0F9300000001pQ5CAI?tab=discussion&sort=LAST_MODIFIED_DATE_DESC
27.) How to find the handlebar code for Update Contact activity
The Update Contact Activity is a helpful activity in Journey Builder as it allows you to update a data extension based on the journey path of the subscriber. Setting up this activity is not easy as detailed below:
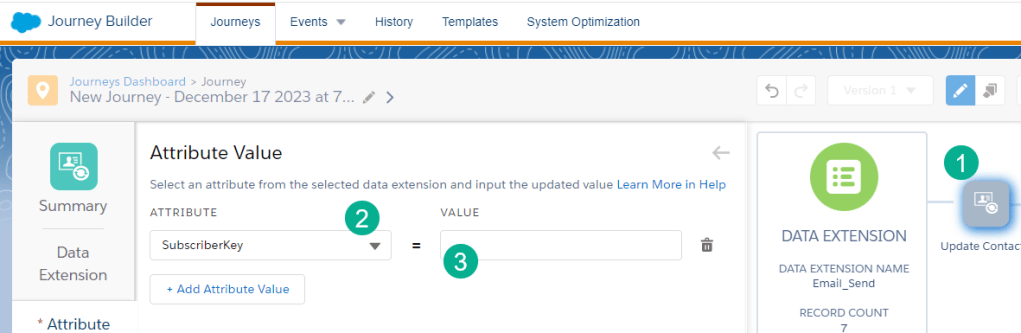
(1) In the settings of the Update Contact activity in Journey Builder
(2) When selecting the fields to update
(3) Journey builder doesn’t provide you with the handlebar code needed to populate the field
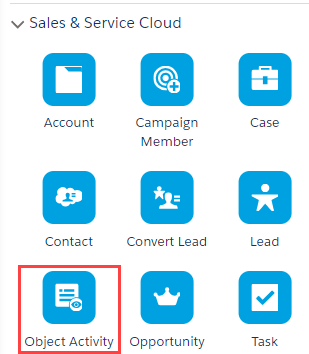
To find this handlebar code exit out of the Update Contact activity and add an Object Activity.
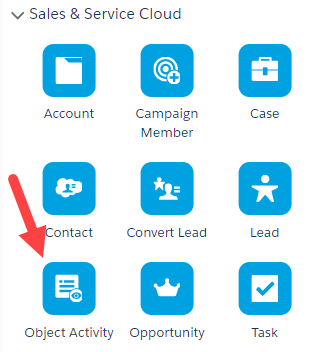
Follow the steps and select an object like Lead, Find and Update and select a text field to update.
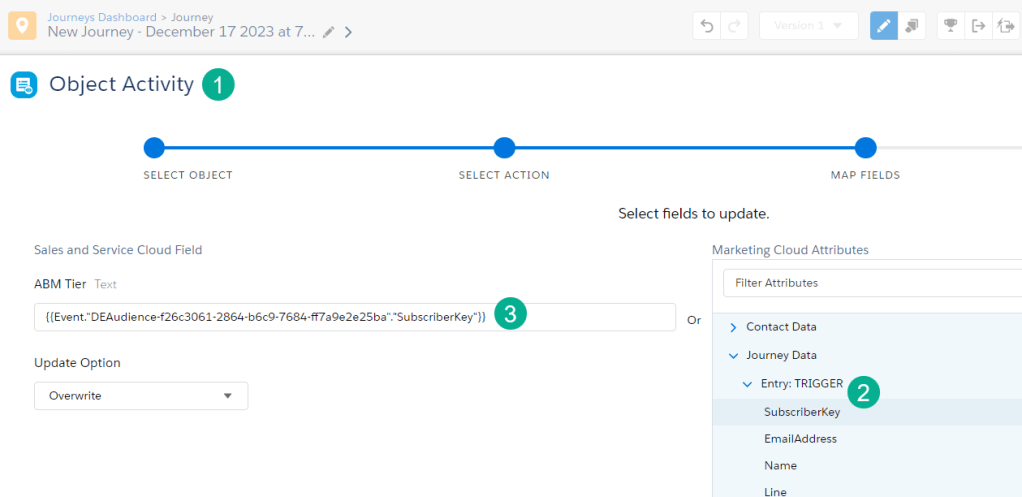
(1) In an Object Activity settings
(2) Select the field in your data extension under Attributes
(3) The Handlebar code will appear. Copy the handlebar code for the variable and save it in a notepad. Follow these steps for every variable that needs to be populated in the Update Contact DE.
28.) Refresh Contact Builder Data Extension view
One of the challenges viewing and editing records in data extensions in Contact Builder is that the UI constantly needs to be refreshed. In Email Studio it’s much easier to exit the data extension folder which will refresh the data. But unfortunately in Content Builder that won’t work and you are left to do a complete refresh and navigate back to your data extension.
Here’s a work around to do an instant refresh while staying in your data extension.

(1) Viewing a data extension in Contact Builder
(2) Add a new record
(3) And hit cancel and this will refresh the data extension
29.) Add/edit individual records in Contact Builder data extension
When testing it can be helpful to edit individual records in a data extension. To do this first make sure your data extension has a primary key. In Content Builder you will be able to select and edit all fields except for the primary key on individual records.
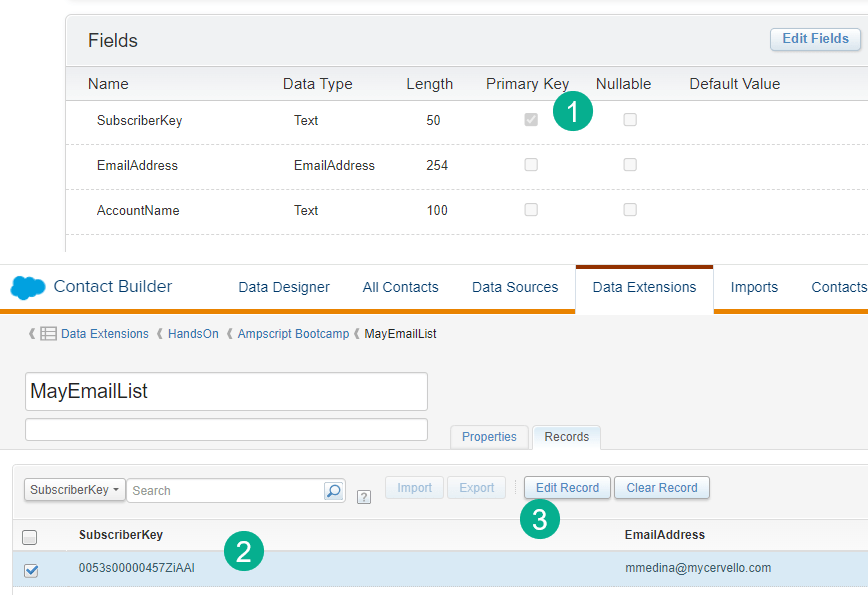
(1) Make sure you select a primary key
(2) Select an individual record by clicking the checkbox
(3) Edit the record
30.) Add CreateDate to Data Extensions
When creating a data extension always consider adding in a CreateDate field to capture the date/time when the record was added to the data extension.
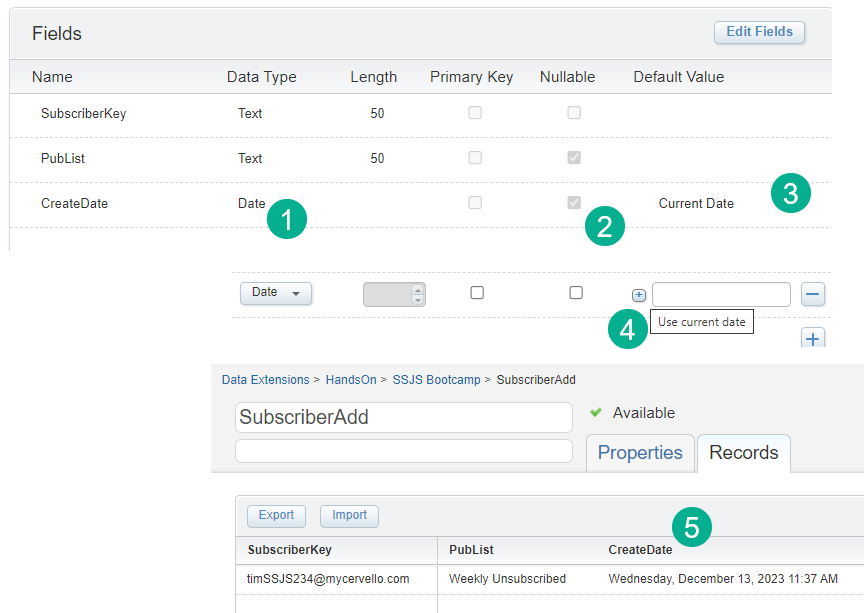
(1) Make sure the field is a Date data type
(2) It can be nullable or not
(3) Set it to the current date as the default
(4) To do so click on the plus icon to the left of the window
(5) When a row gets added the time of entry will be captured
31.) Chrome for PROD and Edge for Test
Hopefully in your environment you’ll have the ability to utilize a Marketing Cloud test and prod environment. Instead of switching back and forth in the same browser, use Chrome for prod and Edge for test. It can be helpful to have both environments open at both times.
32.) Certifications can help but take your time
Marketing Cloud or any Salesforce certifications are an excellent path to learn about the platform when starting out. They also can be helpful to strengthen your knowledge after working in the platform for a couple of years. Always consider certifications as part of your learning/growth path, but we’d advise to not rush into piling up certifications.
If you are starting out consider the Marketing Cloud Admin certification as a starter year one especially if you have exposure to a SFMC instance. If you have had experience in email marketing/operations in the past you could consider Email Specialist.
Take your time building up experience in the platform before attempting Marketing Cloud Consultant or Developer however. Having a couple of years experience in the platform across multiple use cases can help bring to life the areas of focus in these more advance certifications. Also consider the Sales Cloud Admin certification as well as SFMC and Sales Cloud are so well integrated.
33.) Use LookupRows if you need multiple values vs multiple Lookups
The Lookup function is one of the most useful functions to leverage data points in other data extensions. It’s a super simple function that only takes one line of code. https://ampscript.guide/lookup/
If you find yourself needing multiple data points from the same data extension use LookupRows instead: https://ampscript.guide/lookuprows/
The lookup functions should be a key part of your ampscript training for your team. Spend the time to test both lookup options and even lookuporderedrows. These functions will a foundational ampscript function for your team.
34.) Decision split – attribute to attribute settings
When configuring a decision split in Journey builder if the data point you are using is matching a data point in a synchronized data extension with a 1 to many relationship you’ll want to utilize the attribute to attribute function.
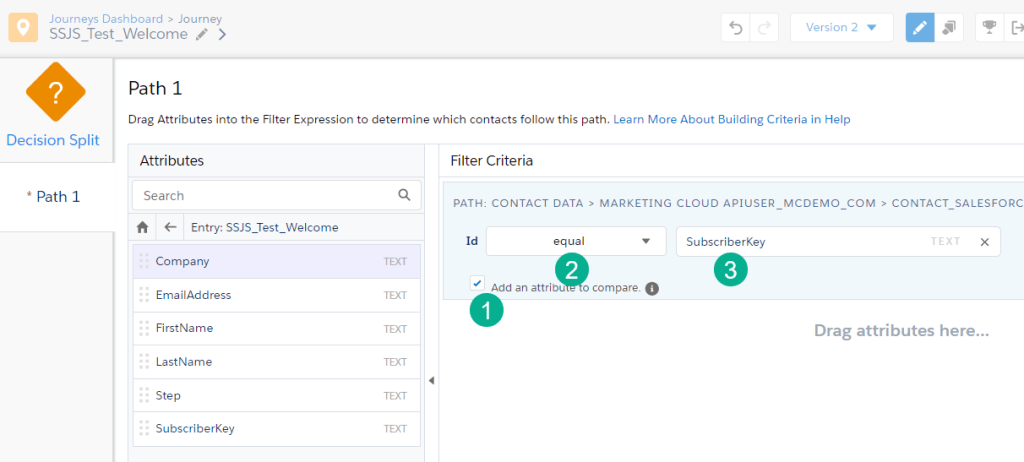
(1) Select the checkbox on the attribute to attribute comparison
(2) Select the data point in the custom attribute or synchronized data extension first or on the left
(3) Then select the data point in the data extension on the right
35.) Refresh email in Journey
Making an update to an email that is in an active journey? Don’t forget to update the email content in the journey as well. The email updates won’t take affect unless you do. Click into each email and select “Done”. If you are updating a version that is active you should see the following spinner which will confirm the email is being updated:
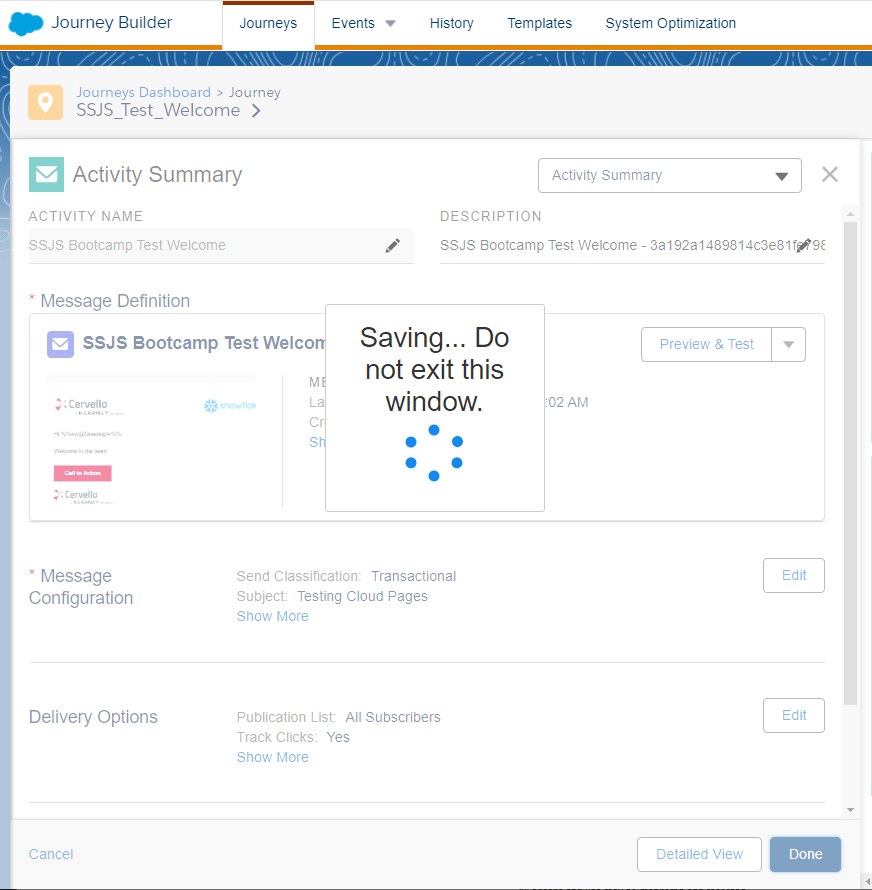
Tip: It may be easier to update the email directly in the Journey vs updating in Content Builder separately.
36.) Never pause a journey
Each version as well as all versions have the ability to be paused in journey builder.
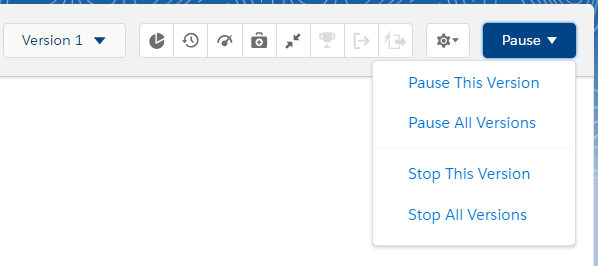
The problem with pausing is the options are limited:
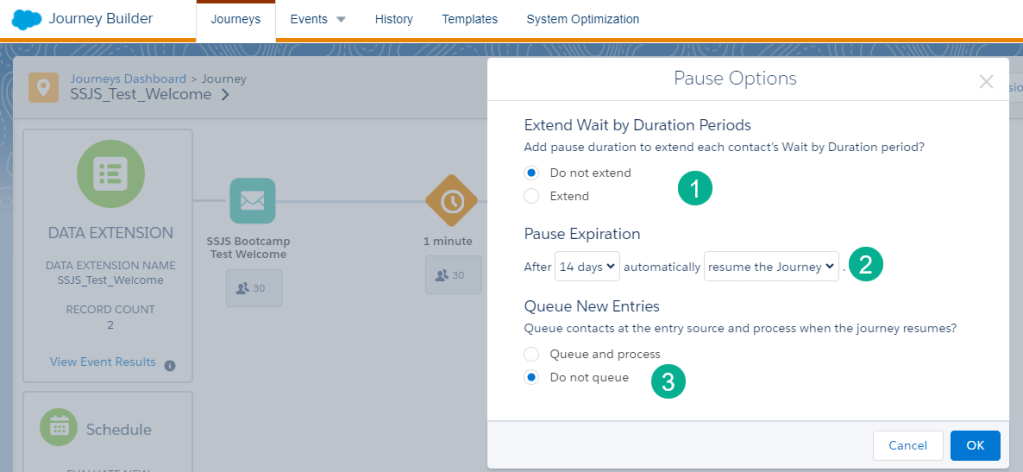
(1) This is a nice feature where it looks like you can pause even those in an existing journey. Now this can be handy if #2 wasn’t so limiting.
(2) Unfortunately the longest you can pause a Journey is 14 days. After that you have two choices, either resume the journey or stop it.
(3) Queuing sounds interesting after-all a journey is based on a trigger and you probably can view and clear the queue like a trigger send as well.
An longer term solution to pausing would be the following:
(1) Create a new version of the journey and Activate it. This will put the current version of the journey into a finishing state.
(2) Stop the newly activated Journey version.
This will allow you to prevent any new entrants into the journey and safely resume whenever needed. To resume, simply create another version of the journey and activate.
37.) Use Postman to test triggered sends
There is now way to test trigger sends in Marketing Cloud. Utilizing an API tool like Postman you can test triggered sends end to end. Obtain the key credentials from a installed package in Setup and configure an Auth and Post call in Postman.
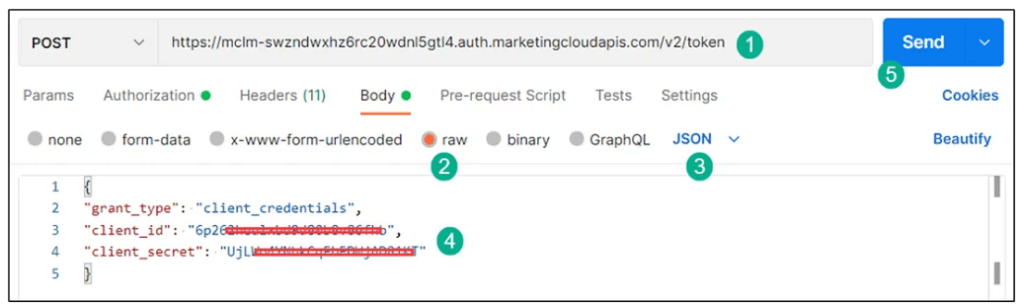
(1) Use the provided Auth URL from the installed package plus additional syntax to the URL string.
(2 – 3) Select the appropriate settings in Postman to configure the API call.
(4) Add i the Client ID and Secret in the JSON payload.
(5) And click send to make the handshake into the Marketing Cloud environment.
And then configure the POST call:
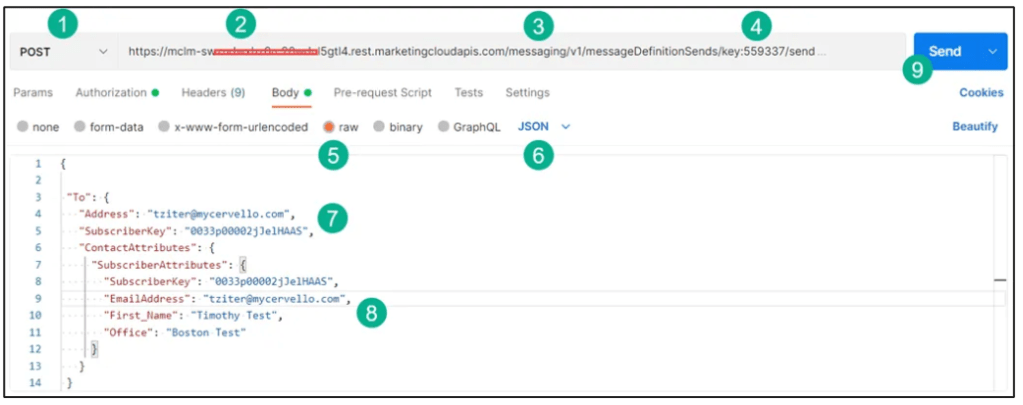
(1 – 4) Configure the Rest URL settings
(5 – 6) Select the appropriate settings in Postman to configure the API call
(7 – 8) Fill in the payload based on the data extension on the trigger
(9) Click send
For a complete walkthrough refer to this page we posted on Medium: https://medium.com/cervello-an-a-t-kearney-company/marketing-cloud-end-to-end-triggered-email-overview-a32ead33a374
38.) Object Activity vs individual activities
Journey Builder offers a variety of object activities like Lead to Contact to Campaign Member. We’ve heard from Salesforce support that they recommend using the Object Activity vs the individual object activities. The Object Activity gives you the ability to create any object in Sales Cloud.
39.) Use Keys to secure credentials
Utilize the keys in Marketing Cloud to encrypt and decrypt credentials to keep cloud pages and other assets secure. We break this process down in detail at the following page:https://handsonsfmc.com/how-to-create-keys-in-marketing-cloud/
First off you’ll need to follow the steps to create a set of the three keys. Then create an email with a code snippet block where you can encrypt your credentials:
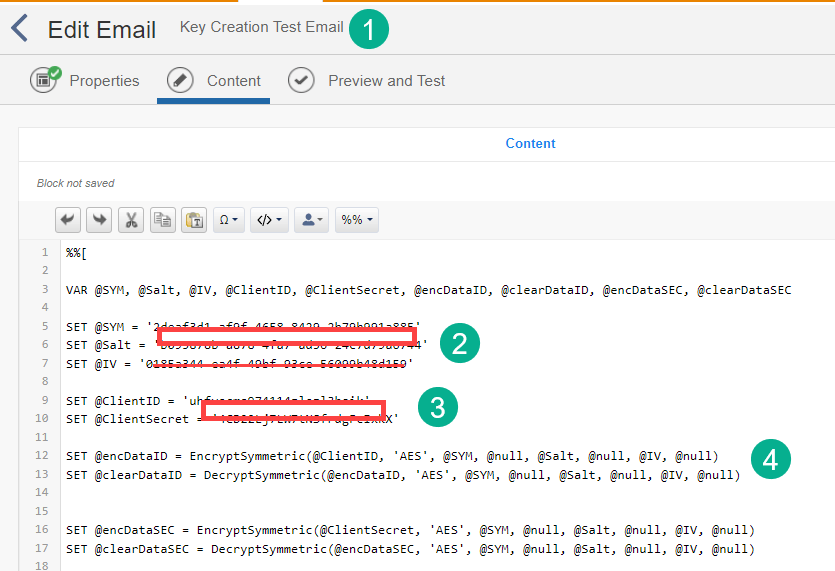
(1) Create your Key Creation test email
(2) Add the three keys that you created
(3) Add in the values for the credential variables you’d like to encrypt. In this case we are encrypting the Client ID and Client Secret for an installed package.
(4) Use the EncryptSymmetric ampscript function to encrypt the variables: https://ampscript.guide/encryptsymmetric/
Then in the cloud page pass in the encrypted values for both variables and decrypt the variables.
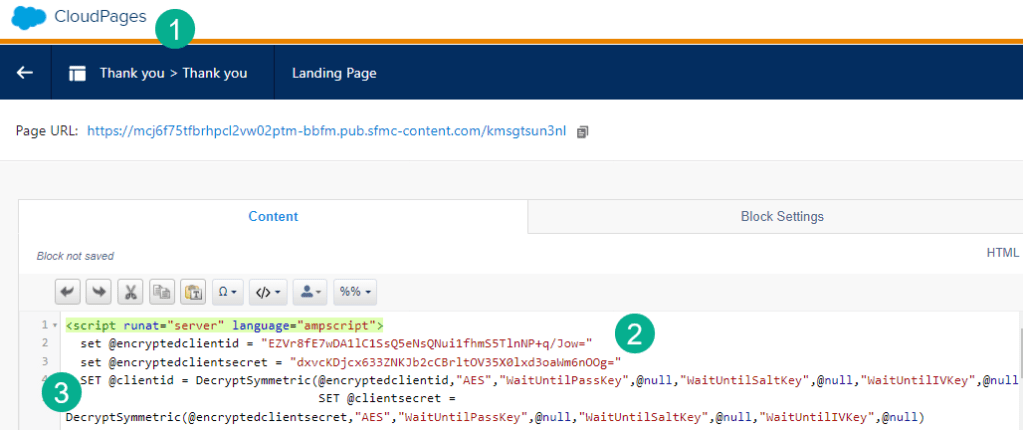
(1) In a cloud page or another asset
(2) Pass in the encrypted variables created in your Key Creation test email
(3) Use the Decryptsymmetric function: https://ampscript.guide/decryptsymmetric/
40.) Make DE send-able if using in a Journey
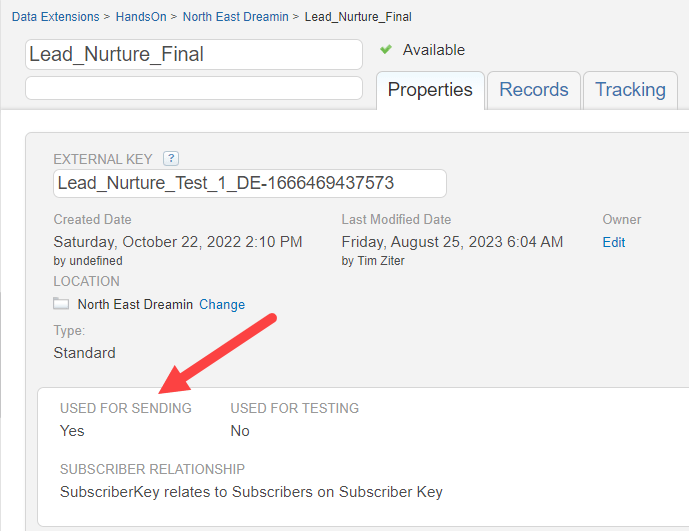
Don’t forget when using an email in a journey, even if it’s being written to in a Contact Update activity and not sending the Data Extension must be selected “Used for Sending” in order for Journey Builder to see it or be able to be selected.
41.) Stack exchange for Marketing Cloud
Another fantastic resource to ask questions in the community is Stack Exchange. This forum is monitored by many legendary SFMC SMEs like Greg Gifford, Eliot Harper, Adam Spriggs and more.
Most common issues have been asked and resolved in this forum and thanks to those who monitor the forum the questions and answers are edited and maintained at a high level. This can make asking and especially answers questions a little more involved. You’ll want to read SE’s recommended formatting for asking questions. Spend some time reading questions to understand the best way to ask a good question.
Here’s a link to Marketing Cloud tagged forum on Stack Exchange: https://salesforce.stackexchange.com/questions/tagged/marketing-cloud
42.) Connections!
You got to go to Connections in Chicago in June. Connections is like the Marketing Cloud Dreamforce. There are a ton of amazing sessions both hands on and regular presentations. All of the SFMC experts are there and they are so approachable.
Here’s a few tips when attending Connections.
A.) Plan your sessions way in advance. Sign up for those hands on sessions early and prioritize your key sessions.
B.) Meet the SFMC experts! Introduce yourself before or after the session where the SFMC expert is presenting. Prepare questions if you can to make the most of your brief time with the expert. One example could be asking them what they’d recommend you focus on to broaden your SFMC experience.
C.) Take advantage of the before and after conference events. Amazing vendors/partners could have a waffle bar before the conference day kicks off or a cocktail hour afterwards. Look for these events prior to the conference and sign up for as many as you can. If you don’t see any events make it a point to meet a few vendors right away at the conference and they’ll provide an invite.
D.) Don’t go just once. It’s a lot to take in and you won’t see half of the amazingness. Plan on at least going three years in a row to start to feel comfortable knowing the entirety of the event and where you can focus attention.
43.) Use a SQL Cheat sheet
SQL cheat sheets are handy to reference if you need to find the right syntax for say the LIKE function or understand which type of JOIN to use. Here’s out Cheat Sheet and we hope it comes in handy for you: https://handsonsfmc.com/query-cheat-sheet/

44.) Leverage those amazing Data Views
Marketing Cloud captures a treasure trove of data points at time of send and throughout the engagement of your communications stored in data views. https://help.salesforce.com/s/articleView?id=sf.mc_as_data_views.htm&type=5
The data is captured and stored for up to six months but this time frame can be extended if you reach out to your Marketing Cloud account executive. Each Data View is a data extension and can be used in queries as such.

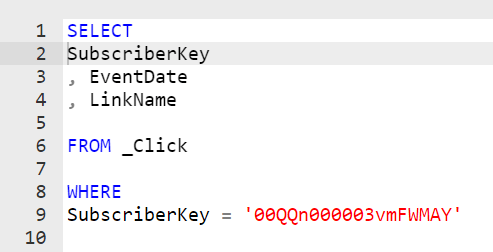
(1) The Click data view – let’s you query on every click by susbscriber
(2) _Click is the name of the data extension
(3) Each Data View has a set of fields to leverage
Also you have to check out https://dataviews.io/ as it is incredibly helpful to identify the linkage when joining multiple data views.
Here’s a basic query accessing the Click data view to check if a certain subscriber has clicked
45.) And don’t forget about Personalization Strings
Personalization strings are another fantastic data source native to Marketing Cloud. At time of send a long list of fields are captured in the system. These fields can be utilized as if they were part of your data extension.https://help.salesforce.com/s/articleView?id=sf.mc_es_available_personalization_strings.htm&type=5
Here are a few of our most used personalization strings:
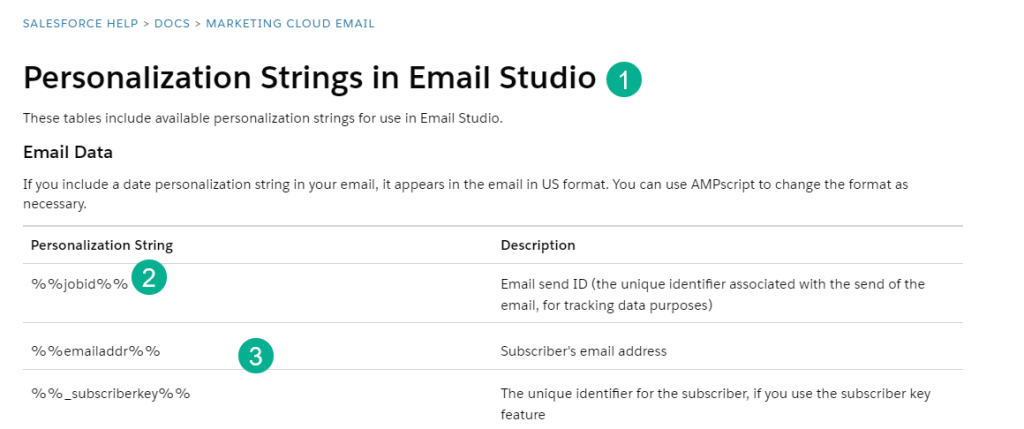
(1) Bookmark the Personalization strings documentation as you’ll be here early and often
(2) Utilize each variable like you would a data extension field by surrounding the variable in %%. You can set variables as well like:
SET @subscriber = atttributevalue(“_subscriberkey”)
(3) These are our top three used strings
46.) Use cloudpagesurl to pass all data extension and personalization strings to a cloud page
Whenever possible utilize the CloudpagesURL ampscript: https://ampscript.guide/cloudpagesurl/ for your links that go to Marketing Cloud Cloud pages. Using this syntax will link the data in the email to the cloud page and all data extension and personalization string data points will be available in the cloud page.
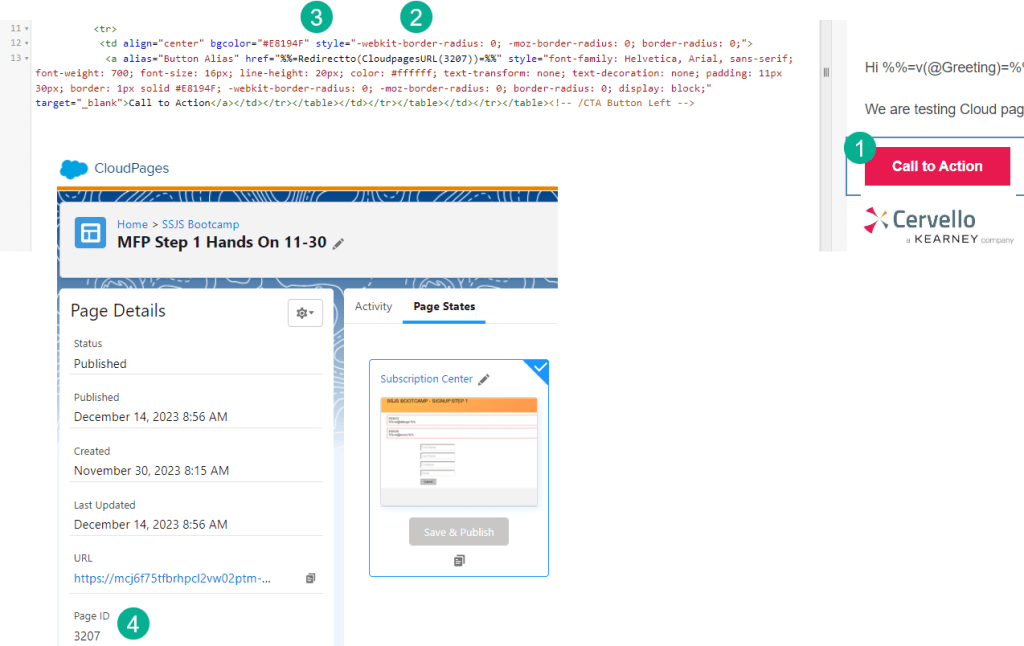
(1) When using a link or call to action button that goes to a cloud page
(2) Wrap the cloud page number with the CloudpagesURL function
(3) And wrap that function in a Redirectto function: https://ampscript.guide/redirectto/ especially for <a> tag links
47.) Invest in an Email Design System
An email design system involves creating a blank template and a series of content blocks that you can drag and drop to create emails relevant to your company/instance. These systems take time and a solid understanding of HTML and CSS to stand up, but the effort is well worth the it.
48.) Save as content block
When using your email design system and working in a content block you can quickly save your block as a content block right in the window.
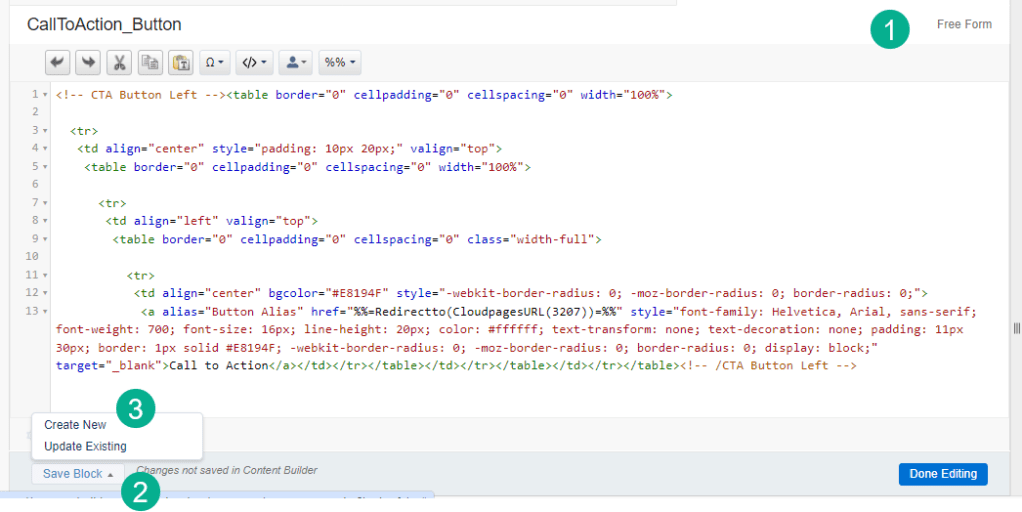
(1) In any content block
(2) Select “Save Block” in the lower left corner
(3) Select Create New and follow the steps to quickly create a new content block in your email design system
49.) Leverage ContentblockByKey
Contentblockbykey: https://ampscript.guide/contentblockbykey/ and all of its variations are a wonderful tool to leverage in Marketing Cloud. Basically the function brings in additional code into your asset by calling that content block of code. There are many benefits to utilizing this function:
1.) Simplifies the code – Breaking out key areas of code into content blocks can help streamline and simplify the code.
2.) Universal code assets – Instead of building coding functions specific to each email, create content blocks of universal applicable code and call them using contentblockbykey in any asset.
3.) Custom pre-header – Do you need a dynamic pre-header? Based on order of operations: https://ampscript.guide/order-of-operations/ Pre-header comes before the HTML body of the email. Use contentblockbykey to leverage coding to customize the pre-header, just remember to not use the variable set in the body of the email.
50.) Indent your ampscript
Where possible indent your ampscript functions so that it’s easy to tell how IF/THENs or FOR Loops begin and end. Spending a little time up front indenting will save tons of time at the end as it will prevent mistakes in the code like a missing ENDIF.
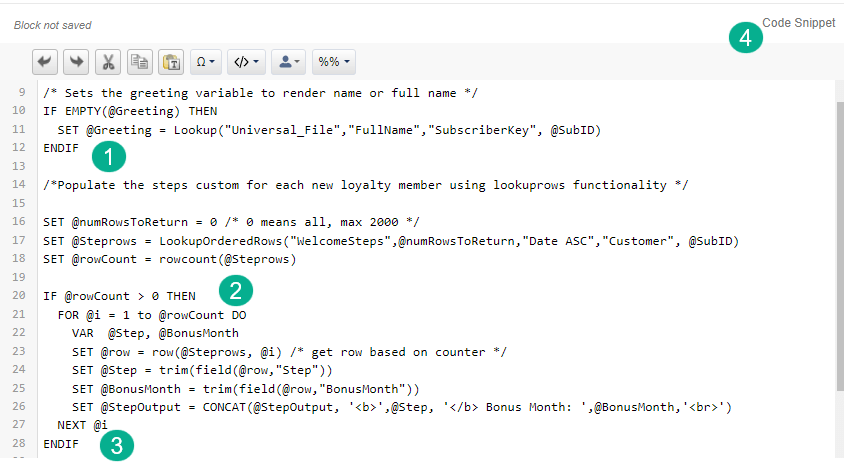
(1) Try indenting any code in an IF THEN statement by two spaces
(2) Indent nested functions as well, each with two spaces
(3) Make sure the ending functions line up as well. See how the NEXT lines up with the FOR and the ENDIF lines up with the IF?
(4) When coding in ampscript always use a Code Snippet block. If you use a Free Form block it can modify your code and mess up formatting.
That’s all fifty tips. We have easily another fifty to share and will add them to our tips page which we will be better about keeping updated: https://handsonsfmc.com/marketing-cloud-tip-of-the-week/
Please share your Marketing Cloud tips whenever you can, we look forward to learning from your experience. Thank you.

Leave a comment