
This is Part II of the Subscriber Function SSJS Bootcamp hosted by Jyothsna Bitra as part of the Phoenix Salesforce Marketer Group.
These bootcamp sessions are part of the Phoenix Marketer Group, please sign up here for future sessions: https://trailblazercommunitygroups.com/salesforce-marketer-group-marketing-cloud-phoenix-united-states/
Here’s the full video of this SSJS Bootcamp session.
Setup – Subscribe to Lists
Before we jump into Sandesh’s amazing code we need to do some set up so we can display the lists that a subscriber has subscribed to Marketing Cloud instance. Identifying the name and status of these lists can be used to display on the preference center.
Before we get started we’ll need to select a subscriber and add them to several publication lists. First create a test data extension with a subscriber.
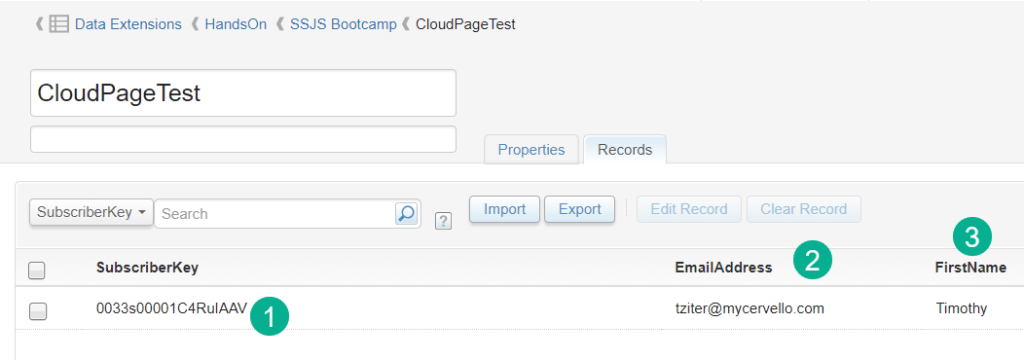
(1) Use a contact or lead ID as a subscriber key.
Subscriber Tip #1 – Don’t use email as the Subscriber Key
If possible utilize a contact or lead id as the subscriber key instead of the email address. Not using the email as the subscriberkey allows for more flexibility for the subscriber. For example you might have a subscriber exist both as a contact and a lead. Some organizations will treat existing customers this way in that they are a contact for their existing products, but a lead might be created as sales works the customer to expand their product set. If email address was the subscriberkey it prevents multiple subscribers for a single email address.
(2) Email address is used in the email address field only.
(3) Add additional fields to personalize the email.
How to populate a subscriber in a Publication List
To add a subscriber into a Publication List you’ll need to send an email to that list. There are many ways to send an email to the publication list including user initiated sends and quick send right in content builder. Here’s how to use the quick send:
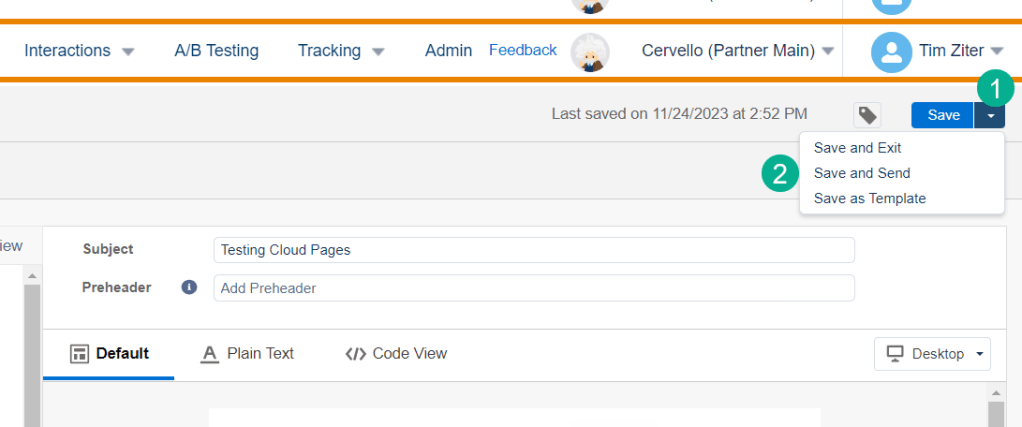
(1) In the email select the arrow in the upper right hand corner.
(2) Select “Save and Send”.
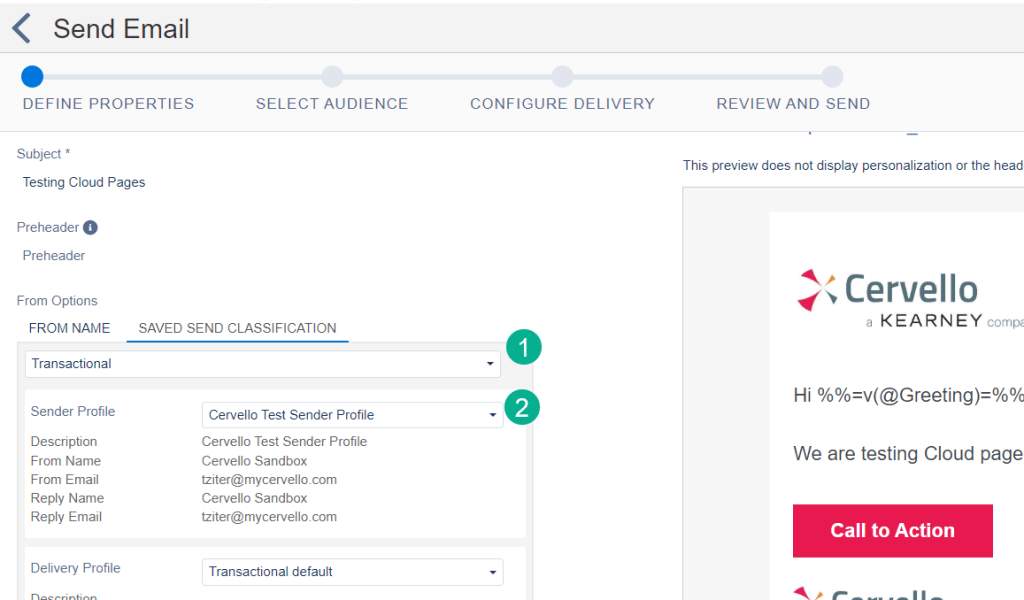
(1) Select send classification – here we are selecting Transactional.
(2) And select the Sender Profile and click “Next”.
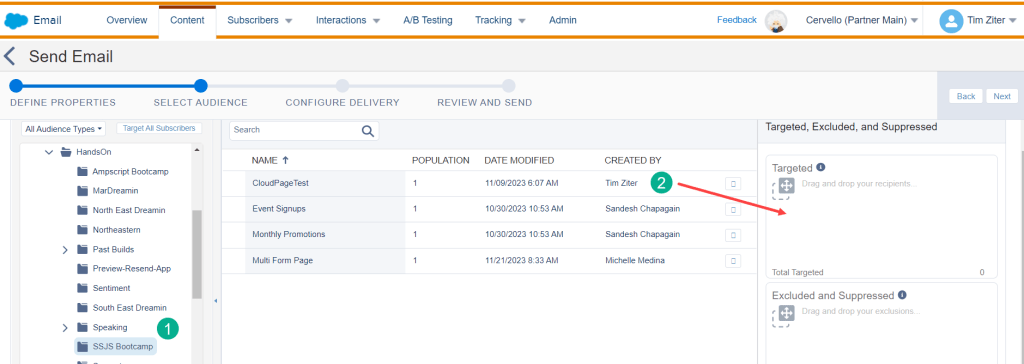
(1) Navigate to the data extension folder.
(2) Take the data extension and drag it over to the “Targeted” section.

A window will pop up. For most sends select All Subscribers, but for our use case we’ll want to select each Publication list we want to add our subscribers.
(1) Select the Publication list folder.
(2) And the list that you want to add the subscriber.
(3) Click Select and the Next button.
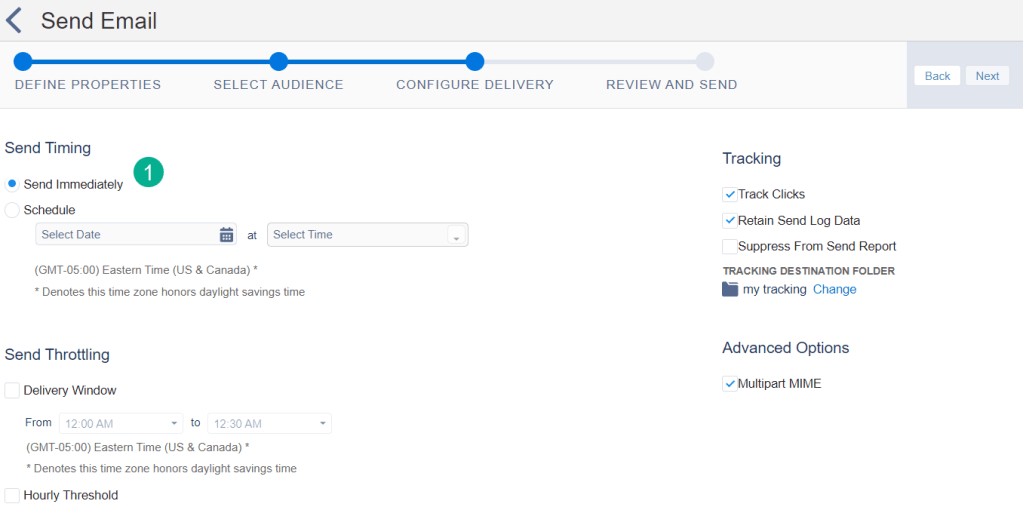
(1) Select Send Immediately and the Next button.

(1) Check the box and
(2) Select Send.

Let’s validate the publication list to confirm the subscriber got added on the Marketing Cloud side.
(1) Navigate to the Publication List menu and pull up the Investors Newsletter publication list.
(2) Validate the subscriber has been added and they should have an “Active” status.
Repeat these steps for as many publication lists that needed to be added to the subscriber.
How to view all subscriber lists for each subscriber in SSJS
Look up the Subscriber and list functions in the Salesforce SSJS documentation: https://developer.salesforce.com/docs/marketing/marketing-cloud/guide/ssjs_subscriberListsRetrieve.html

(1) We’ve initialized the subscriberkey in the code before so the line two of the code above will be the only thing needed.
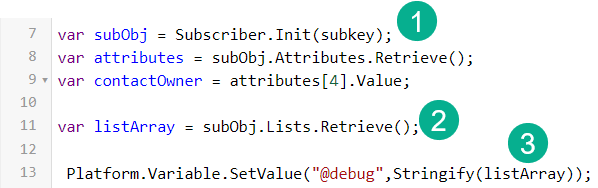
(1) We’ve initialized the subscriber prior.
(2) Dropping in the code we validate the subObj variable matches on line 7.
(3) Using the Debug variable we’ll output the listArray variable and using Stringify: https://developer.salesforce.com/docs/marketing/marketing-cloud/guide/ssjs_utilitiesStringify.html
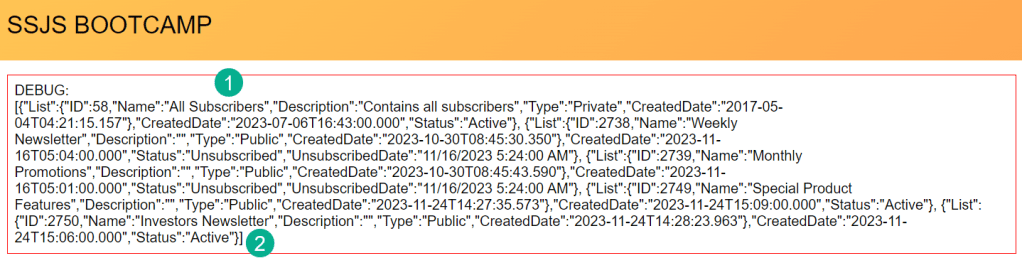
(1) In the string the first value in the string is All Subscribers.
(2) Here’s the publication list that we added our subscriber to above.
How to Output all subscriber lists with SSJS
Our next task will be to output each list so basically clean up the string of variables outputted above into a more readable format which could be used in the front facing website. To accomplish this we’ll want to cycle through all of the lists for each subscriber using a FOR LOOP in SSJS.
Here’s the code that we’ll implement:
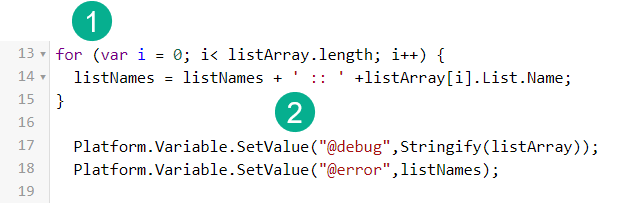
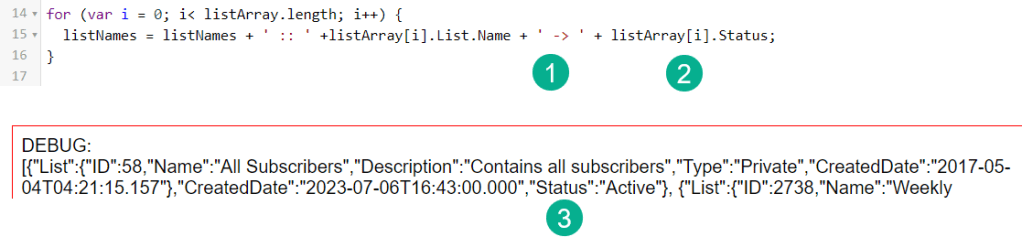
(1) The For Loop which we’ll breakdown below in more detail.
(2) Creating a variable which will concatenate each list name as it cycles through the For Loop.
SSJS Tip: How to create a FOR LOOP in SSJS
There isn’t any documentation in the Salesforce SSJS resources, luckily in the SFMC community we have Mateusz Dabrowski and his amazing site to help us understand how a For Loop is created. https://mateuszdabrowski.pl/docs/ssjs/ssjs-loops/
Mateusz provides a very thorough breakdown of each component that makes up a For Loop in SSJS.
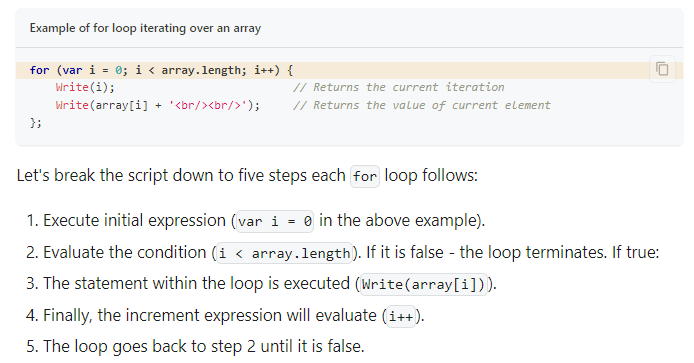
Part I: the var statement setting the counter to 0. This number doesn’t need to be set at zero depending on your use case.
Part II: evaluating the condition of the variable which should be increasing after each loop compared to the .length of the variable which is pretty cool in that it returns essentially what in Ampscript we call a row count.
Part III: Which I think should be his part 4, the increment i++
Part IV: And last is the {} code that will be executed in each loop.
SSJS Tip: How to make a string variable in SSJS
If you are creating a string in a for loop first should always be the variable itself as each loop will take the previous variable and add to it. If you are adding a variable you don’t need quotes, just the variable after a plus sign. If you are adding text or html you’ll need to add quotes before and after.
Back to our build, with code in place we get the following result for the Error variable.

The For Loop produced a list of lists that the subscriber has been added to in Marketing Cloud. What would also be nice is if we could add in their status as well.
(1) Updating the code first we’re adding a arrow character which was different than the ::
(2) Next we are adding the status variable which is .Status not .List.Status because as you can see,
(3) In the string List is it’s own array but Status is not part of this array.
And now that we see the output:

(1) The status is now displayed after the ->.
(2) But what is this “undefined” at the beginning of our output?
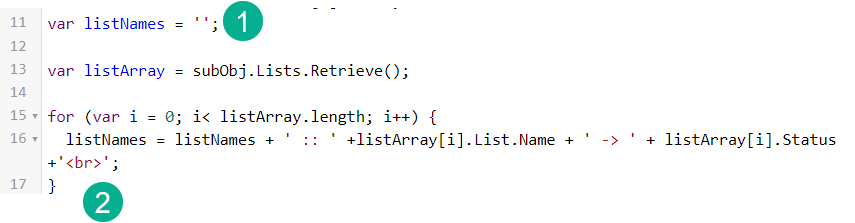
(1) Turns out we never set the variable to empty by setting it equal to ‘ ‘.
(2) And while we are at it let’s add some HTML to our string to show our output more like a list that could be displayed to an end user.
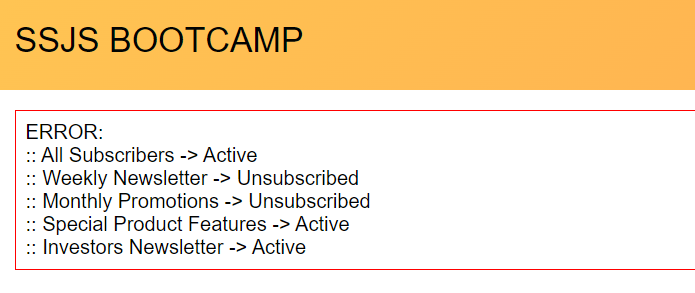
And here’s our list of lists for our subscriber. With a little help of HTML checkboxes could be added where the subscriber could check in to unsubscribe from none, one or all lists.
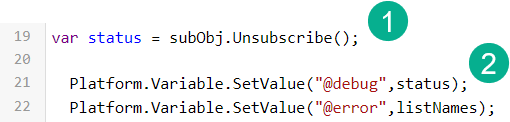
How to unsubscribe from a list in SSJS
Following the documentation: https://developer.salesforce.com/docs/marketing/marketing-cloud/guide/ssjs_subscriberUnsubscribe.html to unsubscribe is very straightforward.

We’ve already included the initialization code line so all that’s left to add is the unsubscribe line.
Before we test clicking on the link in the email first let’s check the subscriber status in All Subscribers.
How to check subscriber status in All Subscribers
All Subscribers is the database of record in Marketing Cloud of the subscriber status for literally all subscribers. For a more detailed explanation of All Subscribers please refer to this helpful documentation from Salesforce: https://help.salesforce.com/s/articleView?id=sf.mc_es_all_subscribers_list.htm&type=5
There are two ways to check a subscriber status in the All Subscribers list, the first is going through the Marketing Cloud UI under the subscriber tab.

(1) Select the Subscribers Tab.
(2) Select All Subscribers.
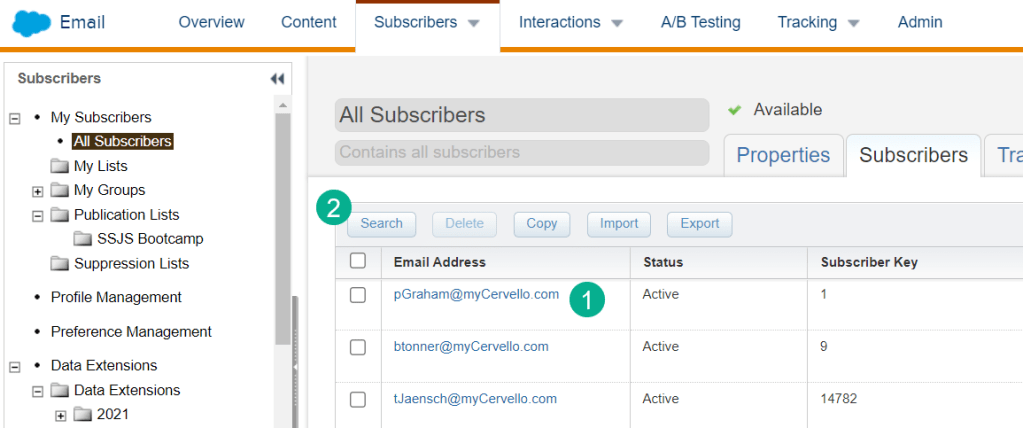
(1) You can navigate through the list that comes up but for the most part
(2) Use the search button to search for a subscriber.

(1) Select Subscriber Key (we’ll walk through selecting email address below)
(2) Enter in the subscriber key here
(3) Select Find Now
(4) Your subscriber will appear here
Alternatively if you select the email address you will see all subscribers associated with that email address.
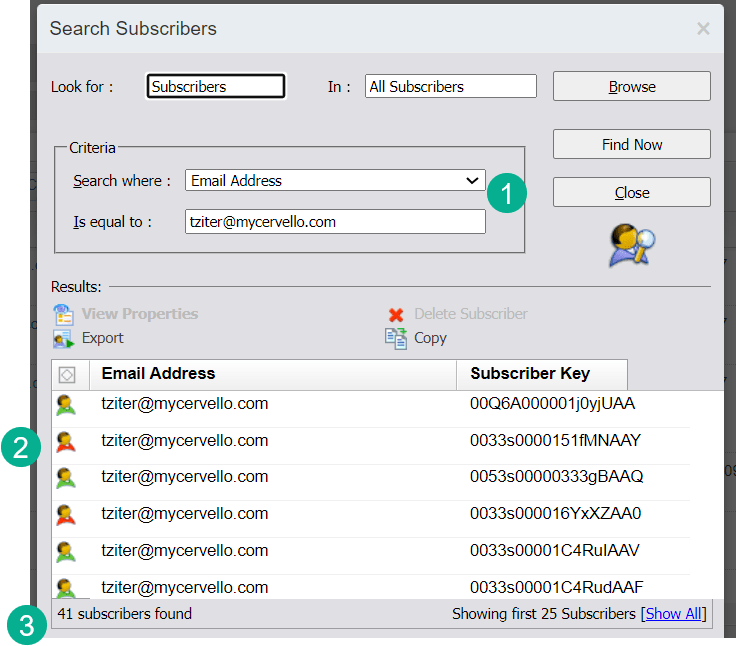
(1) Select email address instead
(2) In the search result all known subscribers will be displayed. At a glance you can quickly see the subscriber status depicted by the color of the shirt.
(3) Subscribers found can be helpful to note especially if you see multiple subscribers for each email address.
All Subscribers Tip:
Be mindful of how you are setting and using the subscriber key in Marketing Cloud. If not used correctly you could be generating dozens of subscribers for each email address in Marketing Cloud. We’ve seen cases where the subscriber key was the name of the data extension which changed daily. The result was dozens of duplicate subscribers for each email address which diluted the performance of the subscriber and resulted in costly charges as Salesforce charges you by the subscriber in Marketing Cloud.
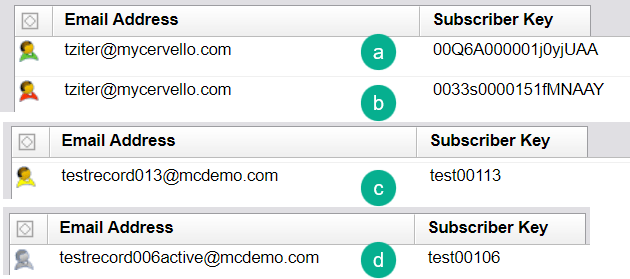
(a) Green Shirt – Active status – good to go, ready to send
(b) Red Shirt – Unsubscribed
(c) Yellow Shirt – Bounced – might want to check to see if the email address is valid
(d) Grey Shirt – Held – this email address bounced three times and is not send-able at the moment.
Double clicking on a subscriber will take you into more details on the subscriber.
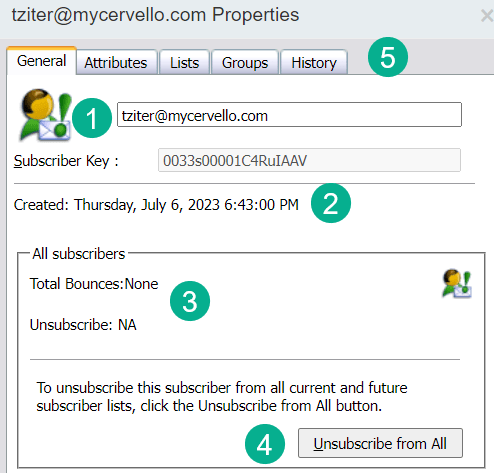
(1) A larger rendition of the shirt color.
(2) The date when the subscriber was created which can be helpful. Please note this isn’t the date the subscriber was synched over from Salesforce Sales Cloud, but the date the subscriber was either imported into All Subscribers or more likely when the first email was sent.
(3) Count of bounces can be helpful to view on a case by case basis.
(4) If you need to manually unsubscribe or re-subscribe a subscriber click this button.
(5) There are additional tabs for more information including the Lists tab where you can see what other lists the subscriber belongs in Marketing Cloud.
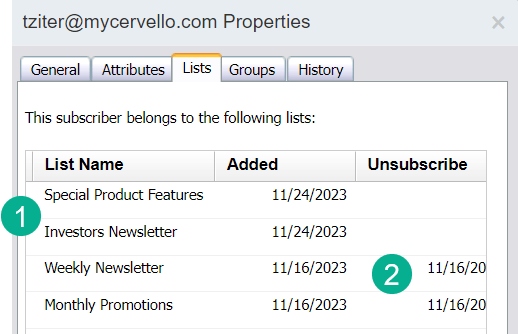
Under the List tab you can view all the lists the subscriber has been added to as well as key information especially when they were unsubscribed from the list.
Now we can verify that our subscriber is active in All Subscribers and not subscribed in the two lists recently added let’s click on the button to unsubscribe the subscriber.
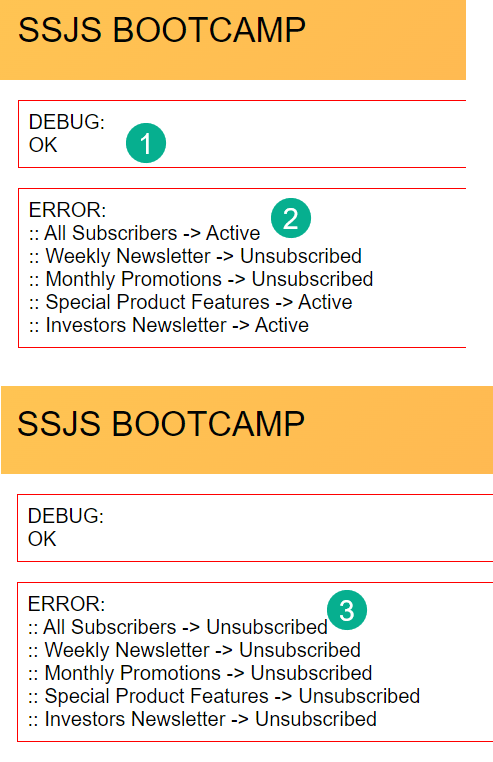
(1) Clicking once will register an “OK” meaning there was no error
(2) The list statuses haven’t changed because they were set before the unsubscribe function.
(3) Refreshing the page once will validate that in fact the subscriber has been unsubscribed.
Taking a look back into All Subscribers we confirm that the subscriber has been unsubscribed.
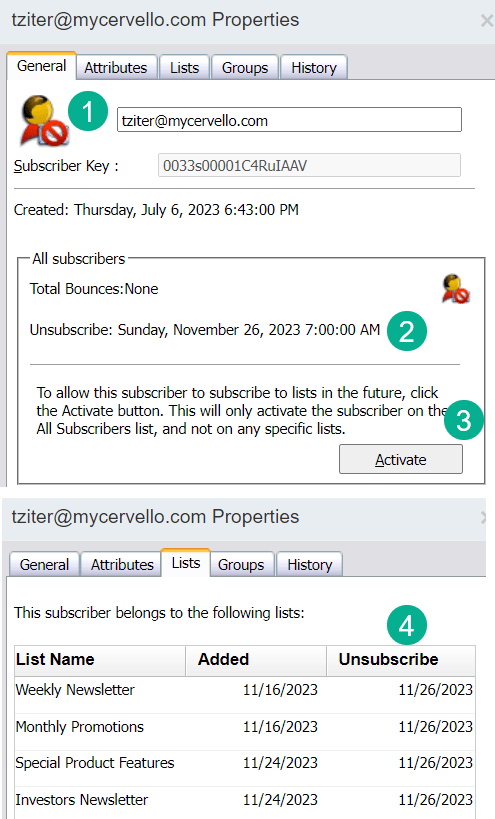
(1) The subscriber now has a red shirt.
(2) The date when the subscriber was unsubscribed.
(3) If you to manually re-active the subscriber click here
(4) Under the list menu confirmation that the subscriber was unsubscribed in the publication lists as well.
That wraps up the subscriber function work for this bootcamp. Join us for our next session when we feature a Hands on Build session as Raja builds out this exact functionality live.

Leave a comment