
Capturing sign up information on a Marketing Cloud Cloud page is a must when building custom landing pages. In our blog this week we’ll cover building a basic form that populates sign up information in a data extension which can be used to follow up accordingly.
Our build today will include HTML and Ampscript coding. We’ll walk through the key lines of code to help us all understand the functionality.
Part I: Form tag basics
A form is a tag just like other tags in HTML. Let’s take a look at a basic form tag outlined at w3 schools site: https://www.w3schools.com/tags/tag_form.asp

(1) Syntax for the <form tag opens and closes like any tag
(2) Action – specifies where to sent the form data when submitted
(3) Method – HTTP method whether get or post
(4) The label tag identifies how the form area will be labeled or named
(5) Input identifies the variable that will capture the entered value
(6) The submit input is a special type of input that identifies when the form is submitted
Part II: How that varies in a SFMC application
Digging into our real use case let’s see how the HTML is different in Marketing Cloud especially how ampscript interacts with the code structure.

(1) Having the autocomplete off will prevent inaccurate completions

(2) A class was set up that determined the size of the form fields
(3) The action in Marketing Cloud changes using the following syntax to output the cloud page url.%%=RequestParameter(‘PAGEURL’)=%% For more information on this syntax please visit the Ampscript Guide: https://ampscript.guide/requestparameter/
(4) The method for SFMC is “post”
(5) Added here is the name designation
(6) A special class is created to display a custom form space
(7) A special line of code label a value of “Submitted” to confirm when the user submits the form
(8) A button tag, styled in CSS and indicating the text for the call to action button
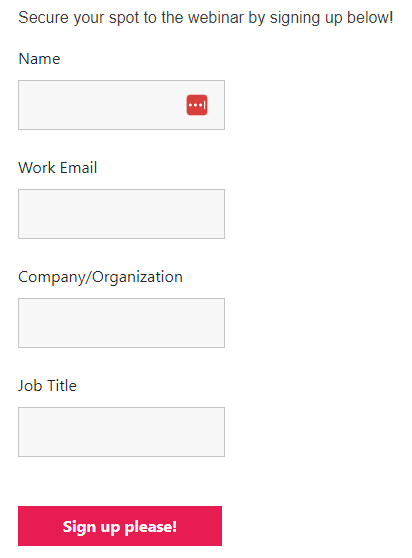
Here’s the example of the form with the code above:
Part III: Ampscript to insert data into the form
We’ll leverage this use case as a reference when we build out the Sitemap. The first step will be to create or clone the dataset to give us a blank sitemap to start our build. First up creating/clone in a data set so we can have a clean slate to build out the sitemap.

(1) Create a code snippet block
(2) and drop it into the cloud page template
(3) Set a variable to identify the data extension where the data will be populated
(4) Set each field as a variable to be inserted via the InsertData function
Part IV: IF RequestParameter(“submitted”) == “submitted” THEN (#5 above)
This simple IF statement is a huge help in that it prevents the form sending empty data into the data extension. Without this line of code, plus the ENDIF, your data extension could look like this:
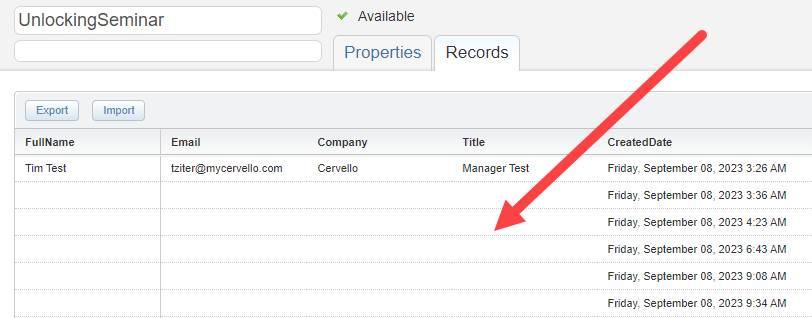
Not ideal with rows and rows of data clogging up the data extension. So don’t forget this simple tip to remedy that issue.
Part V: InsertData overview (#6 above)
The key function to feed that form data into the data extension is utilizing the InsertData ampscript function. The Ampscript Guide provides a well explained walkthrough: https://ampscript.guide/insertdata/
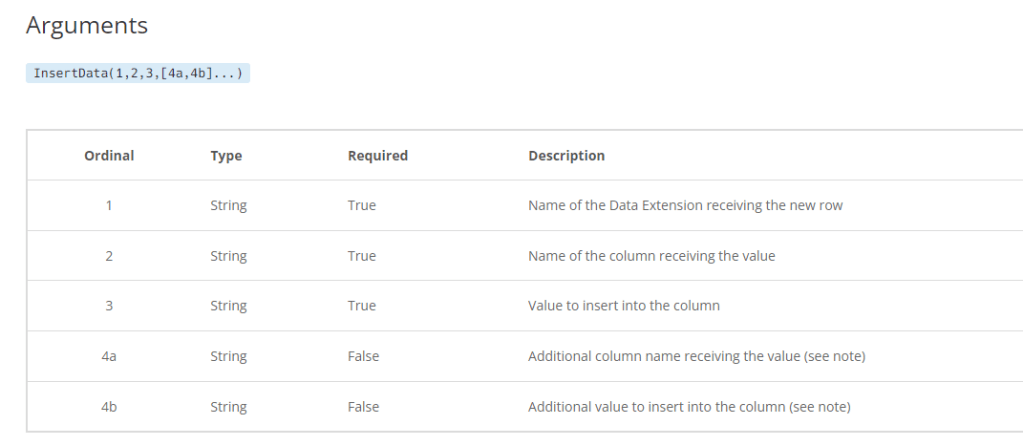
There are three fields you need to know
(1) The name of the data extension
(2) The field that you’ll be inserting the data
(3) The name of the variable/value that will be inserted
You can add as many fields depending on how many fields exist on your form.
Here’s a breakdown of the function used in this use case

(1) You have to set a variable for the function – it may not be used
(2) The InsertData function
(3) The name of the Data Extension or in our case a variable that’s set to the name of the DE
(4) The field in the data extension that will receive the data
(5) The variable or value that will be inserted
The code follows the same pattern for “FullName” all the way down to “Title”.
Here’s an overview of the data extension set up to receive the data.

(1) Select this data extension to be used for sending
(2) Validate the names of the field match the code in the cloud page
(3) Validate the data types
(4) Validate the lengths – if the aren’t long enough the insert will fail
(5) Validate the fields that are required/not required
(6) Add a “CreateDate” field to capture when the record is created
(7) If you add the current date as a default it will always populate a value if it’s not being captured on the form
We hope this has been a quick overview of how to create a custom form in a cloud page utilizing HTML and Ampscript. For more information on custom cloud pages check out the SSJS bootcamp we are participating as part of the Phoenix Salesforce Marketer Group: https://trailblazercommunitygroups.com/salesforce-marketer-group-marketing-cloud-phoenix-united-states/

Leave a comment