
In this session the team participates in an Ampscript Bootcamp that is hosted and created by Jyothsna Bitra as part of the Phoenix Salesforce Marketer Group. The team covers Utility functions including: attributevalue and v function. And the team also does a deep dive into the various Lookup functions as well as For loops.
For more information on the Phoenix Salesforce Marketer Group please follow this link to sign up: https://trailblazercommunitygroups.com/salesforce-marketer-group-marketing-cloud-phoenix-united-states/
PART I: Utility Functions: attributevalue and v
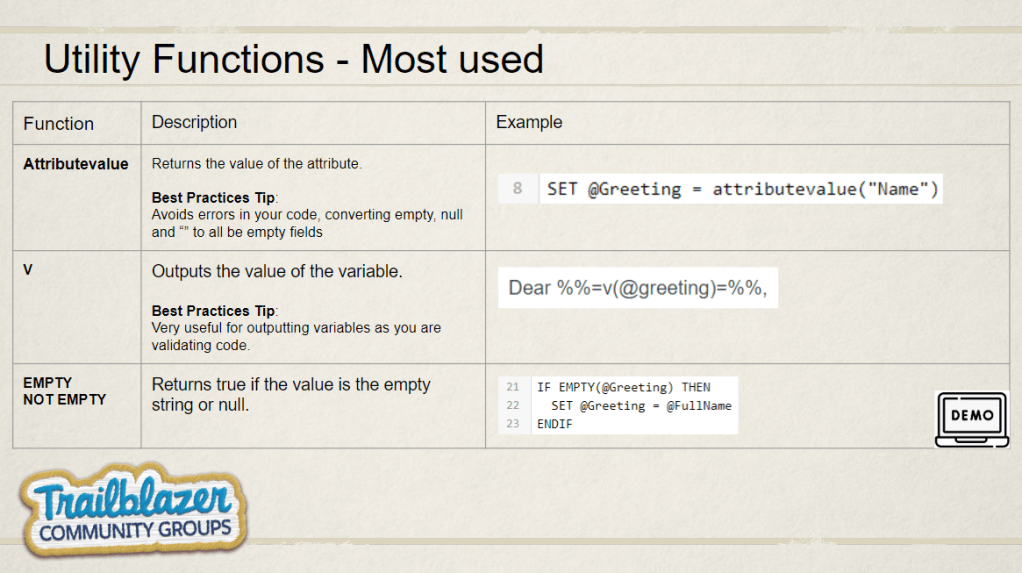
Let’s walk though the core Utility functions used often in ampscript: attributevalue, v and Empty.
Here’s a quick overview of those key functions:
Use Case: We have been brought in to help Norther Trail Outfitters with their new loyalty program. The team wants to send an email to new loyalty members thanking them for signing up and alerting them of a few steps they can take to make the most of their loyalty program.
The problem: The NTO team isn’t that familiar with Ampscript and feels like there’s an opportunity to personalize the email to help deliver a 1-to-1 experience with their new members.
Solution: Working closely with the NTO team you determine there are two areas to make major improvements in the personalization. First(1), in the greeting we’ll want to output the name of the loyalty member. And second(2), we’ll want to add a customized/personalized list of steps to make the most out of the members loyalty program.

Personalization Part I: Greeting Personalization
Good news! The NTO Marketing Operations team has created a data extension that will be used to send out the loyalty email. In this data extension there is a field that contains the First name of the loyalty member.

This is great news and will allow the team to utilize this data point to personalize the greeting. Let’s start creating the ampscript code to populate that name in the email.
Ampscript Tip #1: Code Snippet Header Code
When building ampscript into your emails it’s recommended to centralize your code into a single place in the email. If you have an email design system that has a template which allows drag and drop functionality of blocks, it’s recommended to create a “Code Snippet” block to store most of the core ampscript code.
In our example for NTO under the Blocks tab in content builder, select the Code Snippet block and simply drag it over to the top of the email.

Code snippet blocks are recommended by Salesforce to use to store/build ampscript vs other blocks like Free Form or HTML. The block is an open canvas allowing the user to create code to support any use case.
Part Ia: Setup up the Code Snippet block
To build in ampscript you’ll need to open and close lines of code (1) in the code snippet canvas. Open with percent-percent and a square bracket “%%[” , add several lines of copy and close with a “]%%”
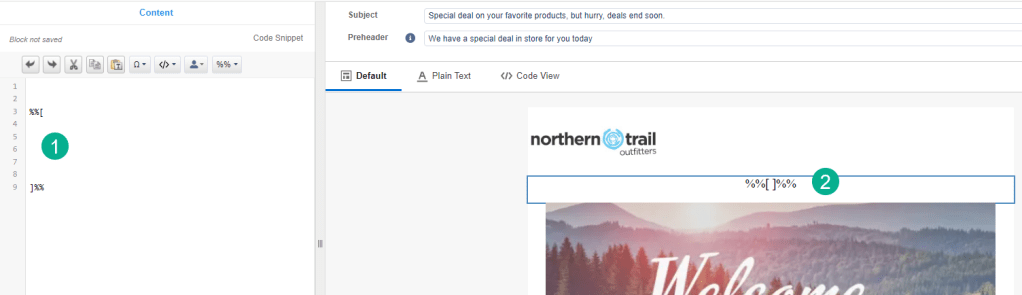
One side effect to coding this way is that the ampscript will render in the email canvase (2) which can look a little offputting to the user. This code won’t render when the email is sent, but still can look messy.
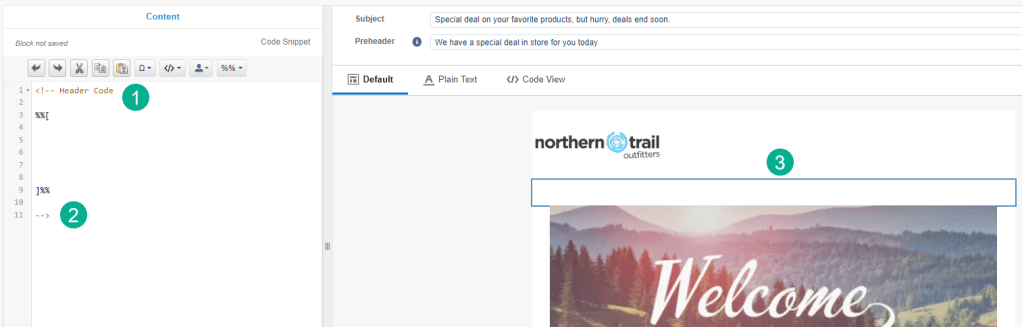
To solve this problem add a “<!–” at the top of your code along with a description of your block. And at the bottom of the code add a “–>” to close out the code. With this added the ampscript on the right will disappear.
Part IB: Using attributevalue and v to personalize the greeting
Let’s add variables to personalize the greeting. We’ll SET (1) our first variable @Greeting to the attributevalue of the “Name” field in the send data extension

And to follow coding best practices let’s add the new variable to a VAR statement which will declare the variable.
With this now set we’ll use the v function in the email body itself to output the name field associated with each subscriber.
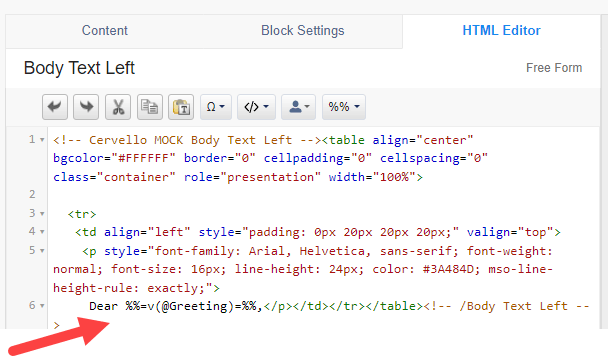
We’ll swap out “Friend” in the code and replace it with the standard v function syntax referencing the new variable we just created %%=v(@greeting)=%%.
Ampscript Tip #2: Always use the HTML editor when adding/updating code. If you are using a Free Form block you can make changes in the wiziwig which can seem easier, but can be inconsistent. Using the HTML Editor will guarantee the code is created as expected and will result in a more consistent and repeatable code solution.
With our new code in place and previewing the email against the send data extension we now have a first name as part of our greeting (1).
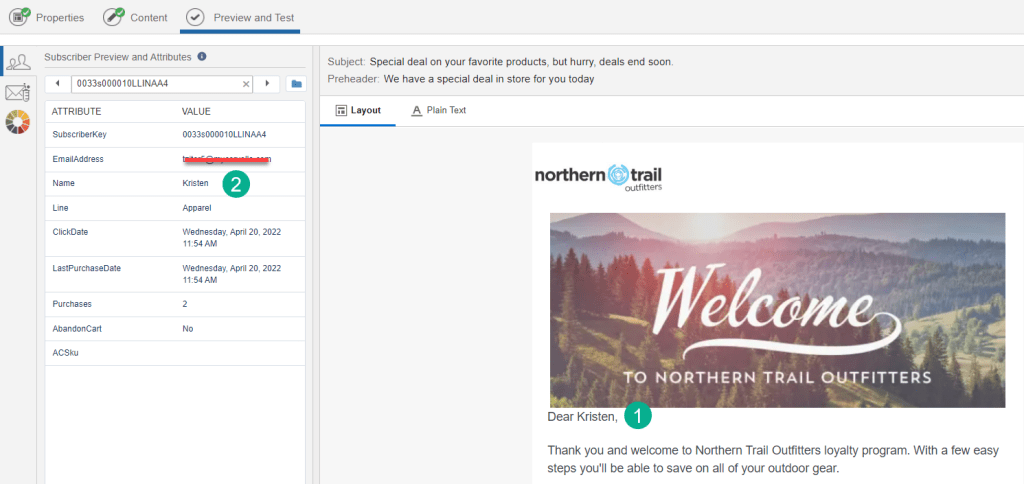
And you can see it’s pulling from the “Name” field in the data extension (2).
Join us in our next post as we add back up redundancy to this personalization use case using an IF/THEN statement and the Lookup function.
Here’s the code referenced in the above use case:
<!– Header Code
%%[
VAR @Greeting
SET @Greeting = attributevalue(“Name”)
]%%
–>
%%=v(@Greeting)=%%

Leave a comment