
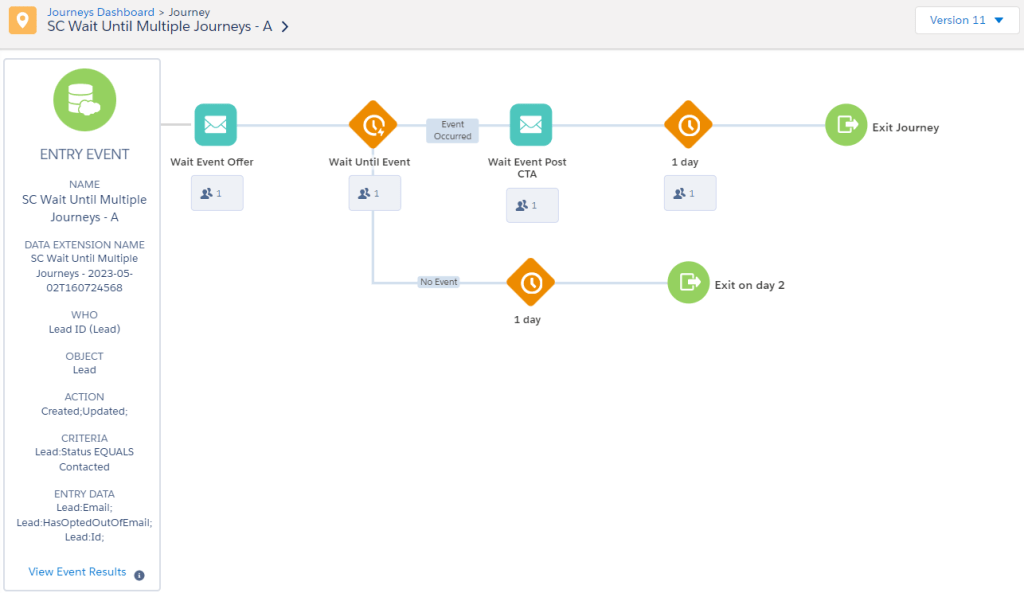
In this session the team builds out the capability for the cloud page to trigger the Wait Until Event to only a specific Journey. This solution uses the Marketing Cloud Data Views to go from JobID to the JourneyID which is passed back into Journey Builder to move the subscriber in the Journey that engaged.
PART I: Obtain that Journey ID via Marketing Cloud Data Views – SSJS
Let’s take a look at Sandesh’s code below to outline the path of how to get from a personalization string (in this case _jobID) to identify the Journey ID that the send or job came from. In this section we’ll be digging into the wonderful world of Marketing Cloud Data Views (https://help.salesforce.com/s/articleView?id=sf.mc_as_data_views.htm&language=en_US&type=5

(1) The Job ID variable was set earlier up in the code:

In the amazing list of personalization strings in Marketing Cloud (https://help.salesforce.com/s/articleView?id=sf.mc_es_personalization_strings.htm&language=en_US&type=5_) you’ll find Job ID:

To set any personalization string to a variable simply add the name and a _ before the name.
(2) Our first lookup in the “Sent” Data View on line 60 to extract out the “TriggerSendDefinitionObjectID” on line 61
(3) This value is used to lookup in the “JourneyActivity” Data View on line 62 to extract the Journey “VersionID”.
(4) In our last lookup were going to the “Journey” Dataview on line 65
(5) To extract out the all important “JourneyID”
PART II: Obtain that Journey ID via Marketing Cloud Data Views – SQL
Let’s try this again but in SQL so we can visualize the data path especially the relationship of the TriggerSendDefinitionObjectID to the JourneyActivityObjectID. Our goal is to be able to output the Journey ID associated with the subscriber that Sandesh sent through in the journey: 3115bf1b-1323-4063-acc7-af76345de35f
First let’s start in Query studio a fantastic free App (https://appexchange.salesforce.com/appxListingDetail?listingId=a0N3A00000FP3yFUAT) and let’s find Sandesh’s email that
Our first stop will be to pull in the Job Data View to obtain the job id. Since we can’t leverage the jobid personalization string we’ll use the name of the email and a date range to pull in a list of job ids:
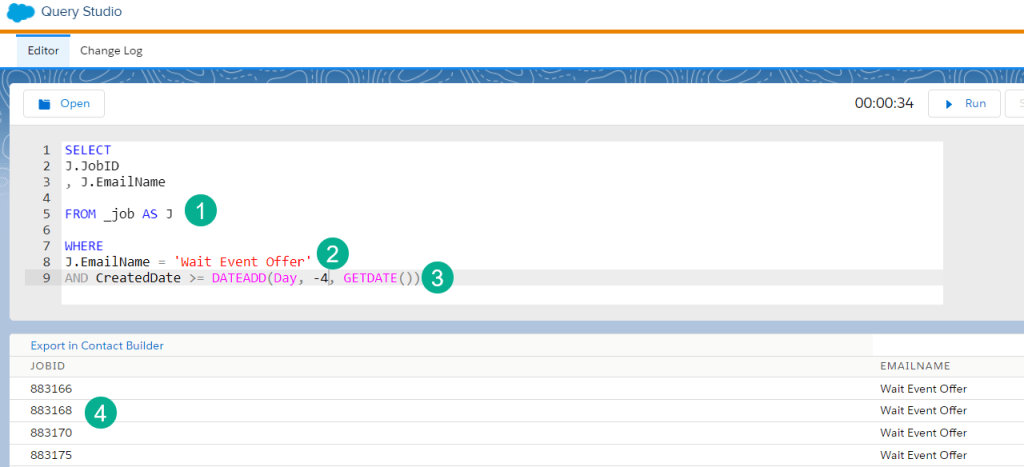
(1) Our FROM statement pulls in the job data view
(2) We enhance in our Where clause to only pull in those jobs that were sent the name of the email andutilize the name of the email
(3) A send date in the last four days as Sandesh sent this email in that window.
(4) Here’s our list of job ids that we can begin to start our path.
Next up we’ll join in the Sent data view

(1) We’re going to use a JOIN or Inner Join here because we only want to pull in jobs that have been sent. Luckily in both data views there’s the exact same field, “JobID”.
(2) We’re going to output the field to connect to Journey Activity: TriggererSendDefinitionObjectID
(3) Now we can see this ID come through and I’m excited to see the match to the Journey field.
Next up we’ll join the JourneyActivity Data View
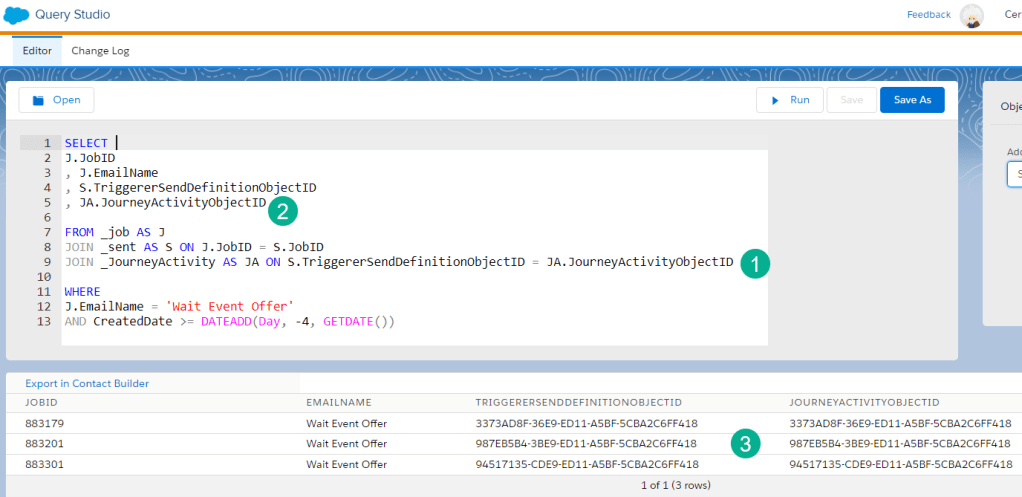
(1) Again we are going to use JOIN as we only want job/sent records that were Journey sends. And there’s the link to the two dataviews we were curious to see
(2) We’re adding the JourneyActivityObjectID to our SELECT statement so we can output the data
(3) And excellent we are seeing that these two fields match, which validates this data path.
Next up let’s add in the Journey data view
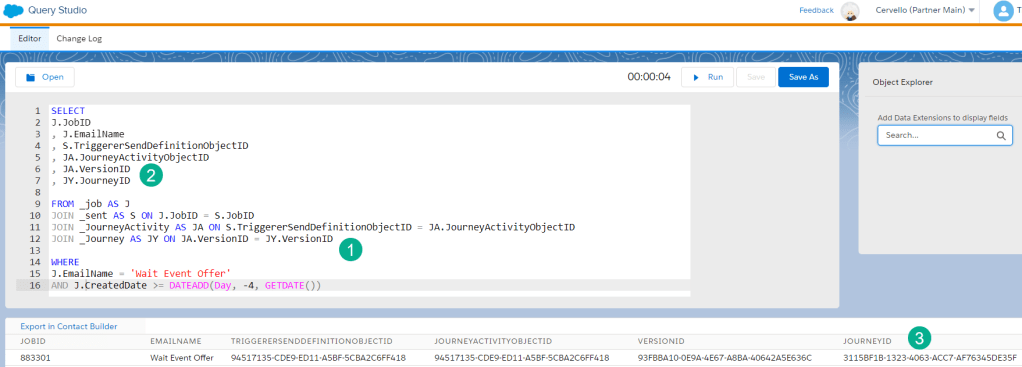
(1) Our last JOIN will continue to be an Inner JOIN as we want only Journeys. And we’re matching on VersionID, a field that is common in both views.
(2) We’re added the Version and Journey ID to output
(3) And there we go, validation of the JourneyID: 3115bf1b-1323-4063-acc7-af76345de35f
Hopefully that gives you another path to JourneyID and validation of the fields so you can see the data. Query Studio is incredibly helpful validating paths before you build code in Ampscript or SSJS.

Leave a comment