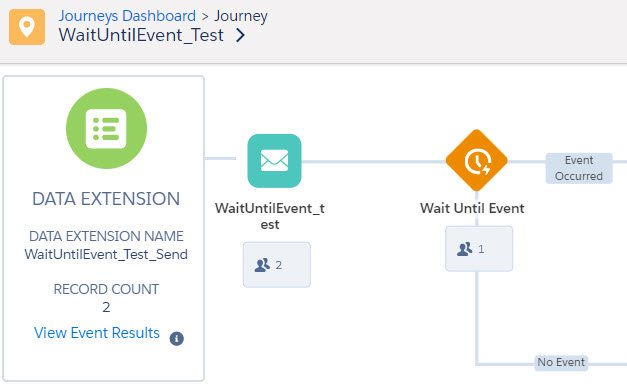
In this session the team builds out the Journey that includes the Wait Until Event functionality. You’ll see the team create a Journey with the SF Data Entry event, Create an API event and use the CloudPagesURL function in an email to link to the cloud page that will be sending the API call back to the Wait Until Event functionality.
Build Components
| Asset | Notes/tips |
| Journey Builder – SF Data Entry Event | SF Entry event walkthrough |
| Journey Builder – Wait for Event setup | Wait for Event setup |
How to create a SF Data Entry Event
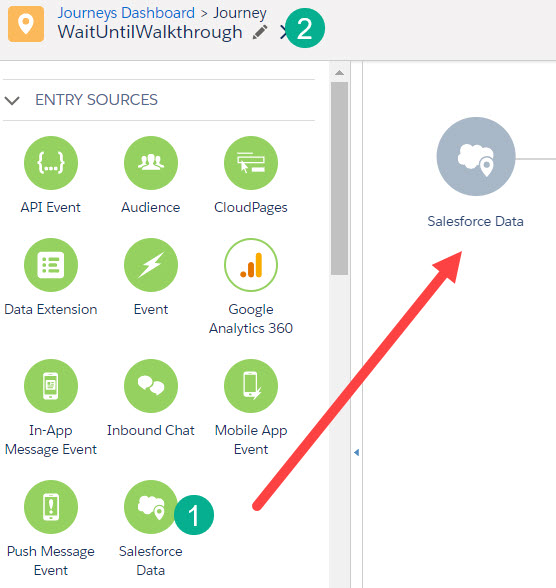
Create a new multi-step Journey. Select (1) Salesforce Data entry source and drag it to the Entry Source section of your Journey canvas.
JOURNEY TIP: Create a name for your journey early on. (2) Try to name your journey early on in your process. If you don’t Journey builder will give it a default name something like “New Journey – Date.” Also be mindful about how you name the journey. If you activate the journey and need to change the name you’ll only be able to change the name on future versions and your journey will have two names which will cause extra confusion.
Click into the Salesforce Data Entry Event. In the Define Entry Source select (1) Salesforce Data. Even if you are creating a campaign based Salesforce Entry Event (2) we recommend using the Salesforce Data option as it gives you the most functionality. Click Next.

Enter in the object you are looking to use as the entry source for your journey (1). In the video above we use Lead, but Campaign Member has a few additional areas to notate.
Find the appropriate object in the search selecting the object that has the subscriber populated. In the case of Campaign you want select the CampaignMember (2) as that object has the subscriber. Same for Opportunity Contact Role for Opportunity.

Now you need to select WHO is going to receive the email. Take your time in this section as it is very important to your configuration. If you are sending this to the Contact or Lead you can select the object separately (1). And you even have an option to send to both Leads and Contacts (2).
Separately you can send to the (3) User or the person who dropped the contact/lead into the campaign (3).

Once you’ve made your selection click Next.
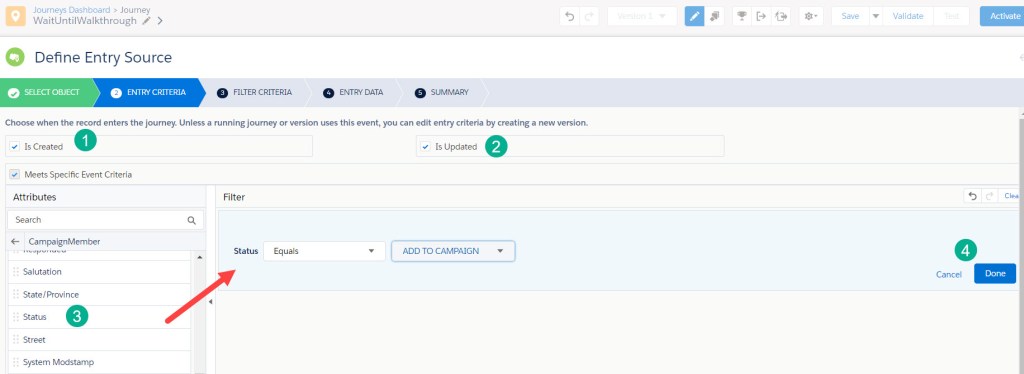
In the next screen you’ll want to select (for most use cases) Is Created (1) and Is Updated (2). Then drag over the filters on the left (3) onto your filter canvas (4), select the appropriate value and click Done.
JOURNEY TIP: When adding the Campaign ID (1) as a filter in the Entry Criteria for the Salesforce Data Entry Event, paste in the campaign ID (2) from Salesforce Sales Cloud by copying it from the URL. Wait a second as the campaign will populate just below (3).

Click on the name and ID box that pops up below (3) to select the campaign ID. It should look like this:

If you don’t select the box below the campaign ID won’t register and your selection will look like this:

If you need to add an OR to multiple filters, first stack those filters on top of each other. In the example below we want contact/leads to enter if they have a status of “ADD TO CAMPAIGN” or “Attending”. Once they are stacked select the grey box to the right of both filters (2) it will group the two filters and allow you to select “AND” or “OR” (2).

Once all the filters have been added click the blue button “Next” in the lower right corner.
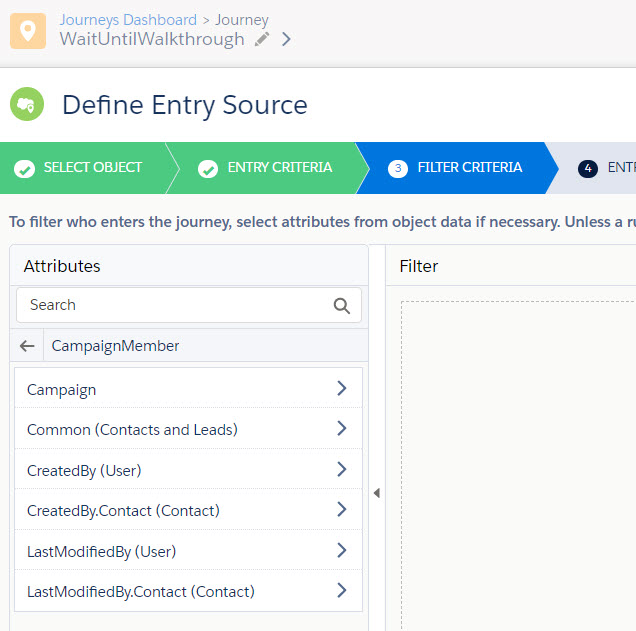
The next section is Filter Criteria where you can select filters from additional objects. We will go into this section in another walkthrough later. If you are starting out with Salesforce Data entry events try to keep your use cases to a single object only. If you have filters on multiple objects a query automation based solution would be preferable.
Click Next.
In the last section, Entry Data, is where you select the data points that will be added to the Journey Data Extension.
(1) Select the object where you want to pull in the data. You’ll have multiple related options in this screen, like in this case, the Common object that will have blended data from contact and leads (2).
Scroll through each object (3) and check boxes for the data fields you’d like to populate. On the right each selection will display to help detail the growing list of data fields. Once all the data points have been select click Next.

The last page will give the user a summary of all the selections.
(1) The WHO – who will be receiving the email communication.
(2) Object – which object are the records coming from.
(3) Action – created/updated or either or.
(4) Criteria – the filters that determine who will be pulled in.
(5) Related Objects Criteria – additional object criteria.
(6) Entry data – those data points that will be populated in the Journey data extension.
(7) Notice the syntax for each data point as it can be very complicated and long. These are the field values that will be created in the data extension. If you need to leverage the fields in your communication you can use the summary to pull in the correct syntax.

If all looks good click on the blue “Done” button.

Leave a comment